In December 2022, I entered my quilt space and was so overwhelmed by all my stuff that I didn’t want to make anything. I had bundles of fabric sitting in piles that I hadn’t opened and fabric stuffed in boxes and in containers that I couldn’t identify. At the same time I was listening to books about minimalism and started to wonder how I could apply the idea to my quilting space.
I started by making a donation of 20lbs of scraps to The Social Justice Sew Academy, and then took a stuffed garbage bag worth of teeny scraps to the fabric recycling center and you still can’t see a difference in my sewing space.
I made a rule that I’m not allowed to by any fabric in 2023, and I need to finish with what I have in my stash. This guideline of using what I have and letting go of what I won’t use has lite a creative fire under me. I figured out how to use backing scraps from 6 or 7 years ago to make a new backing for another quilt. It seems like the more I get rid of the more ideas I have. I’ve made 3 quilt tops from fabric just sitting in my sewing space.
Before we get into details, let’s start by defining a few terms. Fussy cutting or meticulous cutting is a catch-all term for being intentional about how you’re cutting the fabric instead of simply putting your ruler down and what you cut is what you get. There are two general and overlapping categories of fussy cutting: motif highlighting and pattern matching.
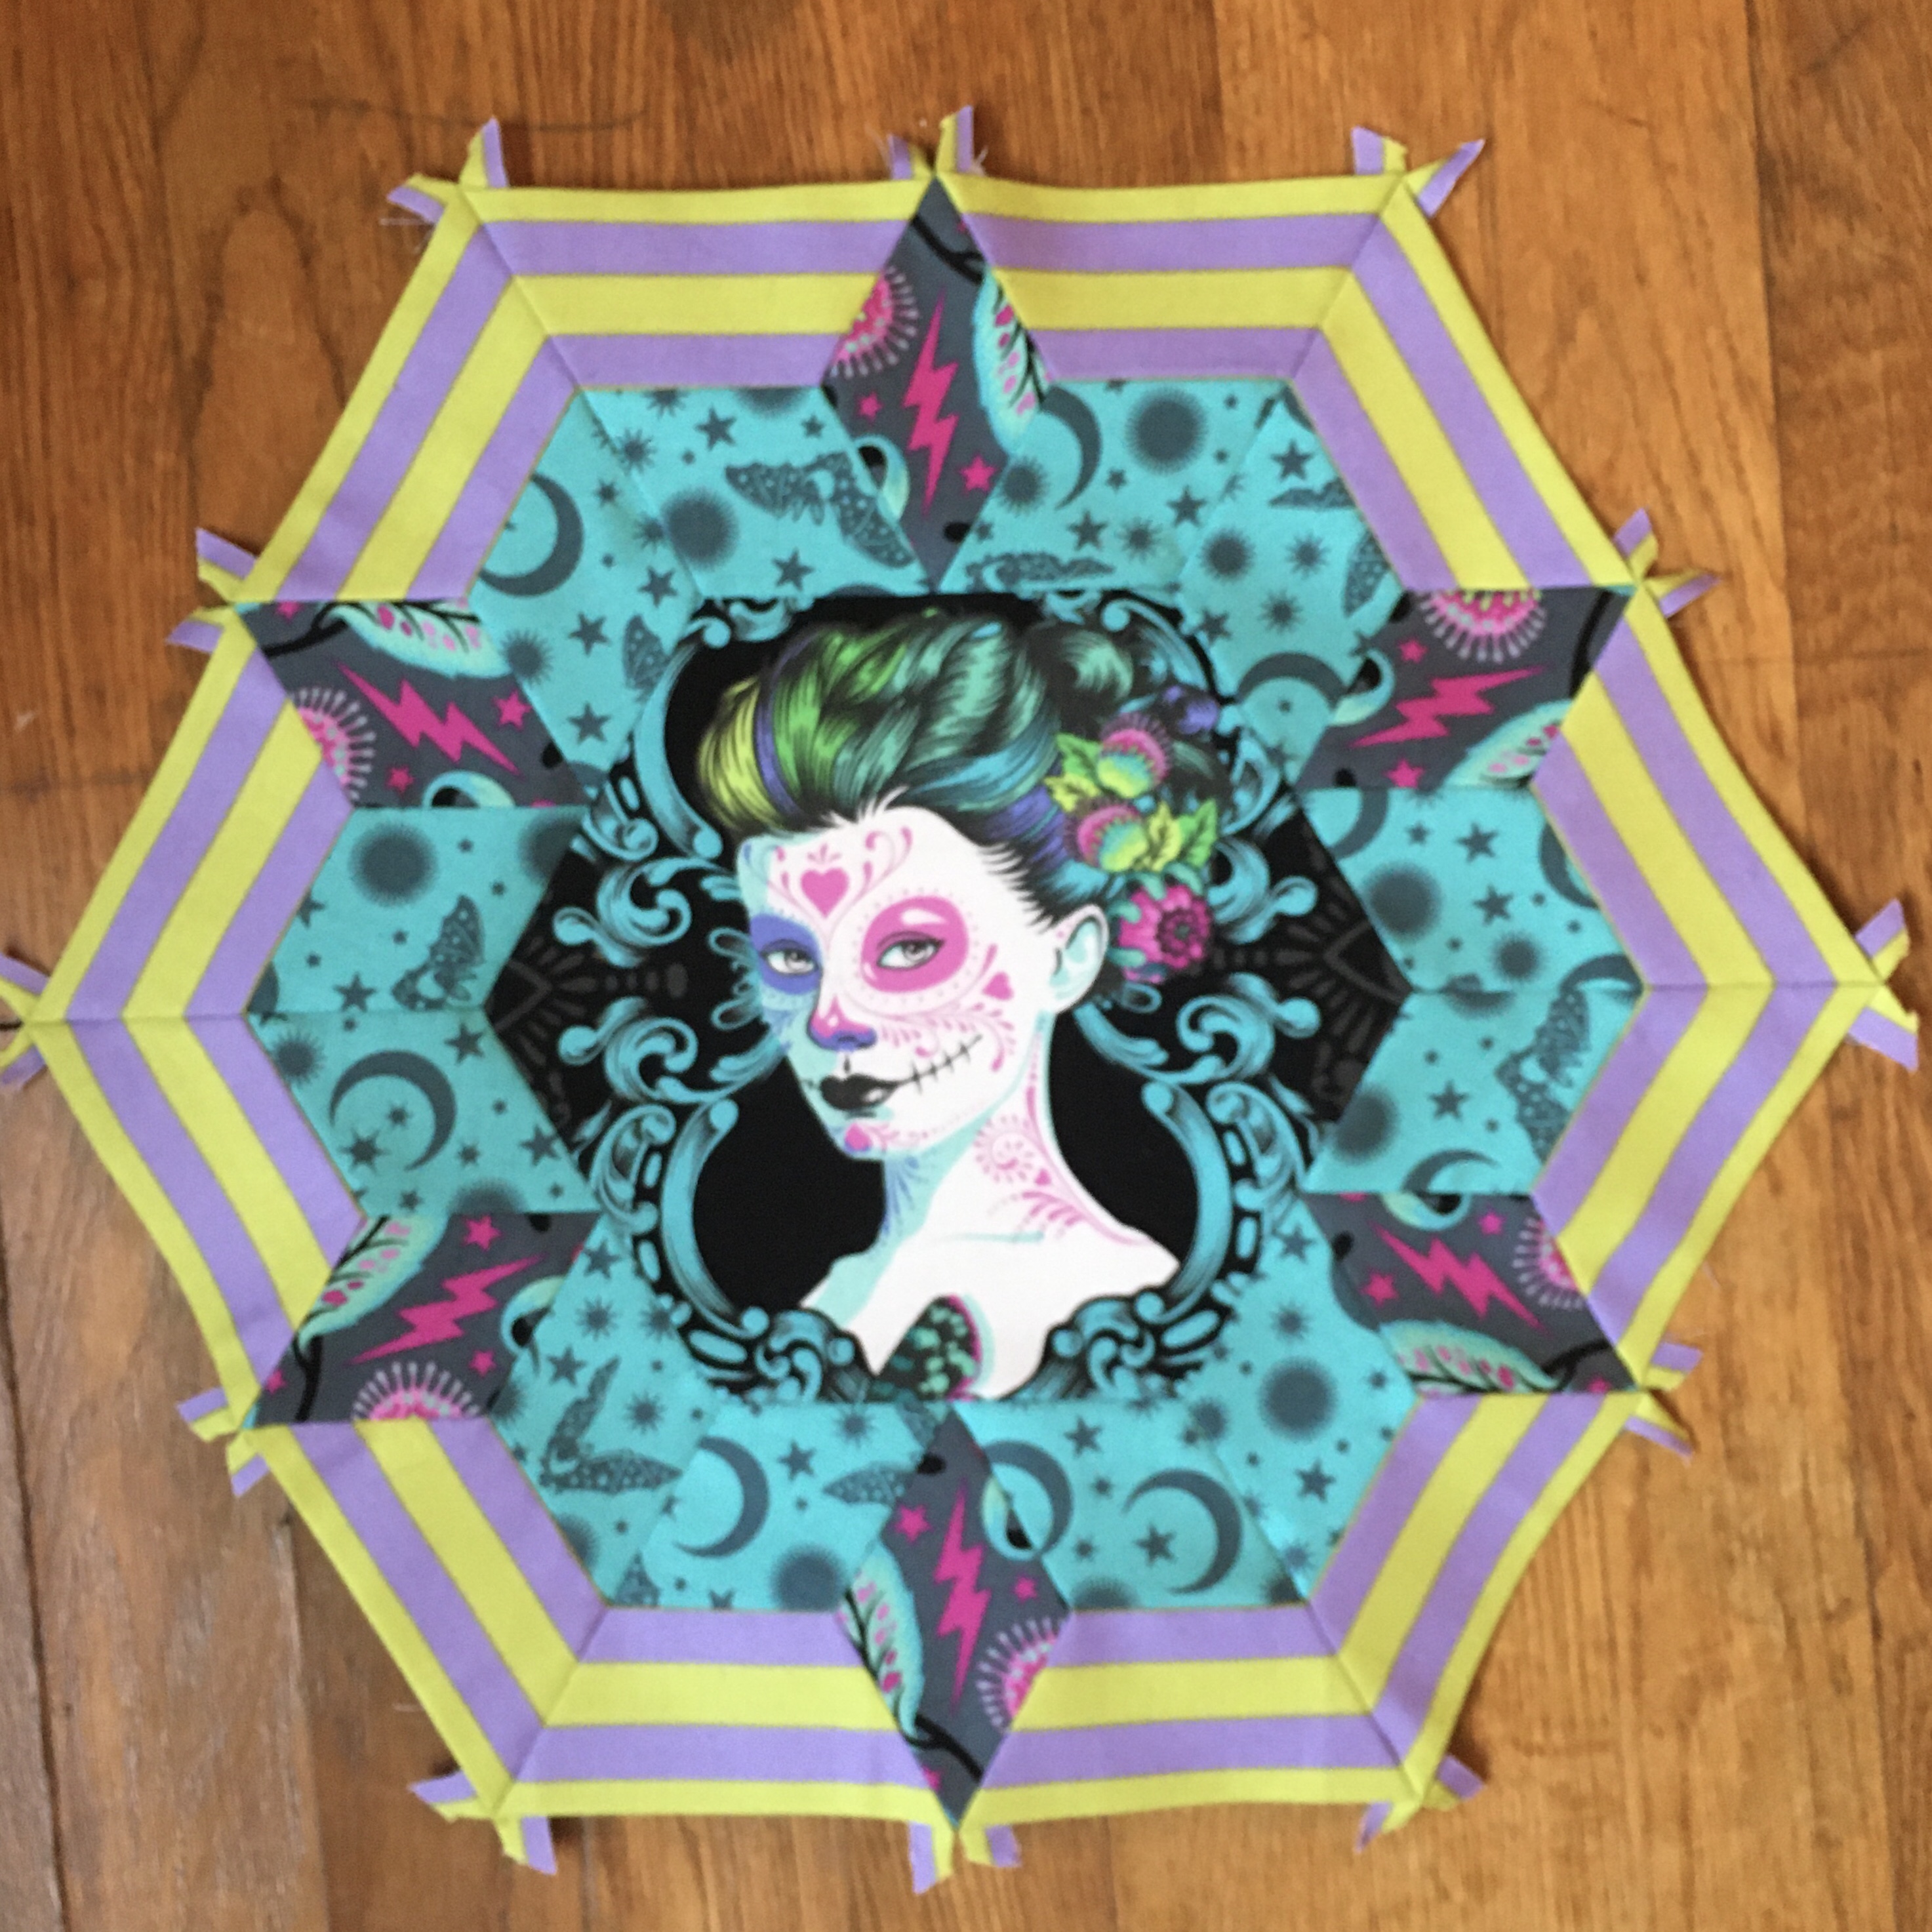
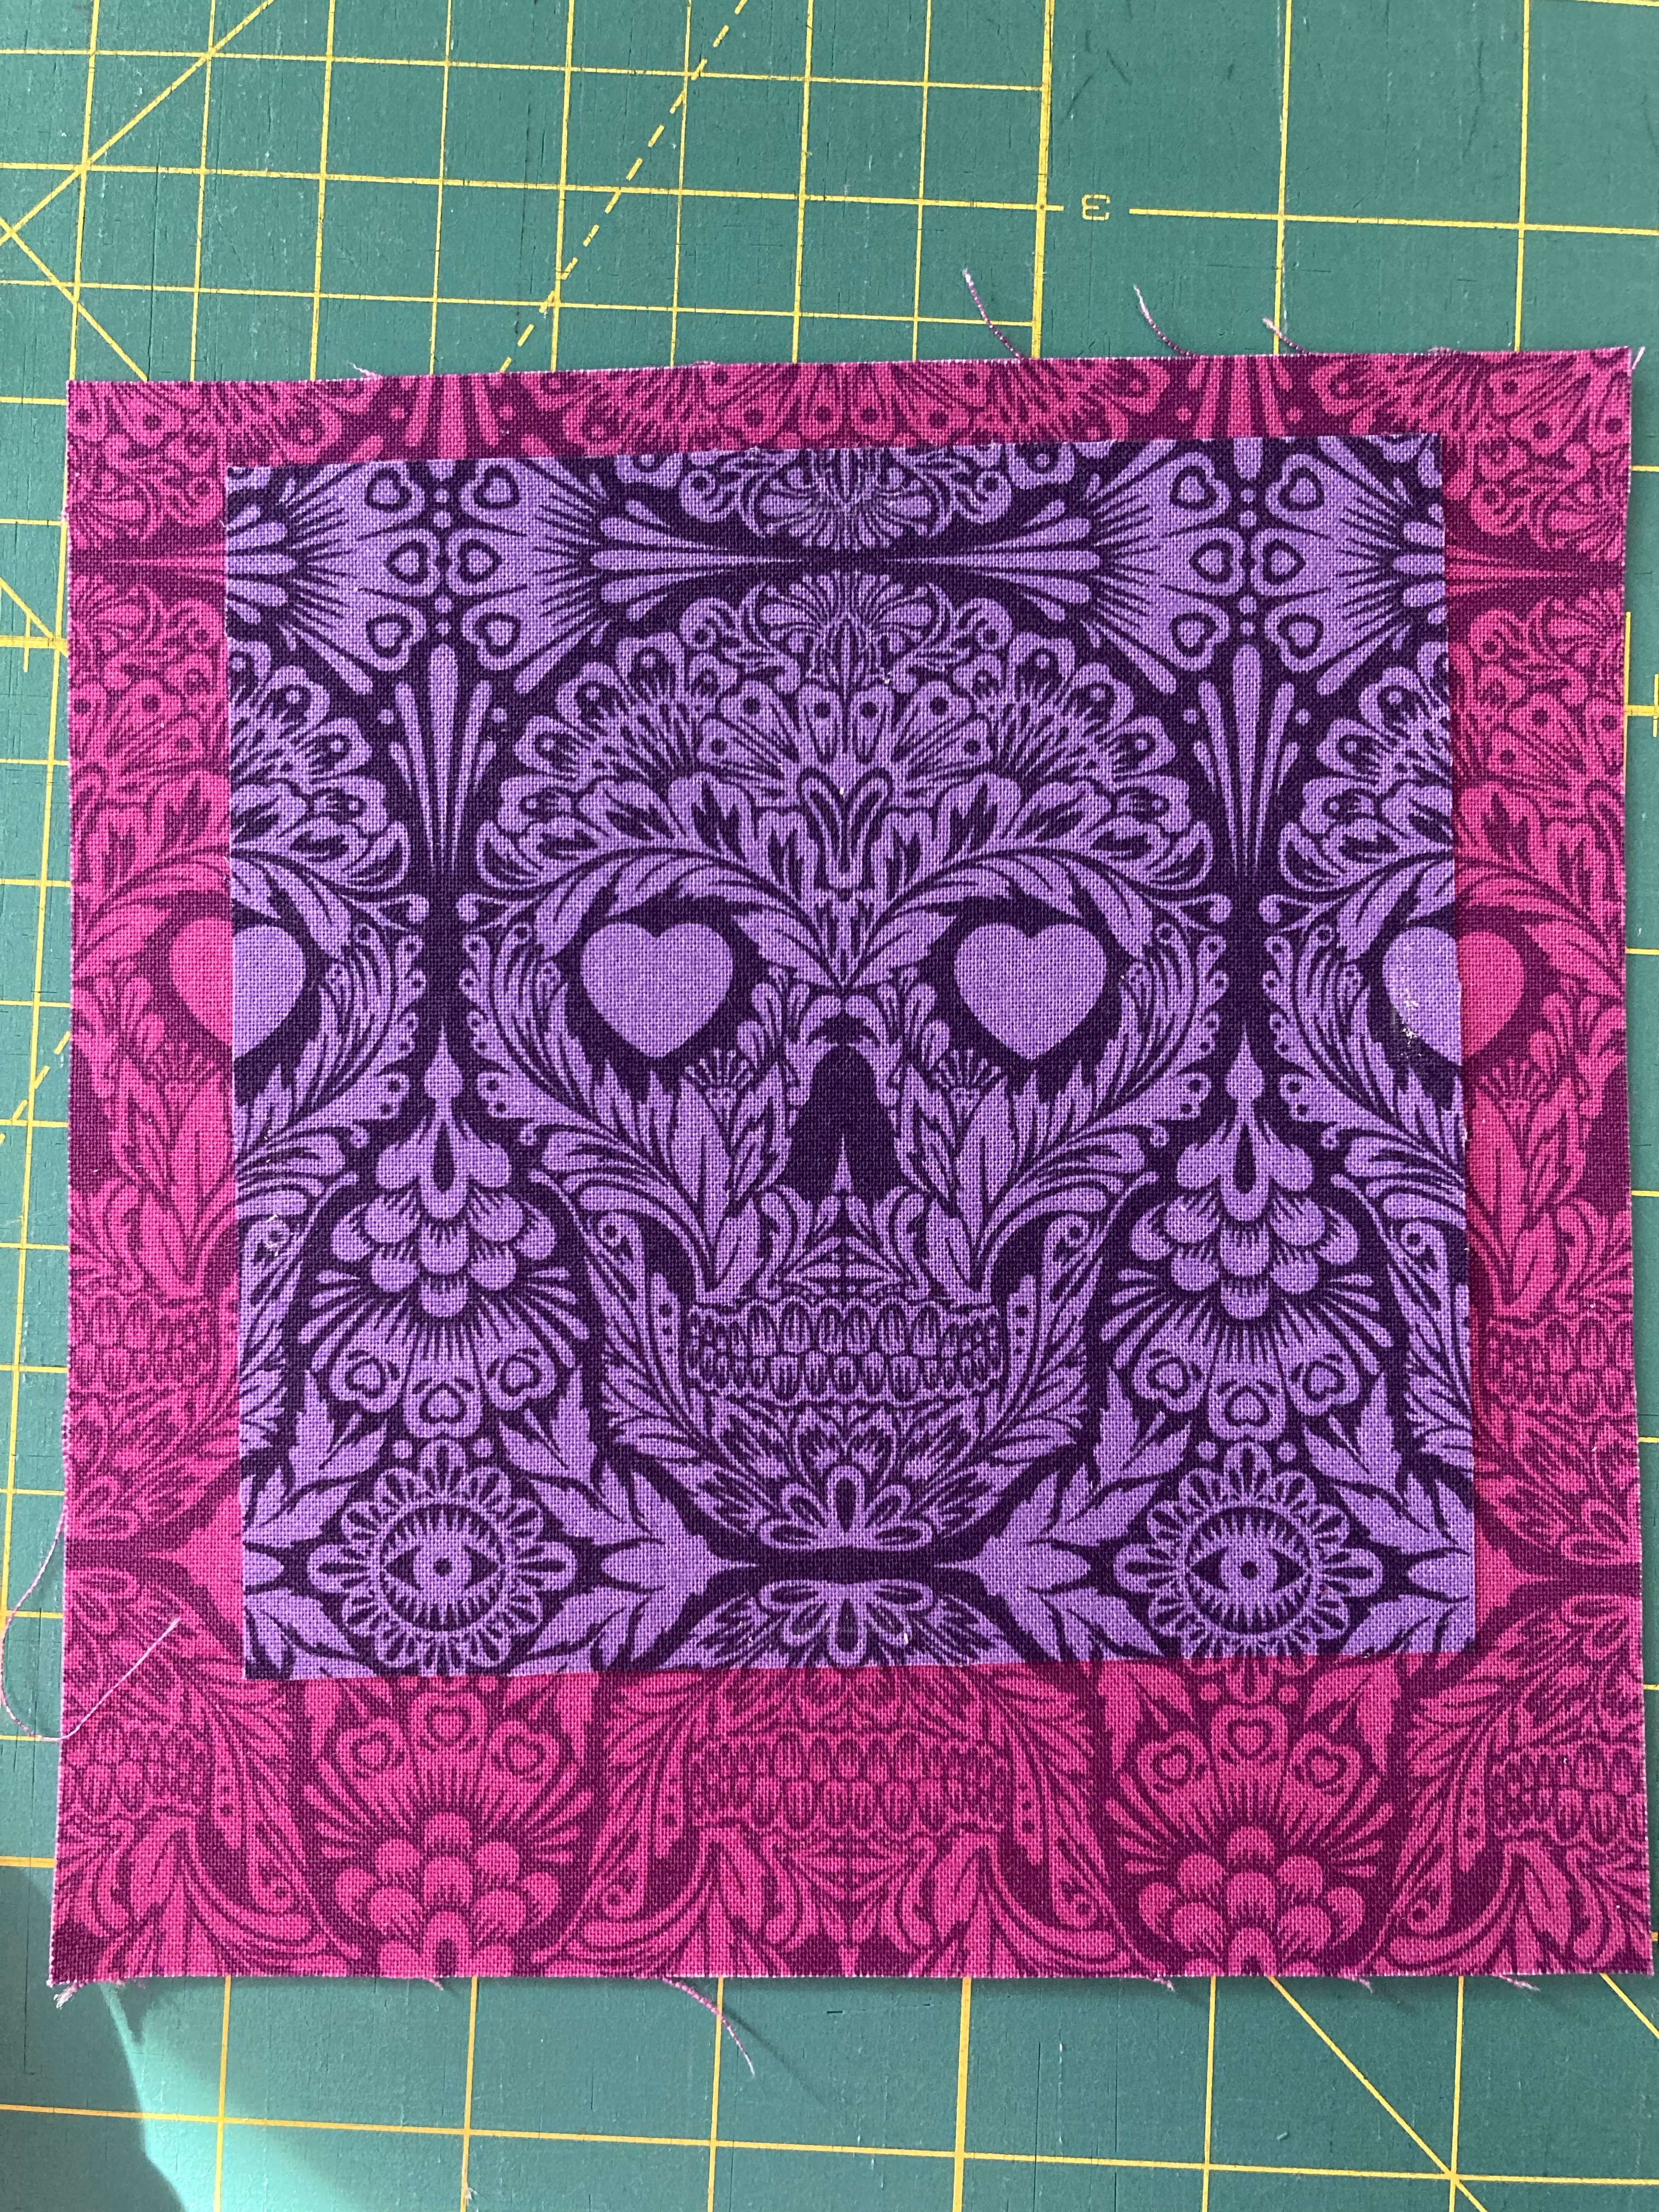
Motif Highlighting is what happens when you want a particular part of the fabric featured in a specific part of your quilt or block. The block below is an example of motif highlighting. The cameo is centered in the block, pulling focus to the face.
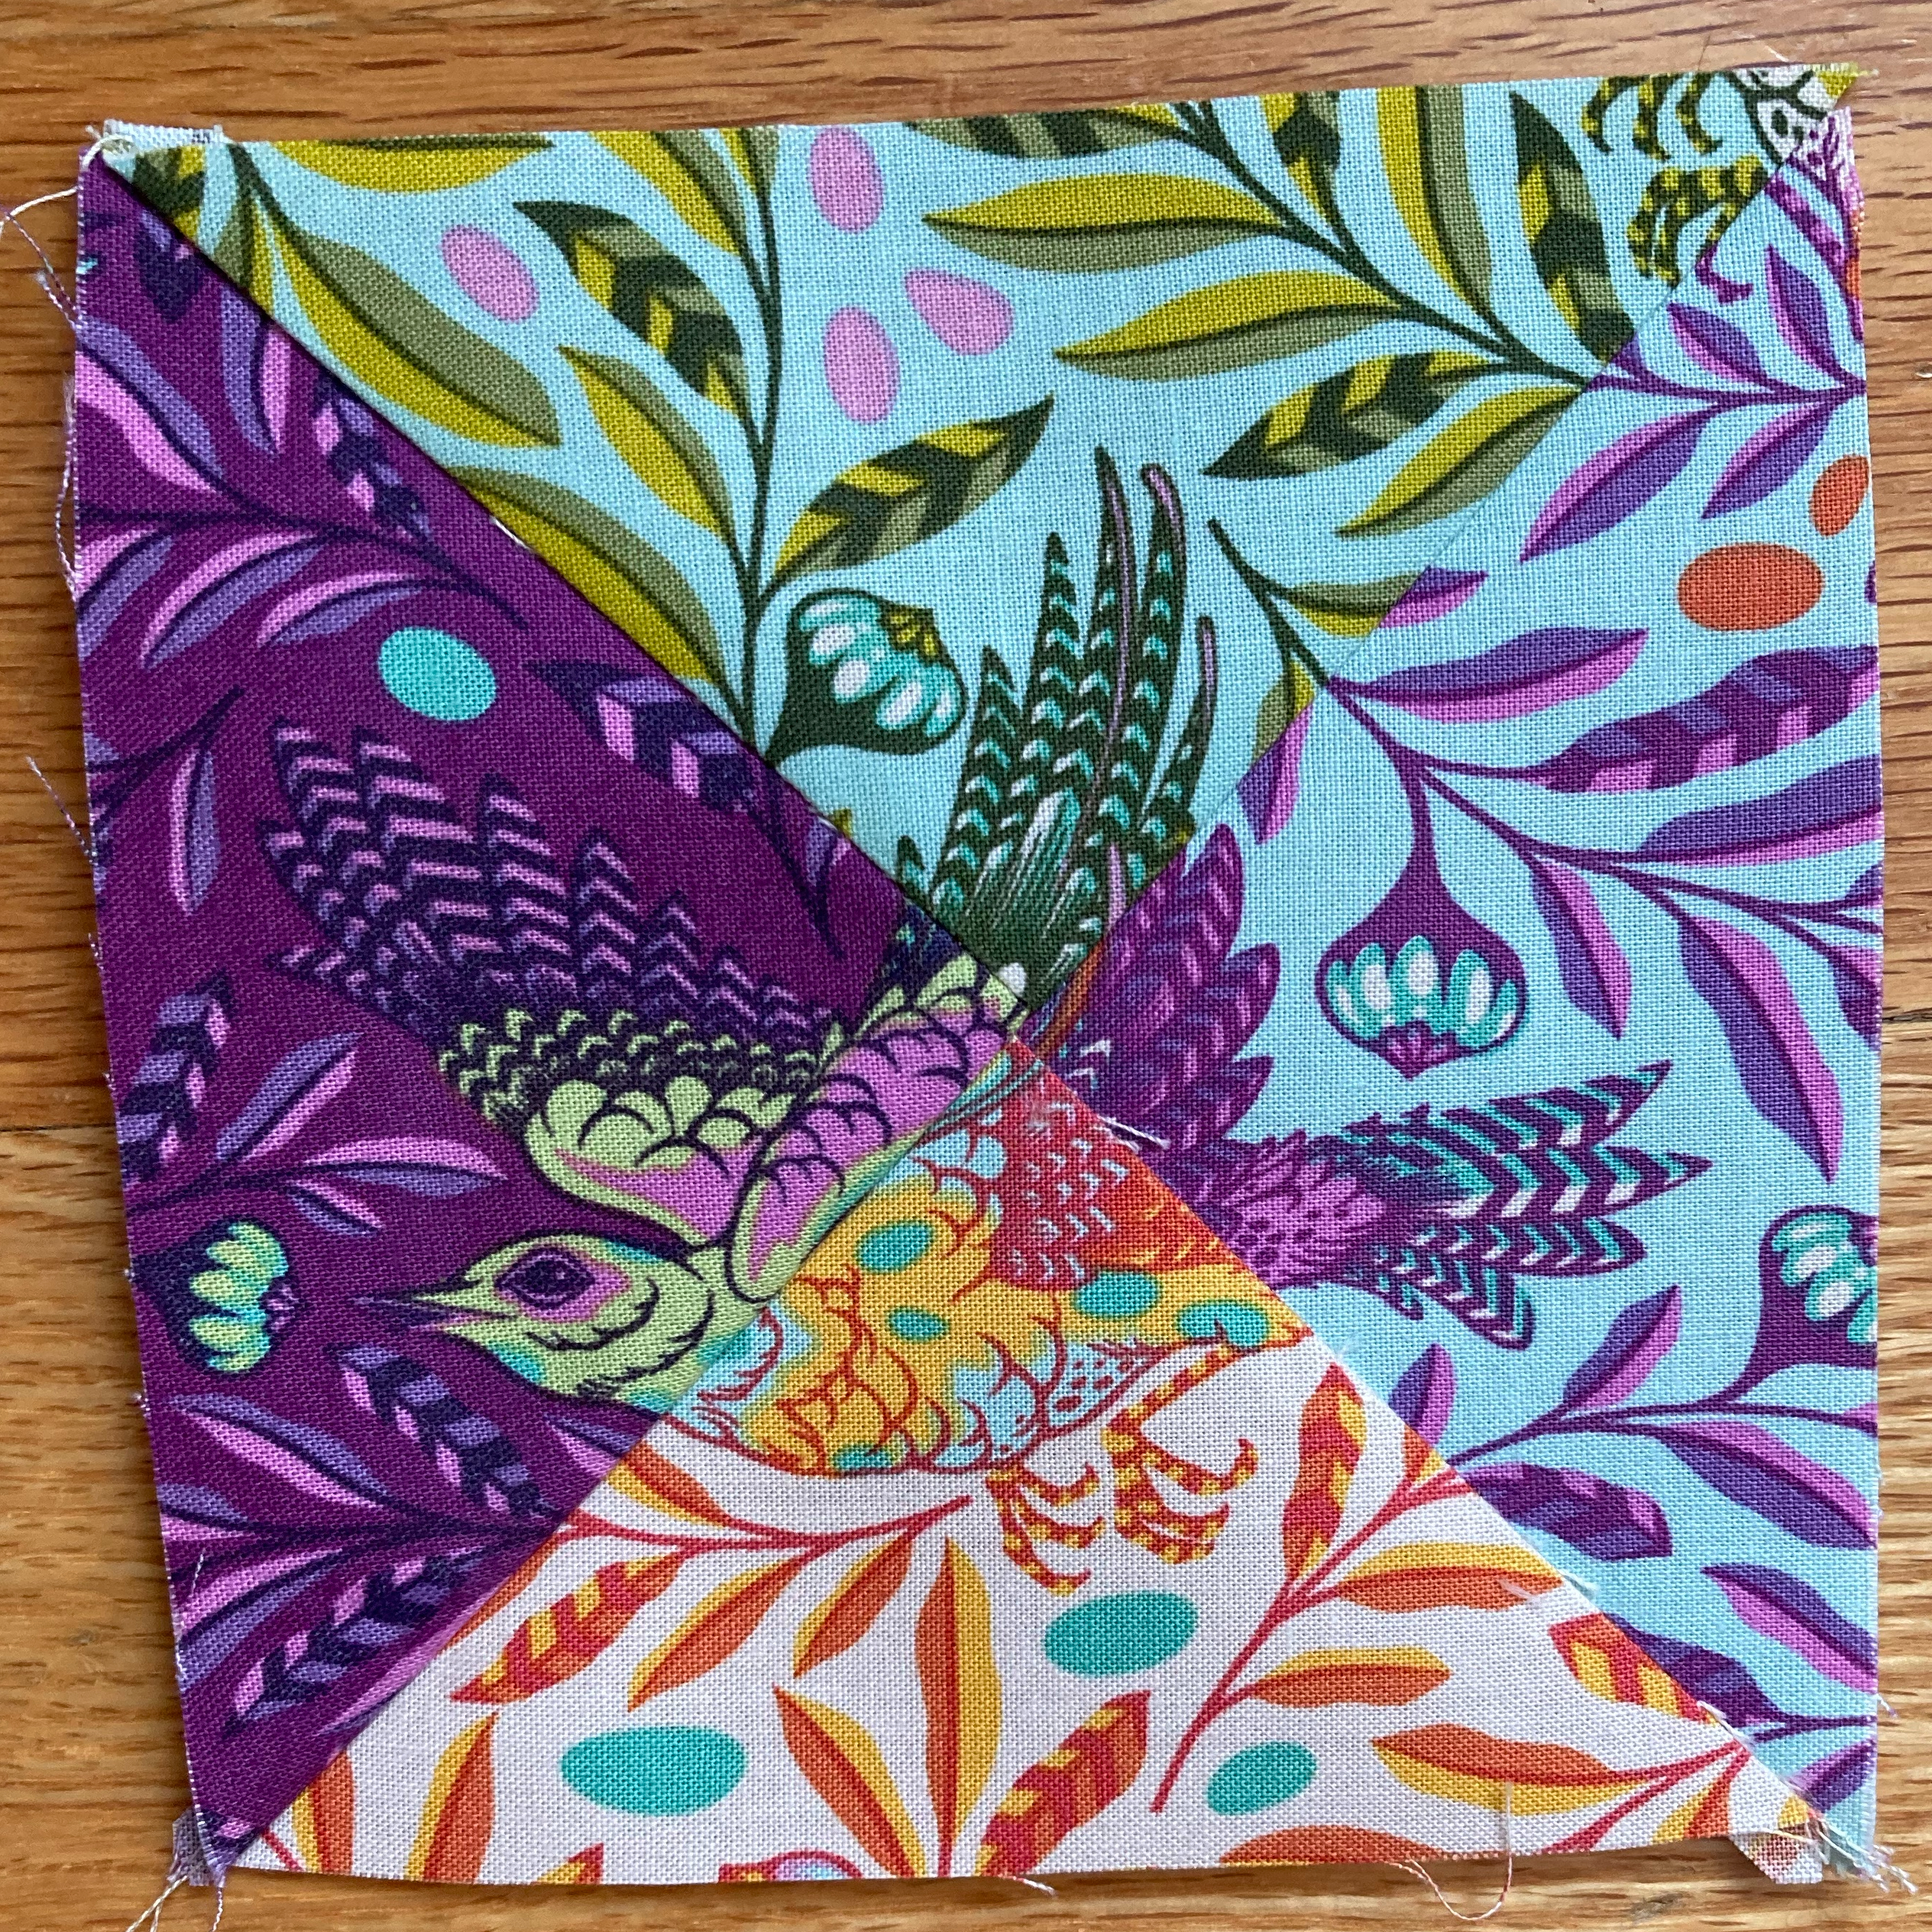
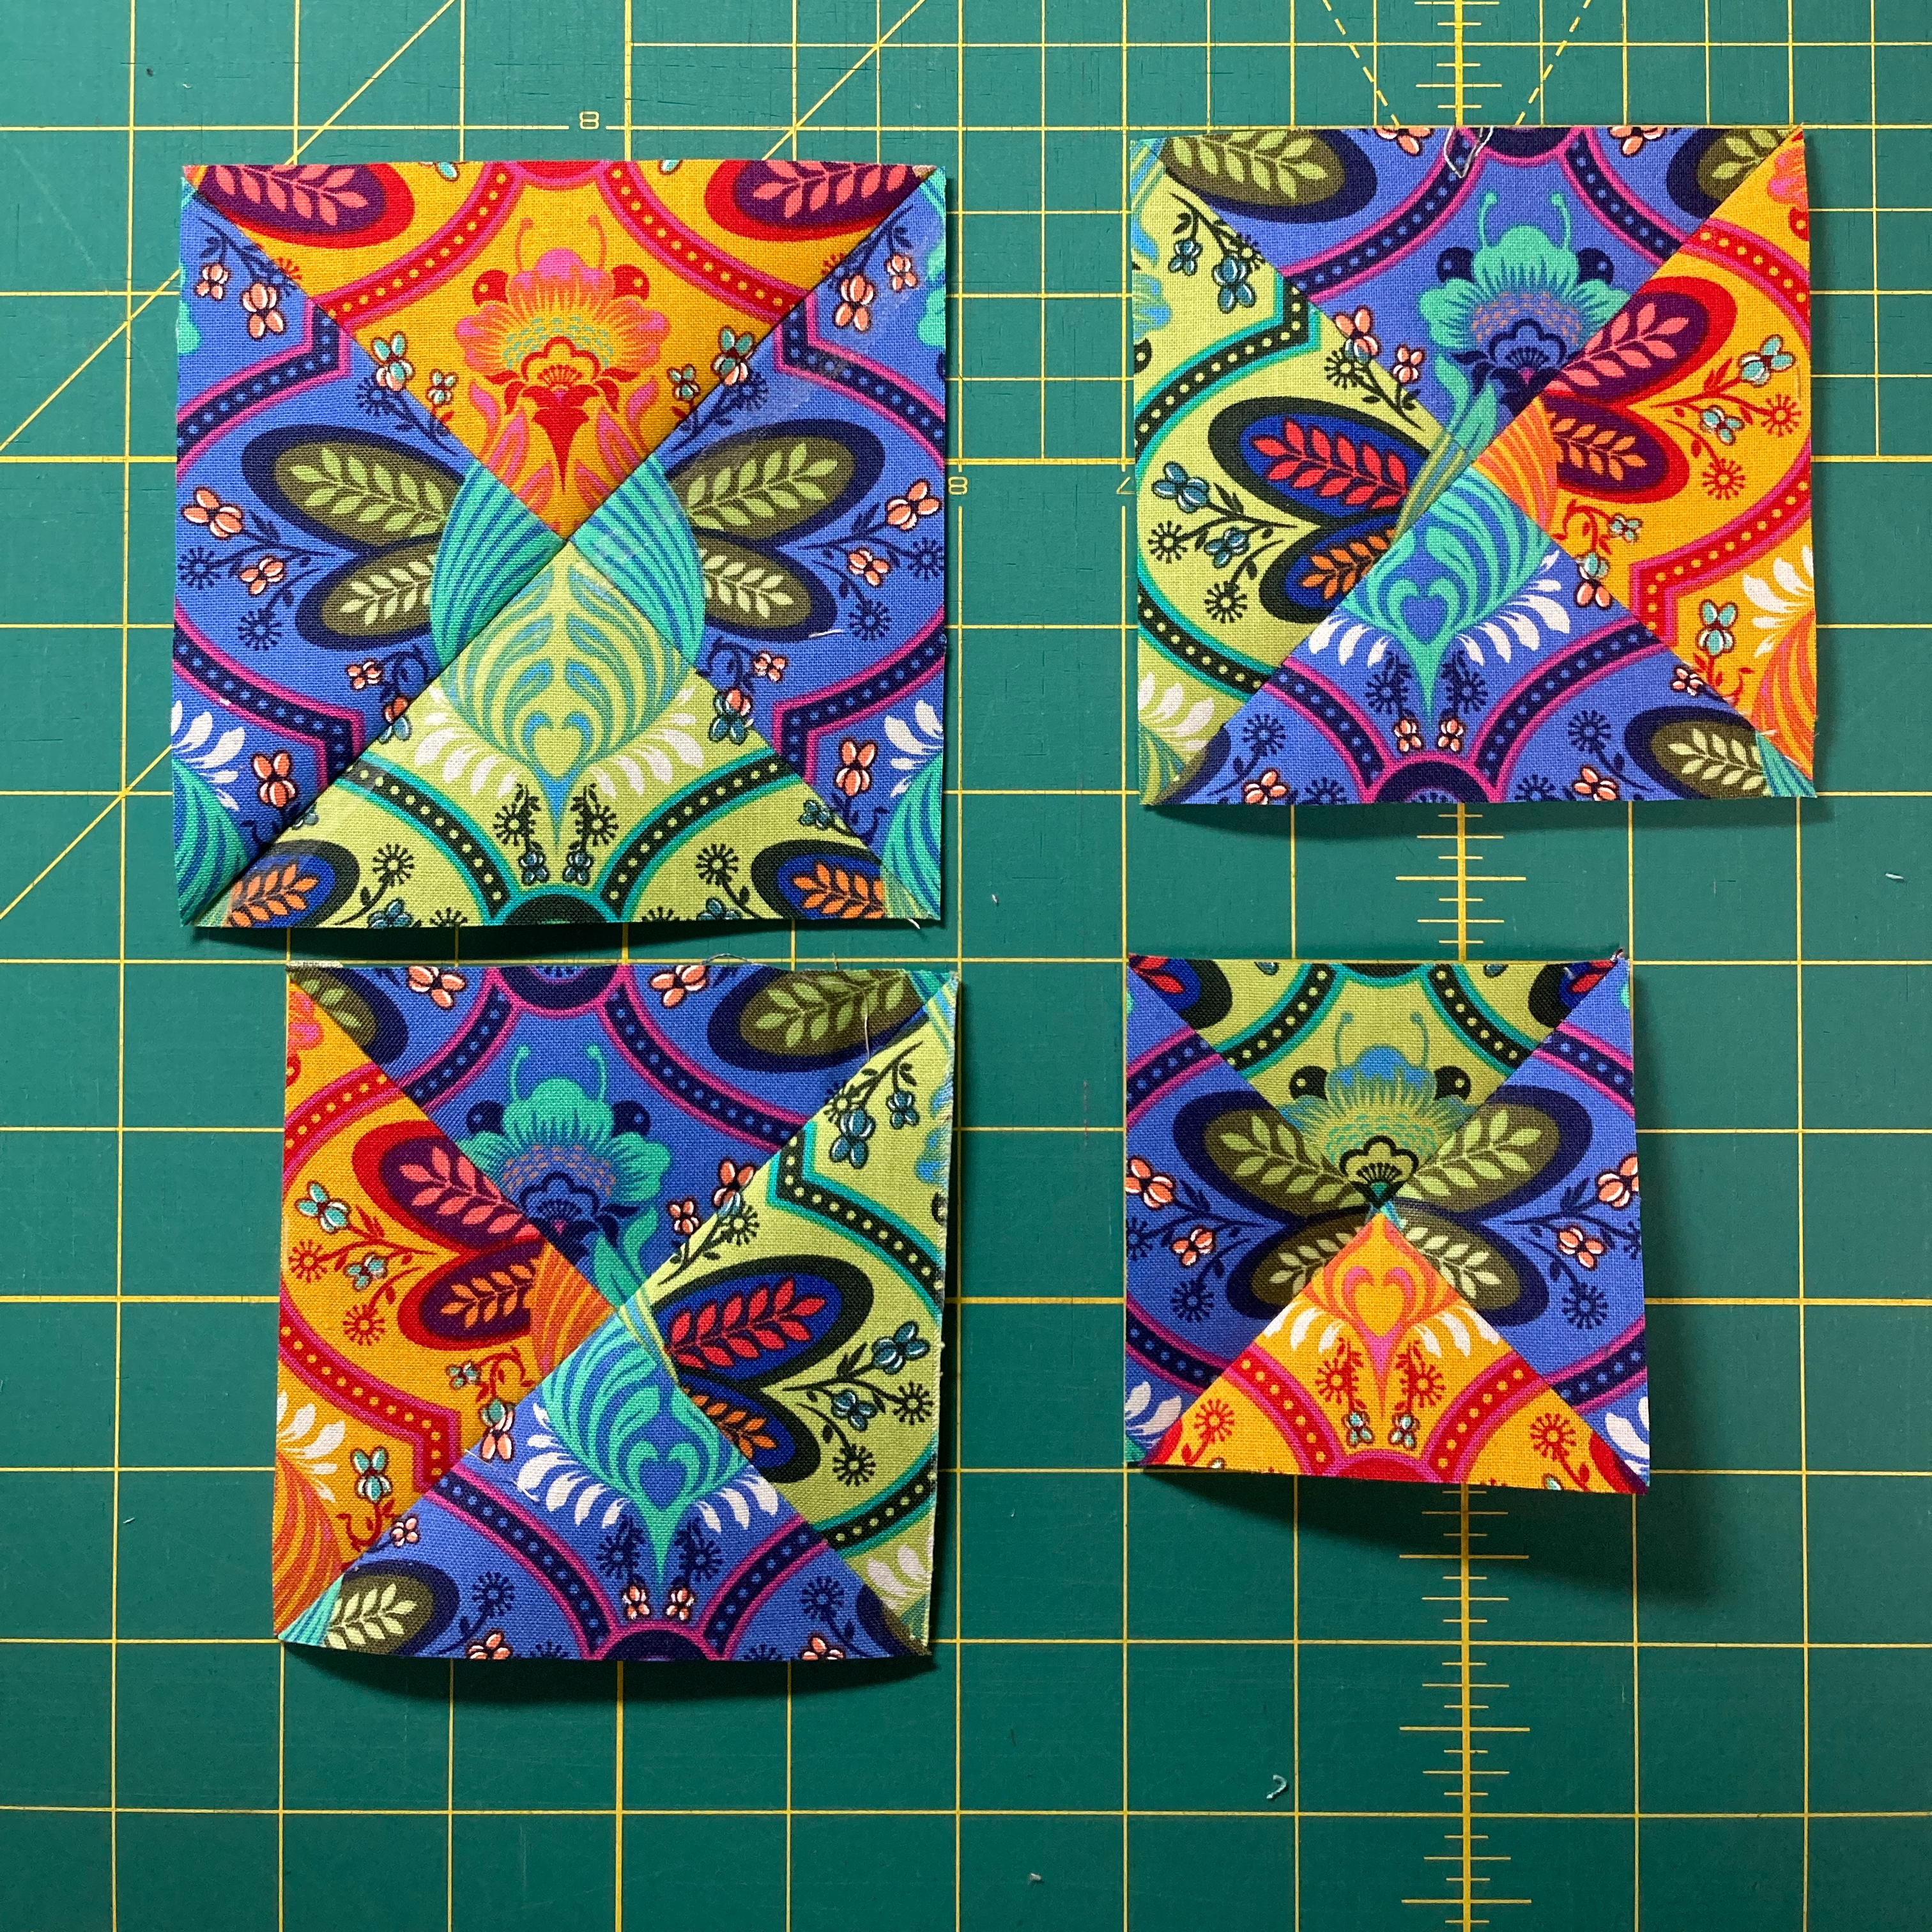
Pattern matching is cutting the fabric and sewing it back together in such a way that reassembles the image you just cut apart. Usually, pattern matching includes motif highlighting (because why else would you bother?), but sometimes the purpose of pattern matching is achieve a kaleidoscope effect rather than recreating the image. The block on the left is an example of pattern matching to achieve a kaleidoscope effect. The block on the right is an example of pattern matching to recreate an image. There are four seams coming together to recreate the trash panda’s (raccoon’s?) face.
First – Gather Your tools
Having the right tools will make this whole process easier. I used starch, hot iron, rotary cutter, a good ruler, and a water soluble glue stick. Maybe a marking tool if your ruler isn’t the just right size for what you’re making. And my sewing machine…does that need to be included or can we just assume? Anyone doing this by hand?
A Quick Break for Math
We are pattern matching quarter square triangles. YOU CANNOT MAKE THOSE TWO AT A TIME. Therefore, with most patterns a math adjustment is required. Pattern writers will often have you use a 2, 4, or 8 at a time method because it goes faster and uses less fabric. When you make half or quarter square triangles one at time the size squares you cut are the sizes you finish with because you are sewing on the diagonal (instead of a 1/4 inch on either side if it). So if you cut two 4.5 inch squares and sew down the diagonal, you have a 4.5 inch square again after you trim and press. Since we’re going to have to sew two seams to get from squares to quarter square triangles, I’m going to add a half inch to give myself some room to trim and square the block when I’m done. Since I want to finish with a 4.5 inch block, I’m going to cut 5 inch squares to give me some wiggle room to make mistakes. Because the great philosopher, Big Bird, says, “Everyone makes mistakes, so why can’t you?”
Pick Your Motif
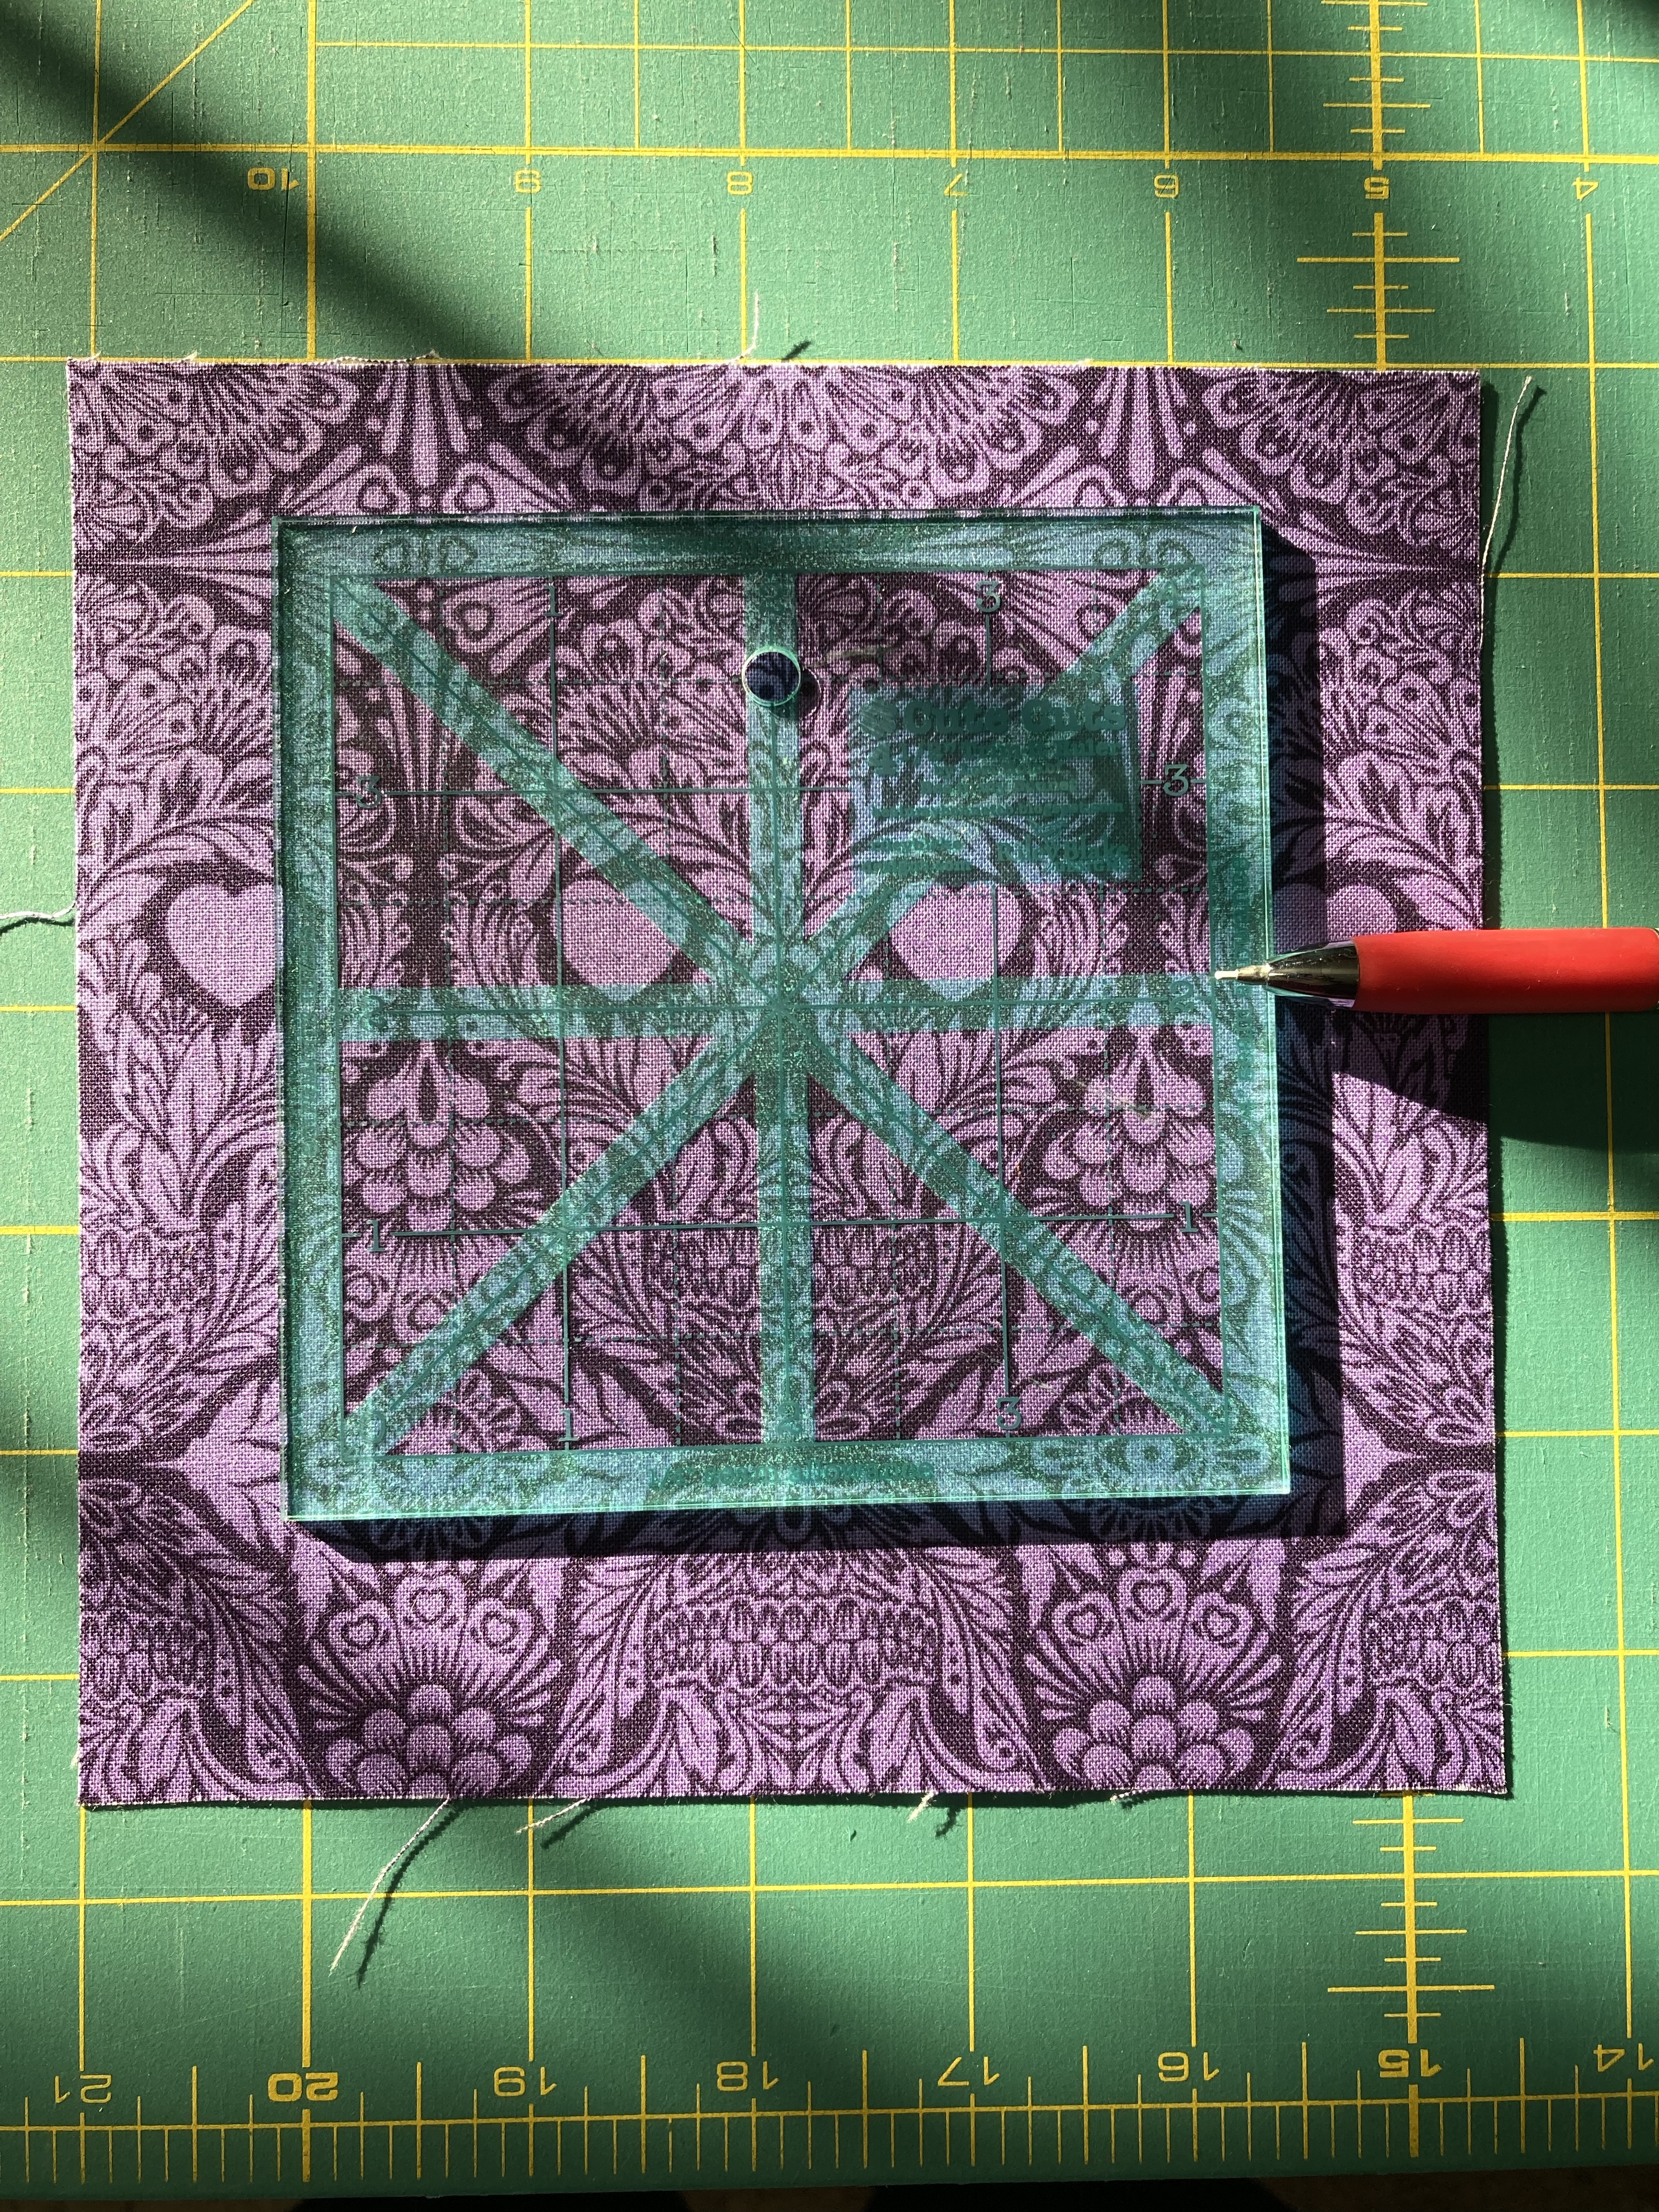
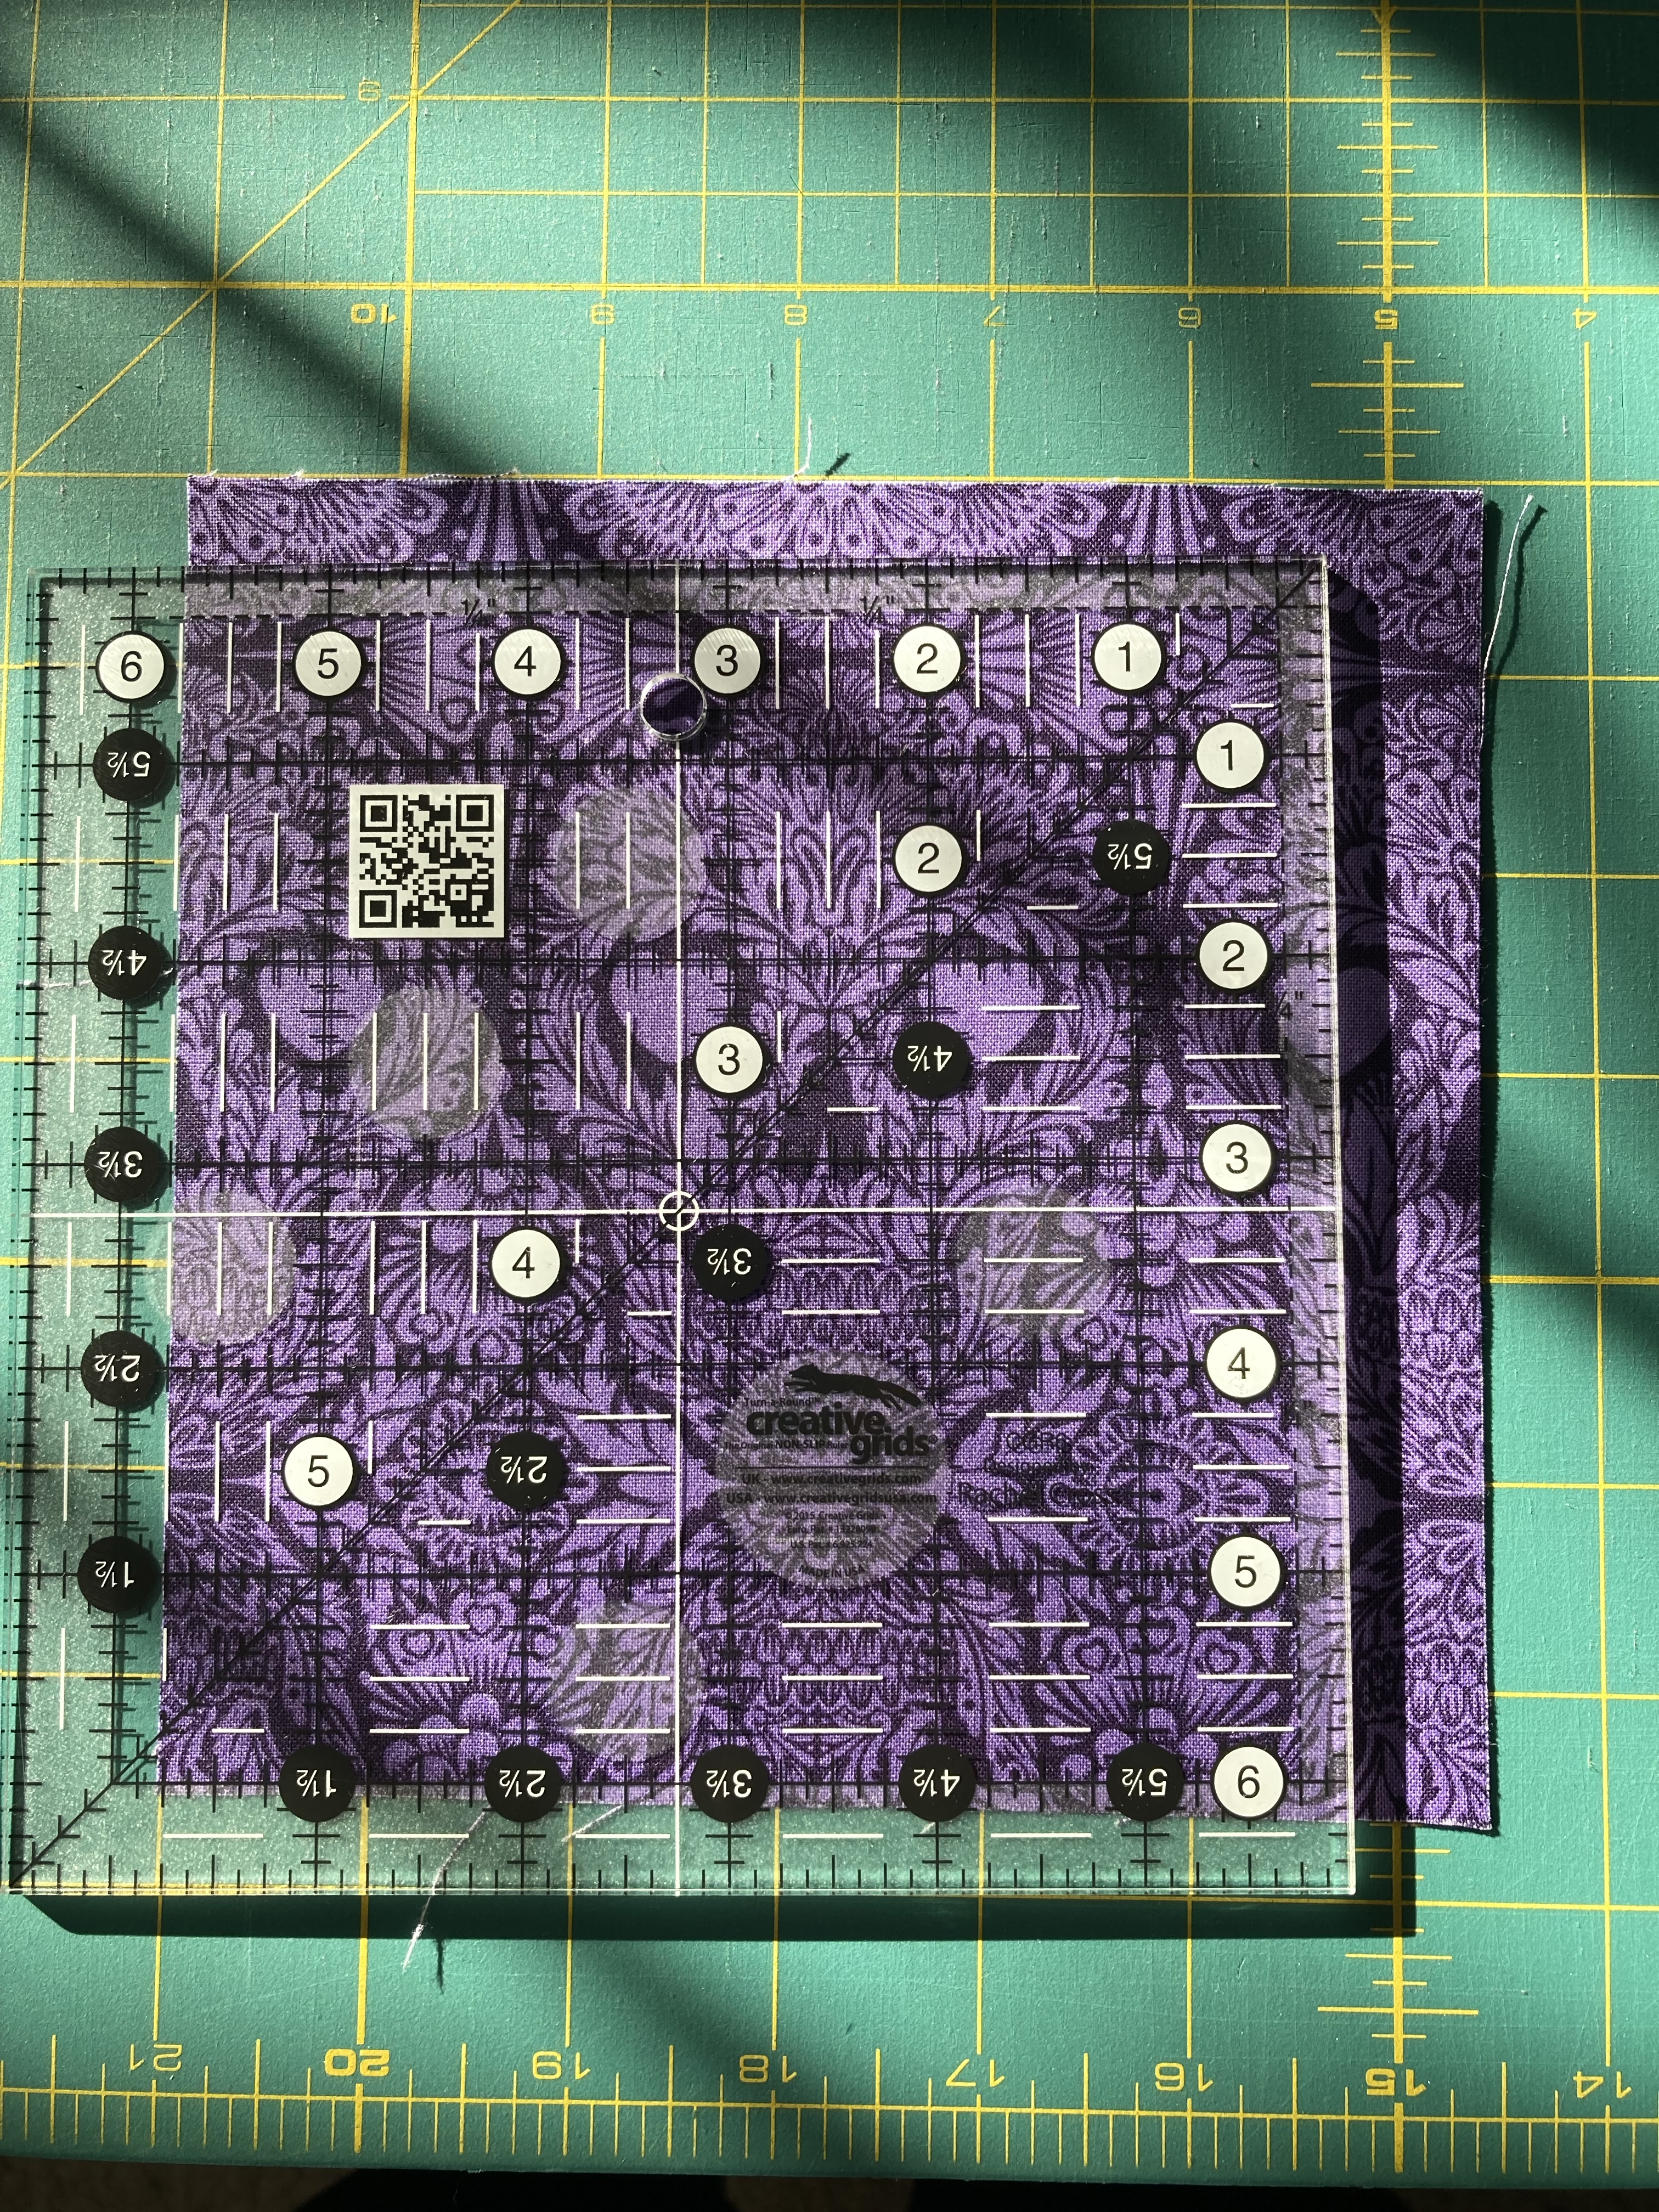
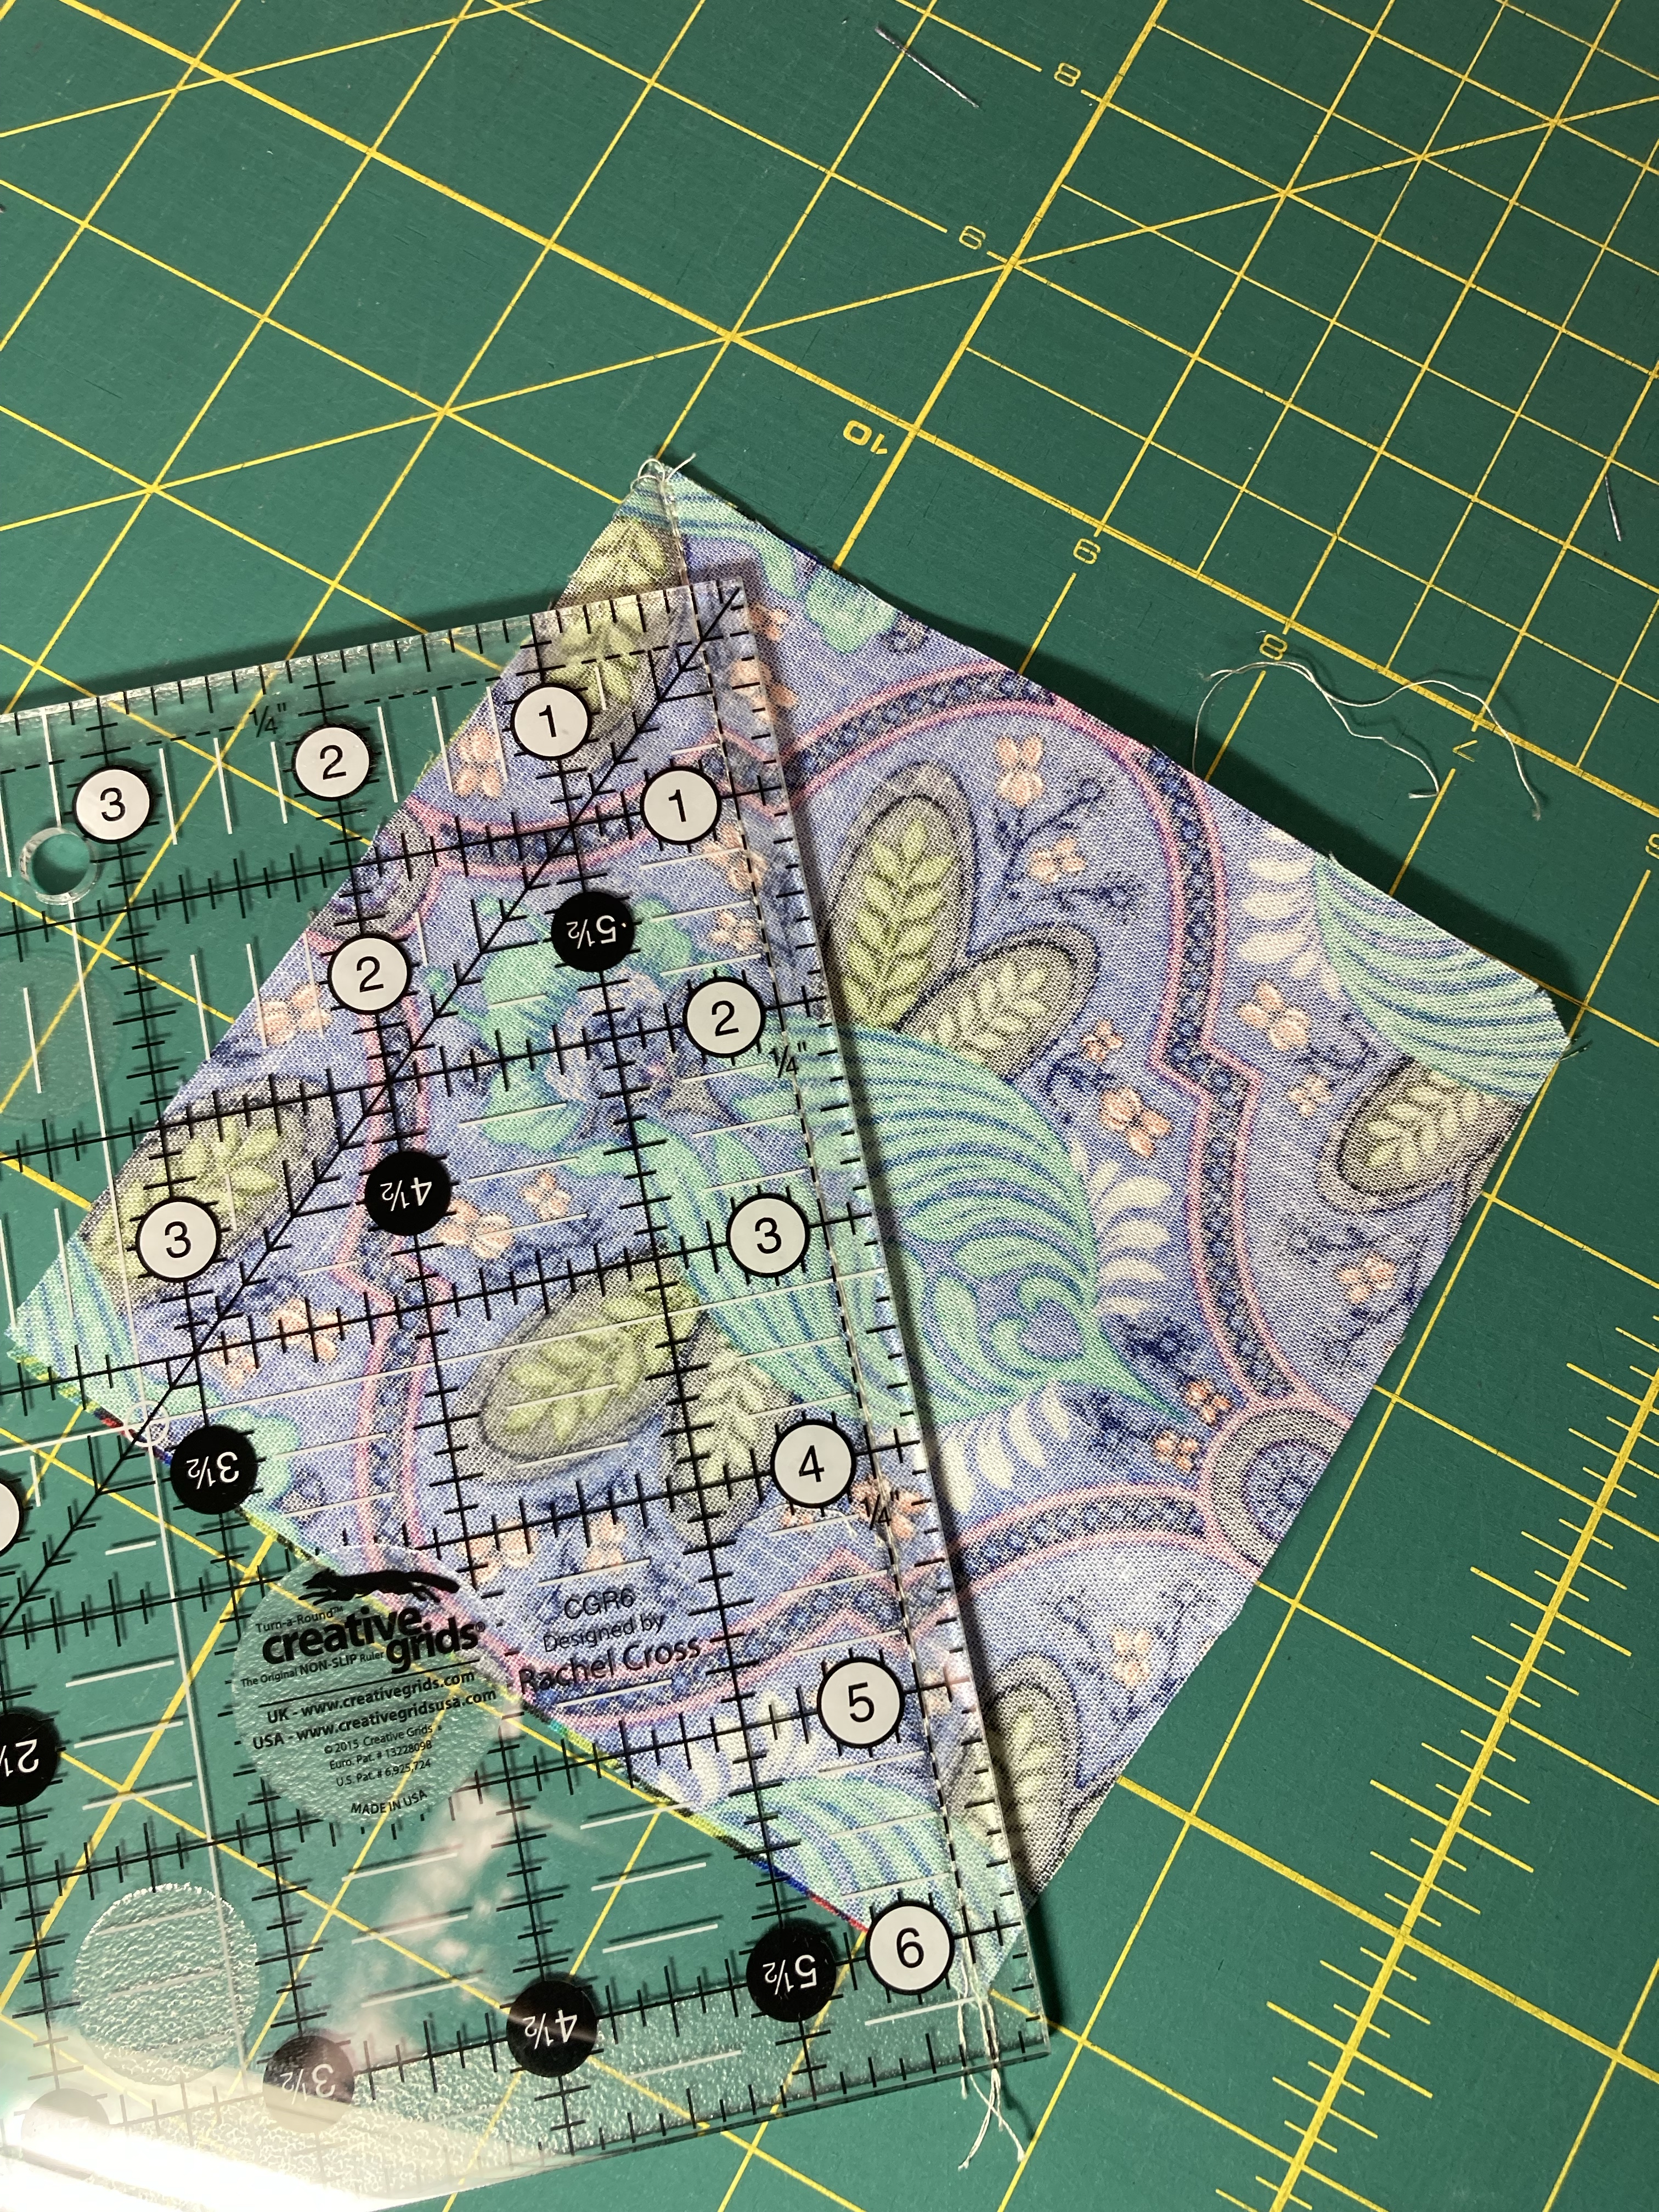
To make a quarter square triangle block to pattern match, you must have 4 full repeats of the motif in the size you need to cut. For me that, that’s four repeats of the motif that are 5 inches square. This is the part of the process where a ruler made for fussy cutting is a lot of help. I have Marti Michelle’s and one by Riley Blake. What makes these helpful is the x in the middle that let’s you center your block and see where the seams will be. You can see an examples of both rulers over the fabric below. The Marti Michelle ruler (right) has guides for a 1, 2, 3, 4, and 6 inch block, so it’s a lot more versatile than the one on the left. But the one on the left happens to be the perfect size for this project.
DON’T CUT ANYTHING YET!!
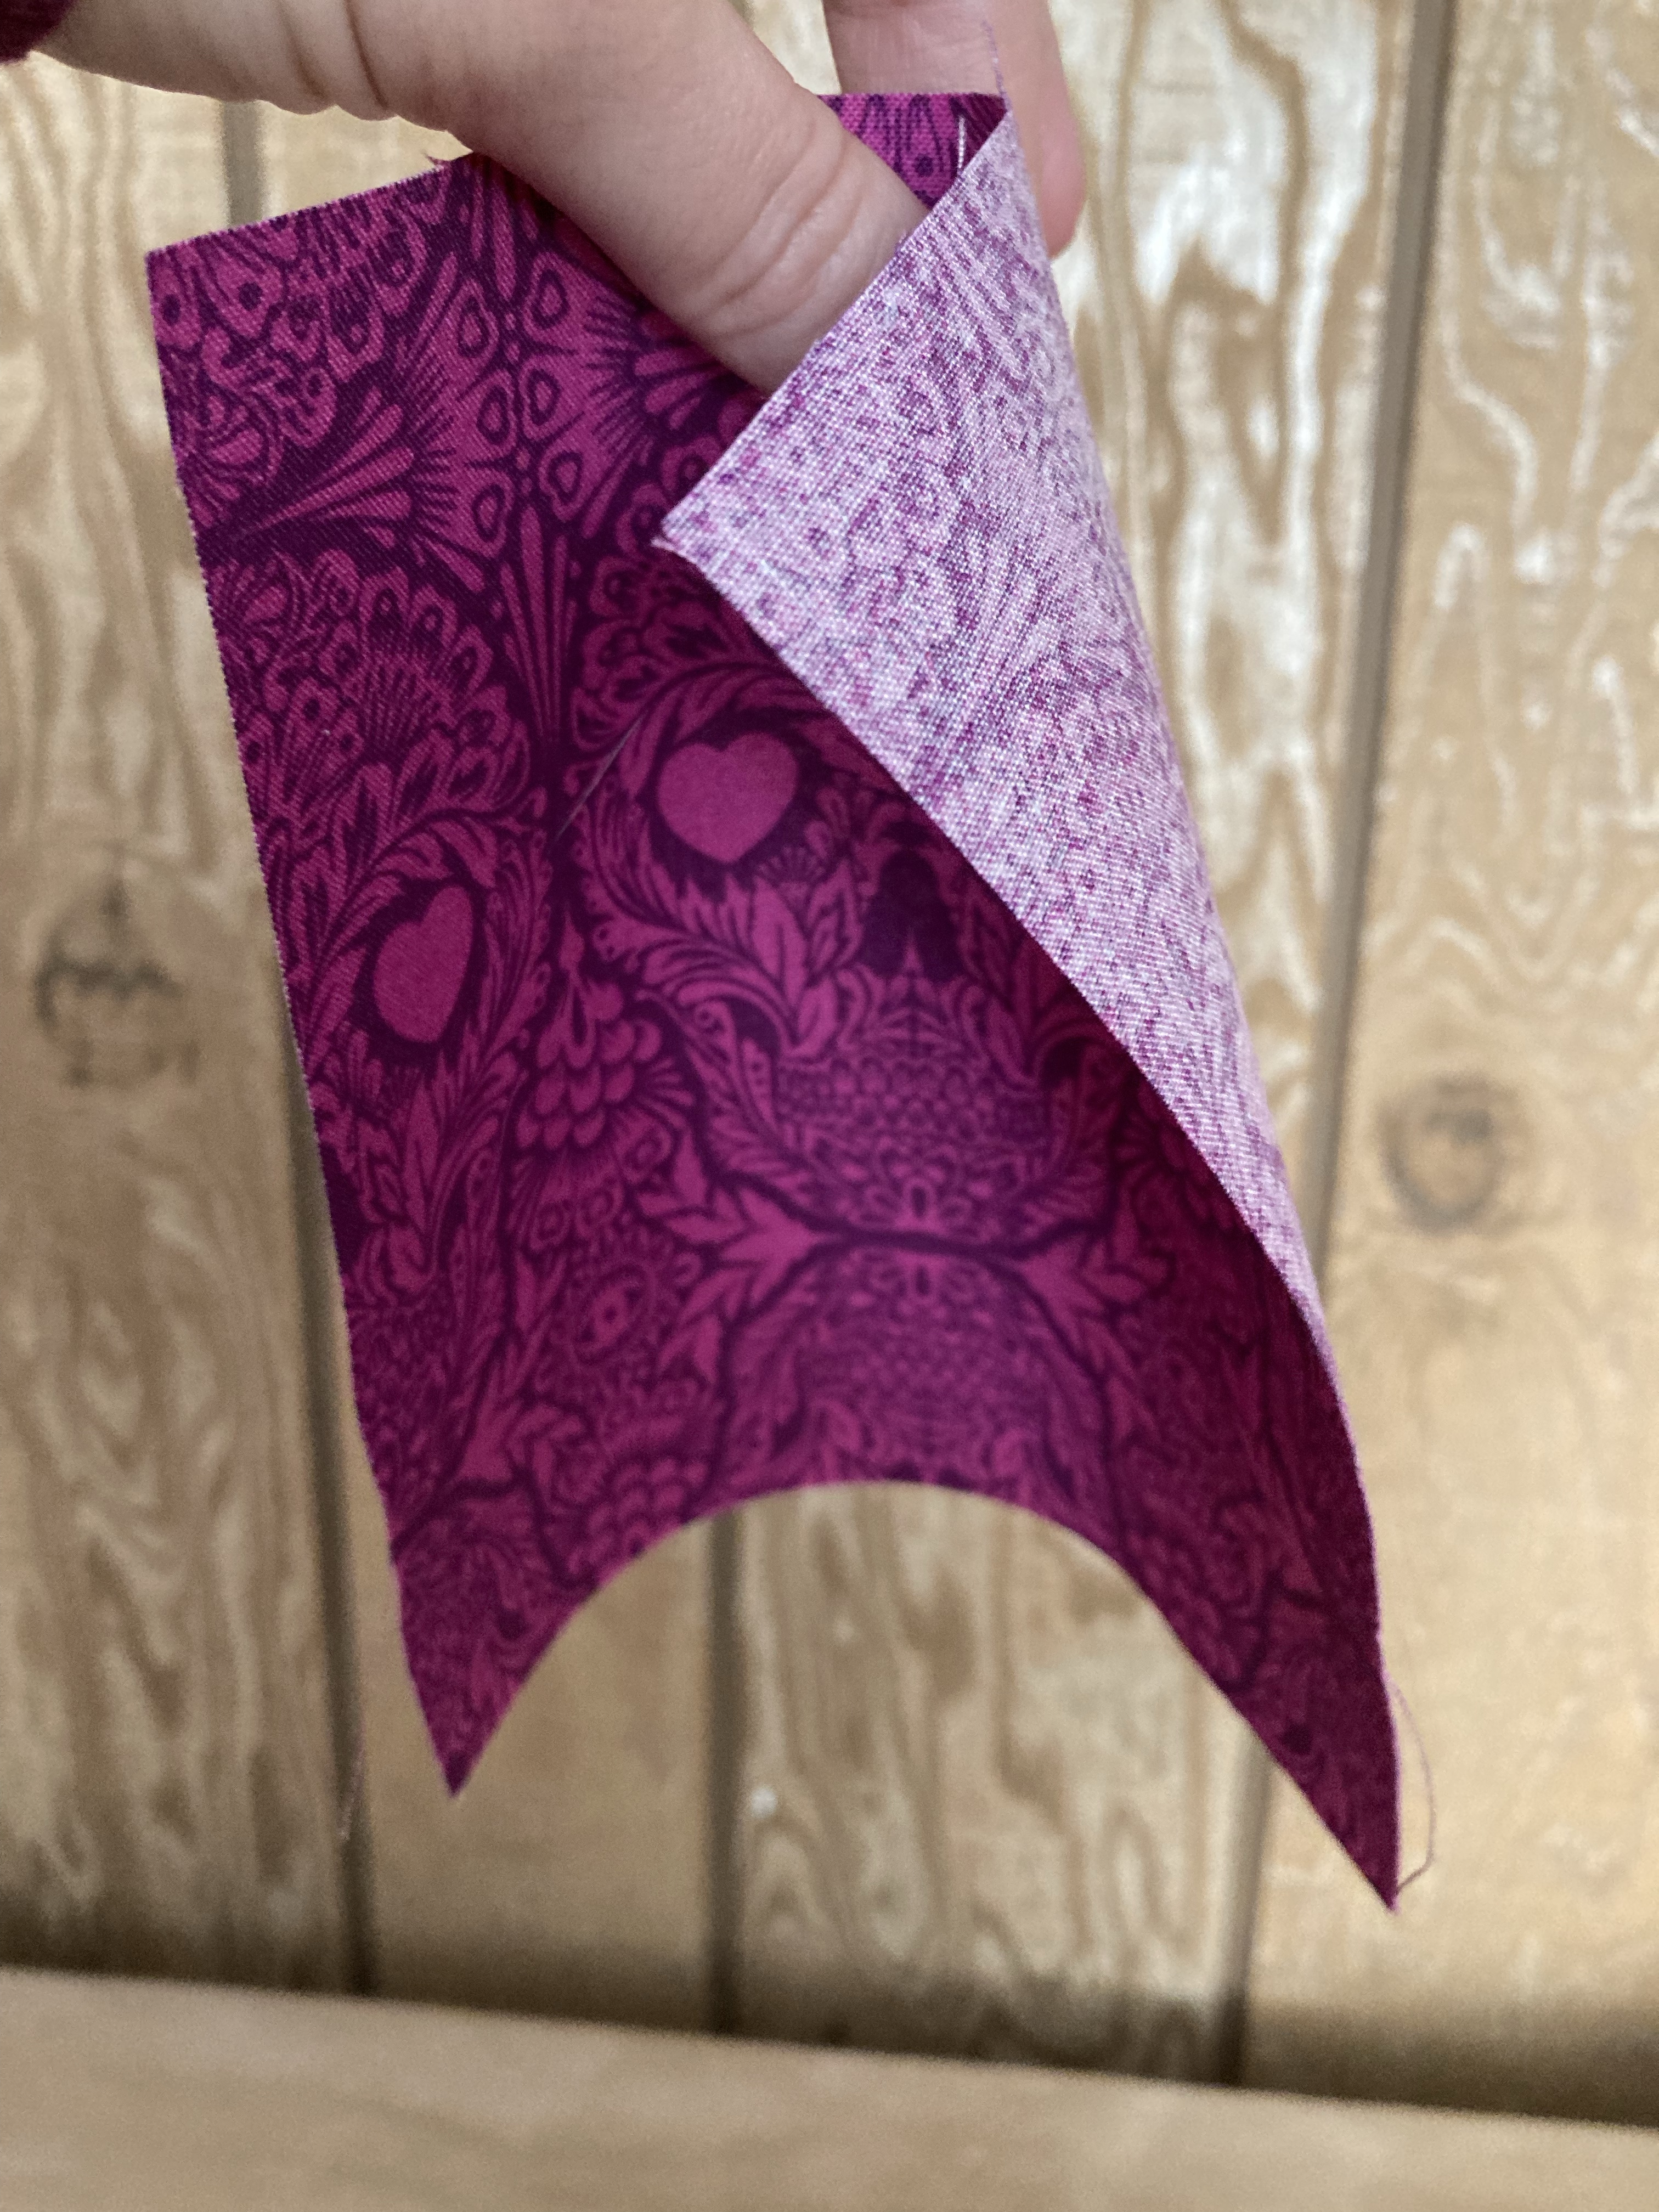
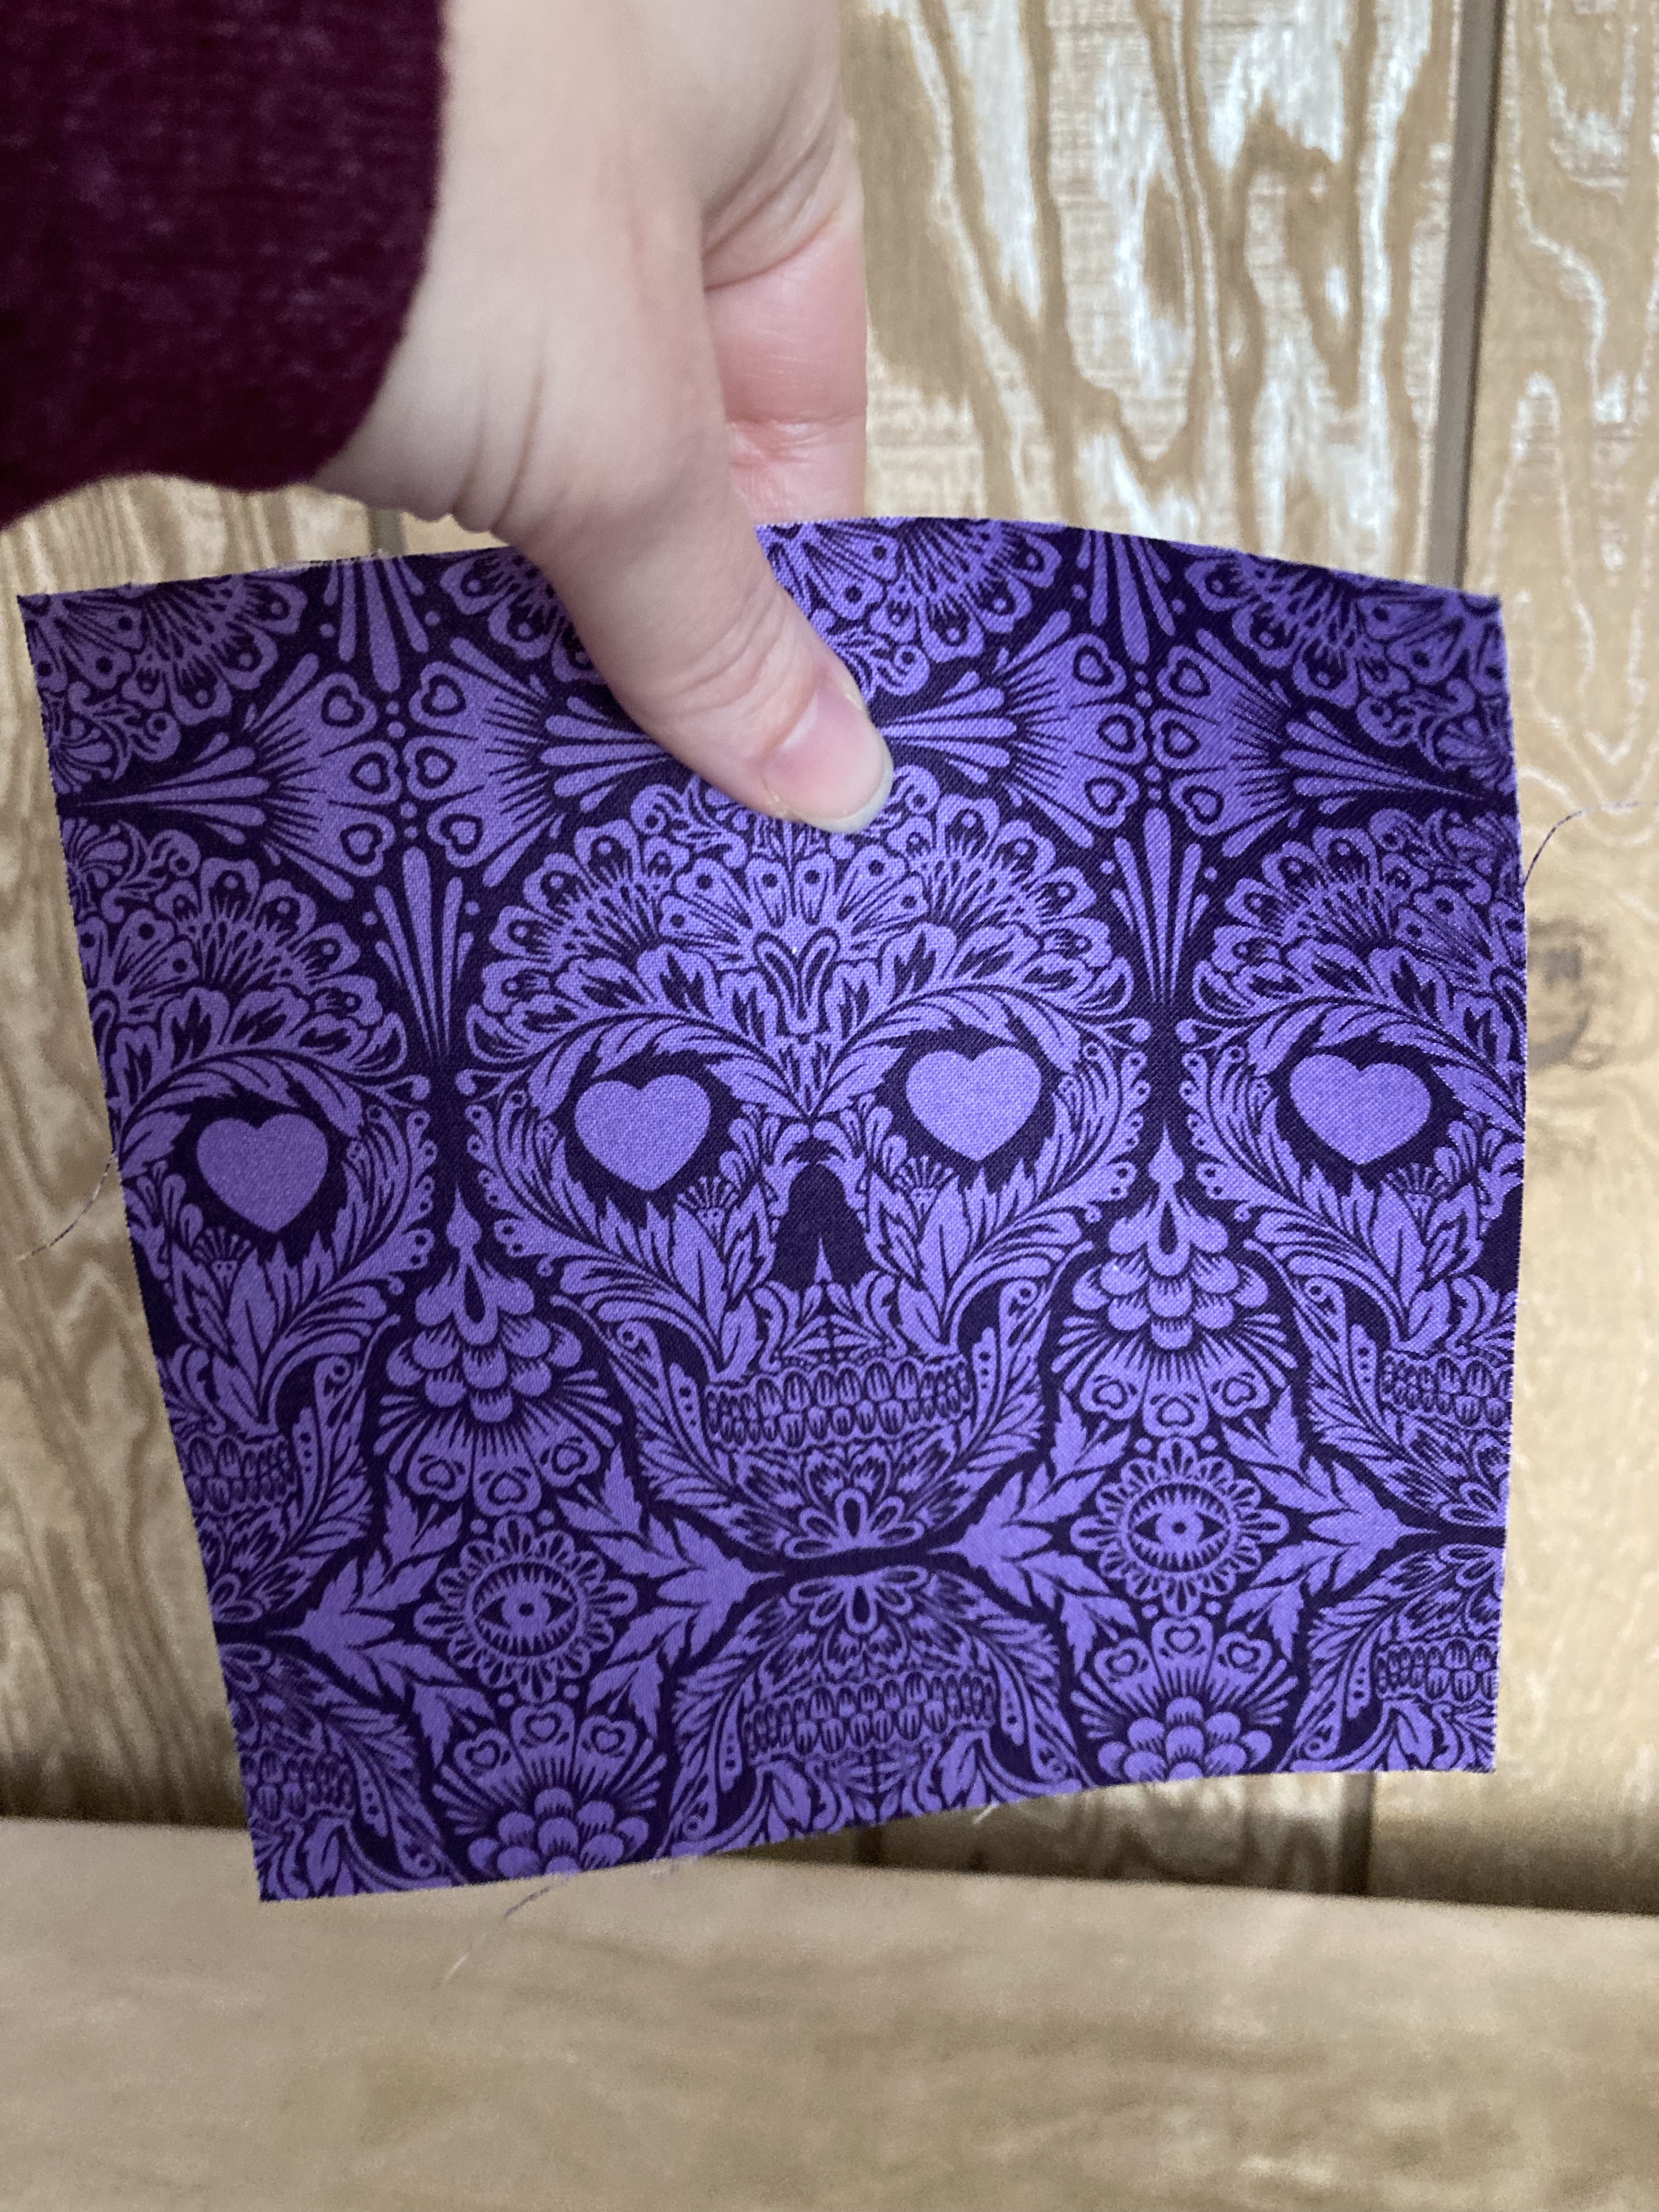
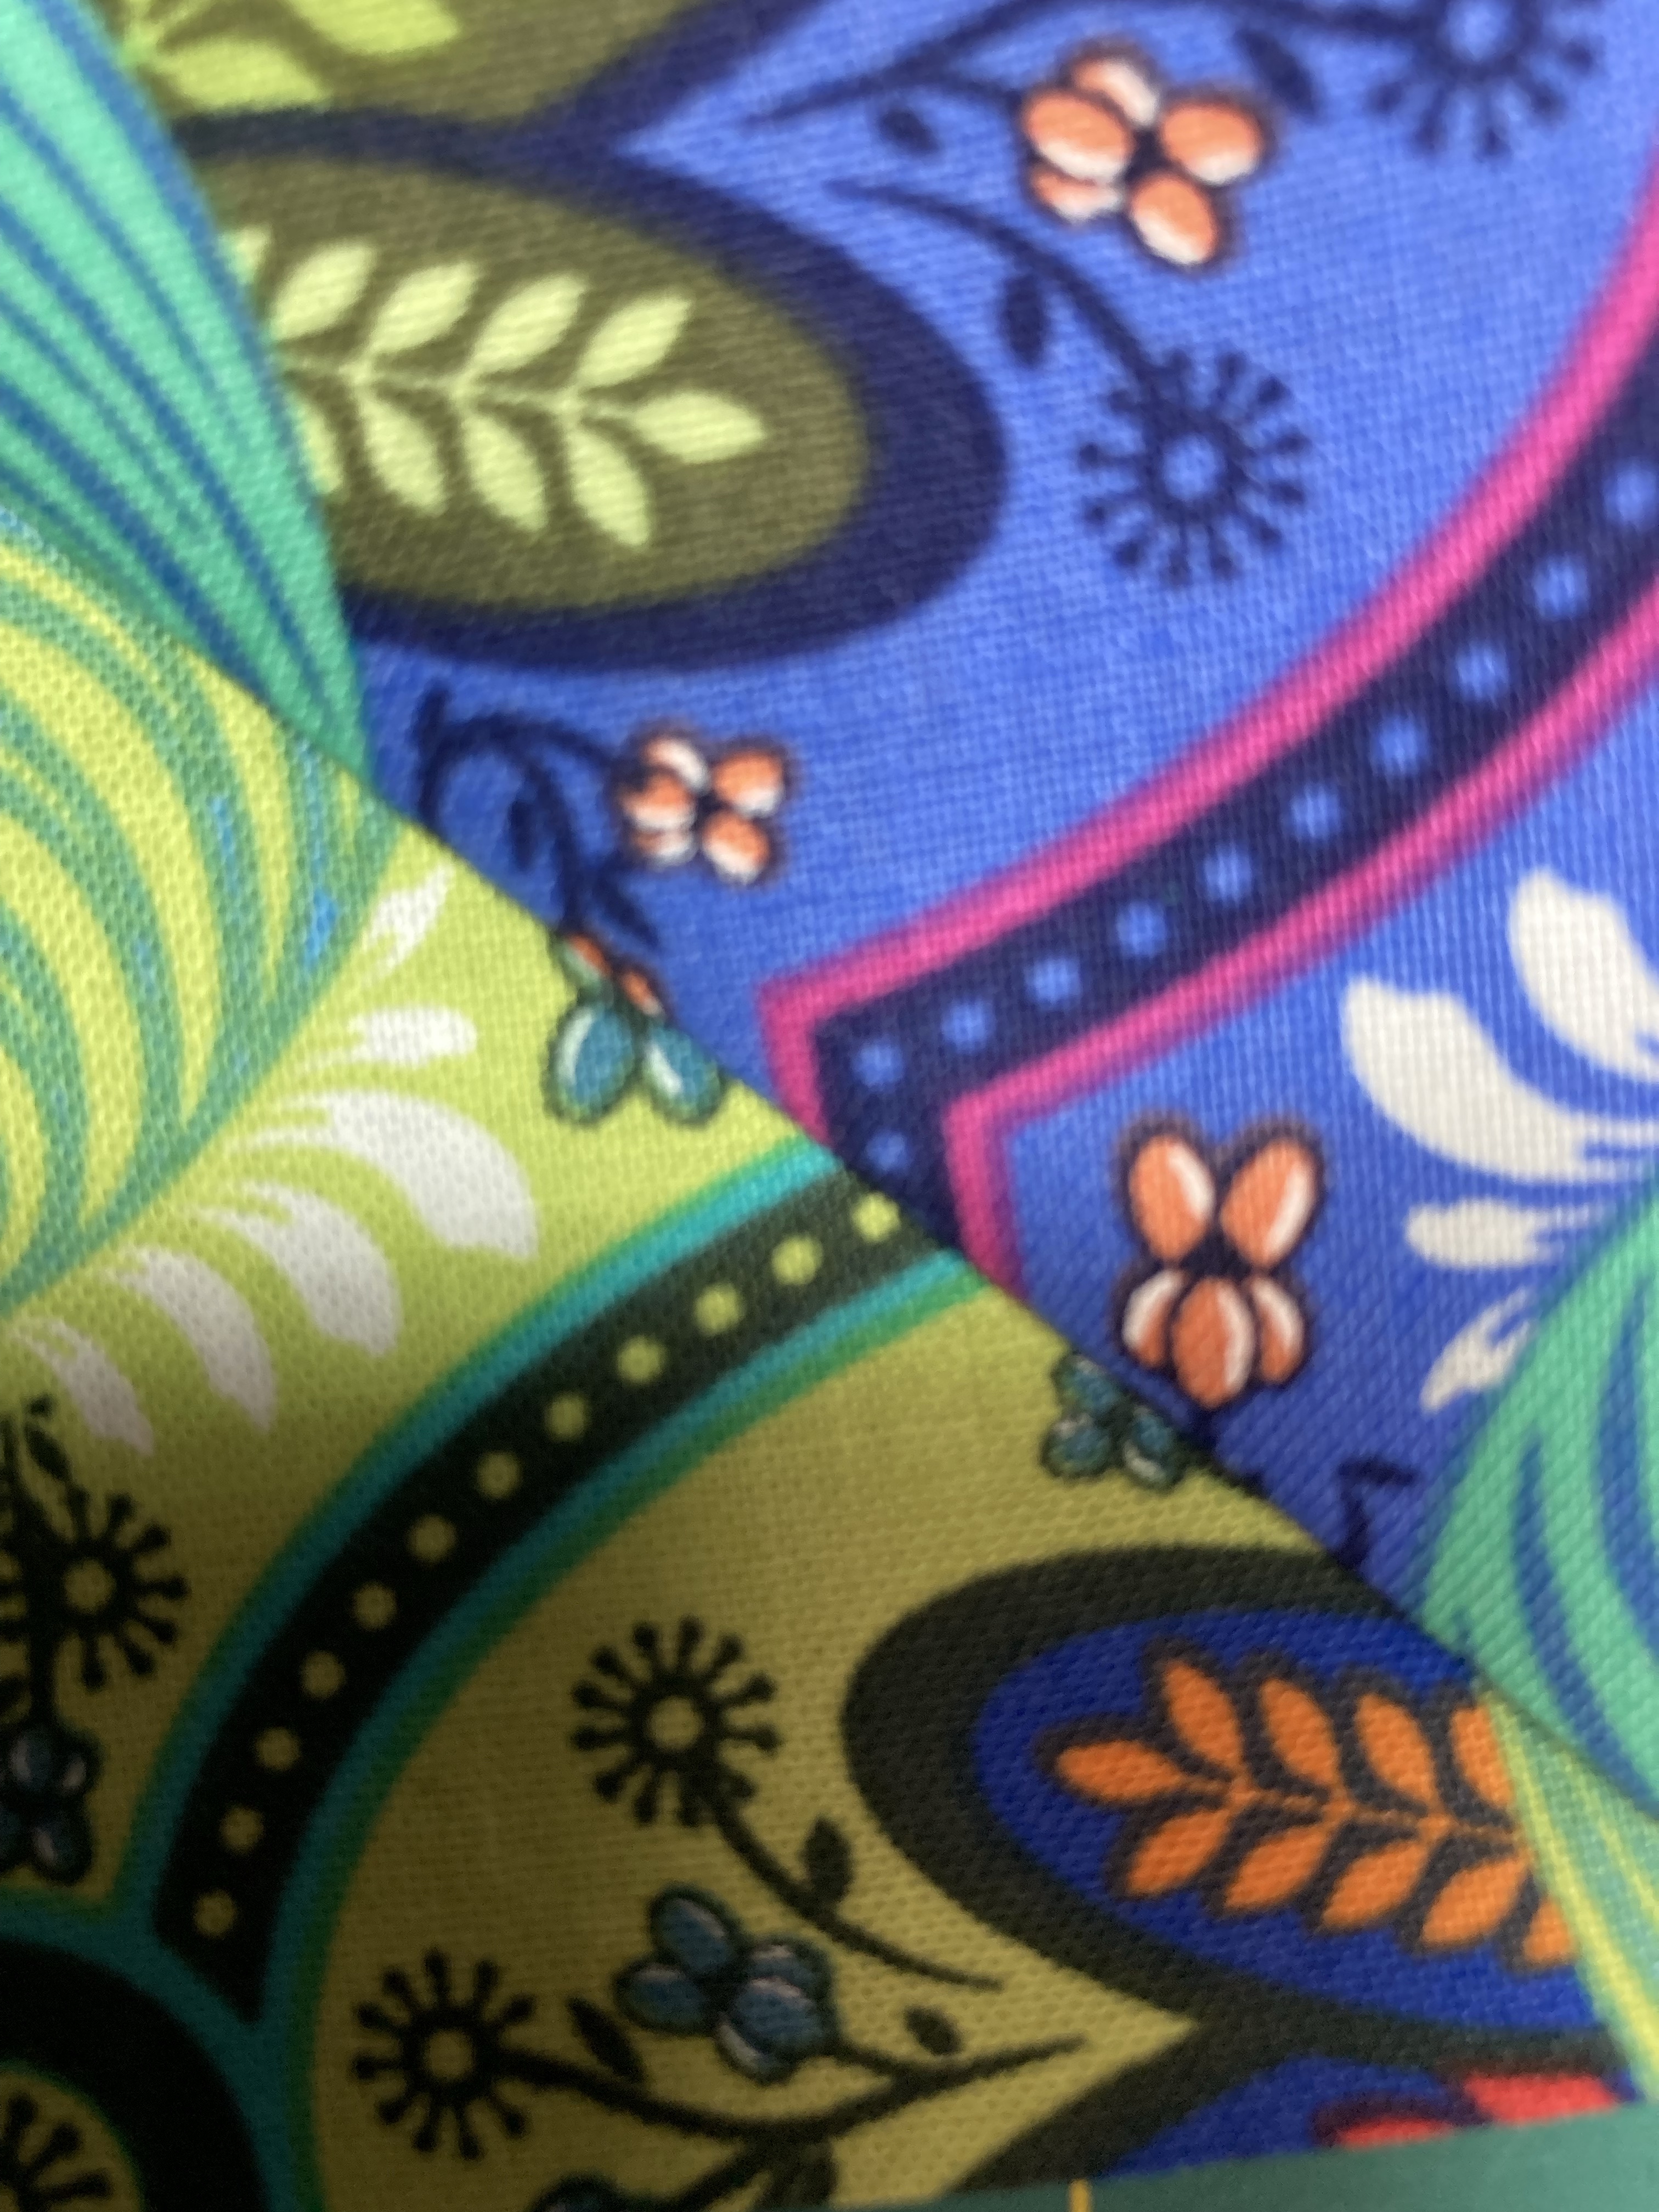
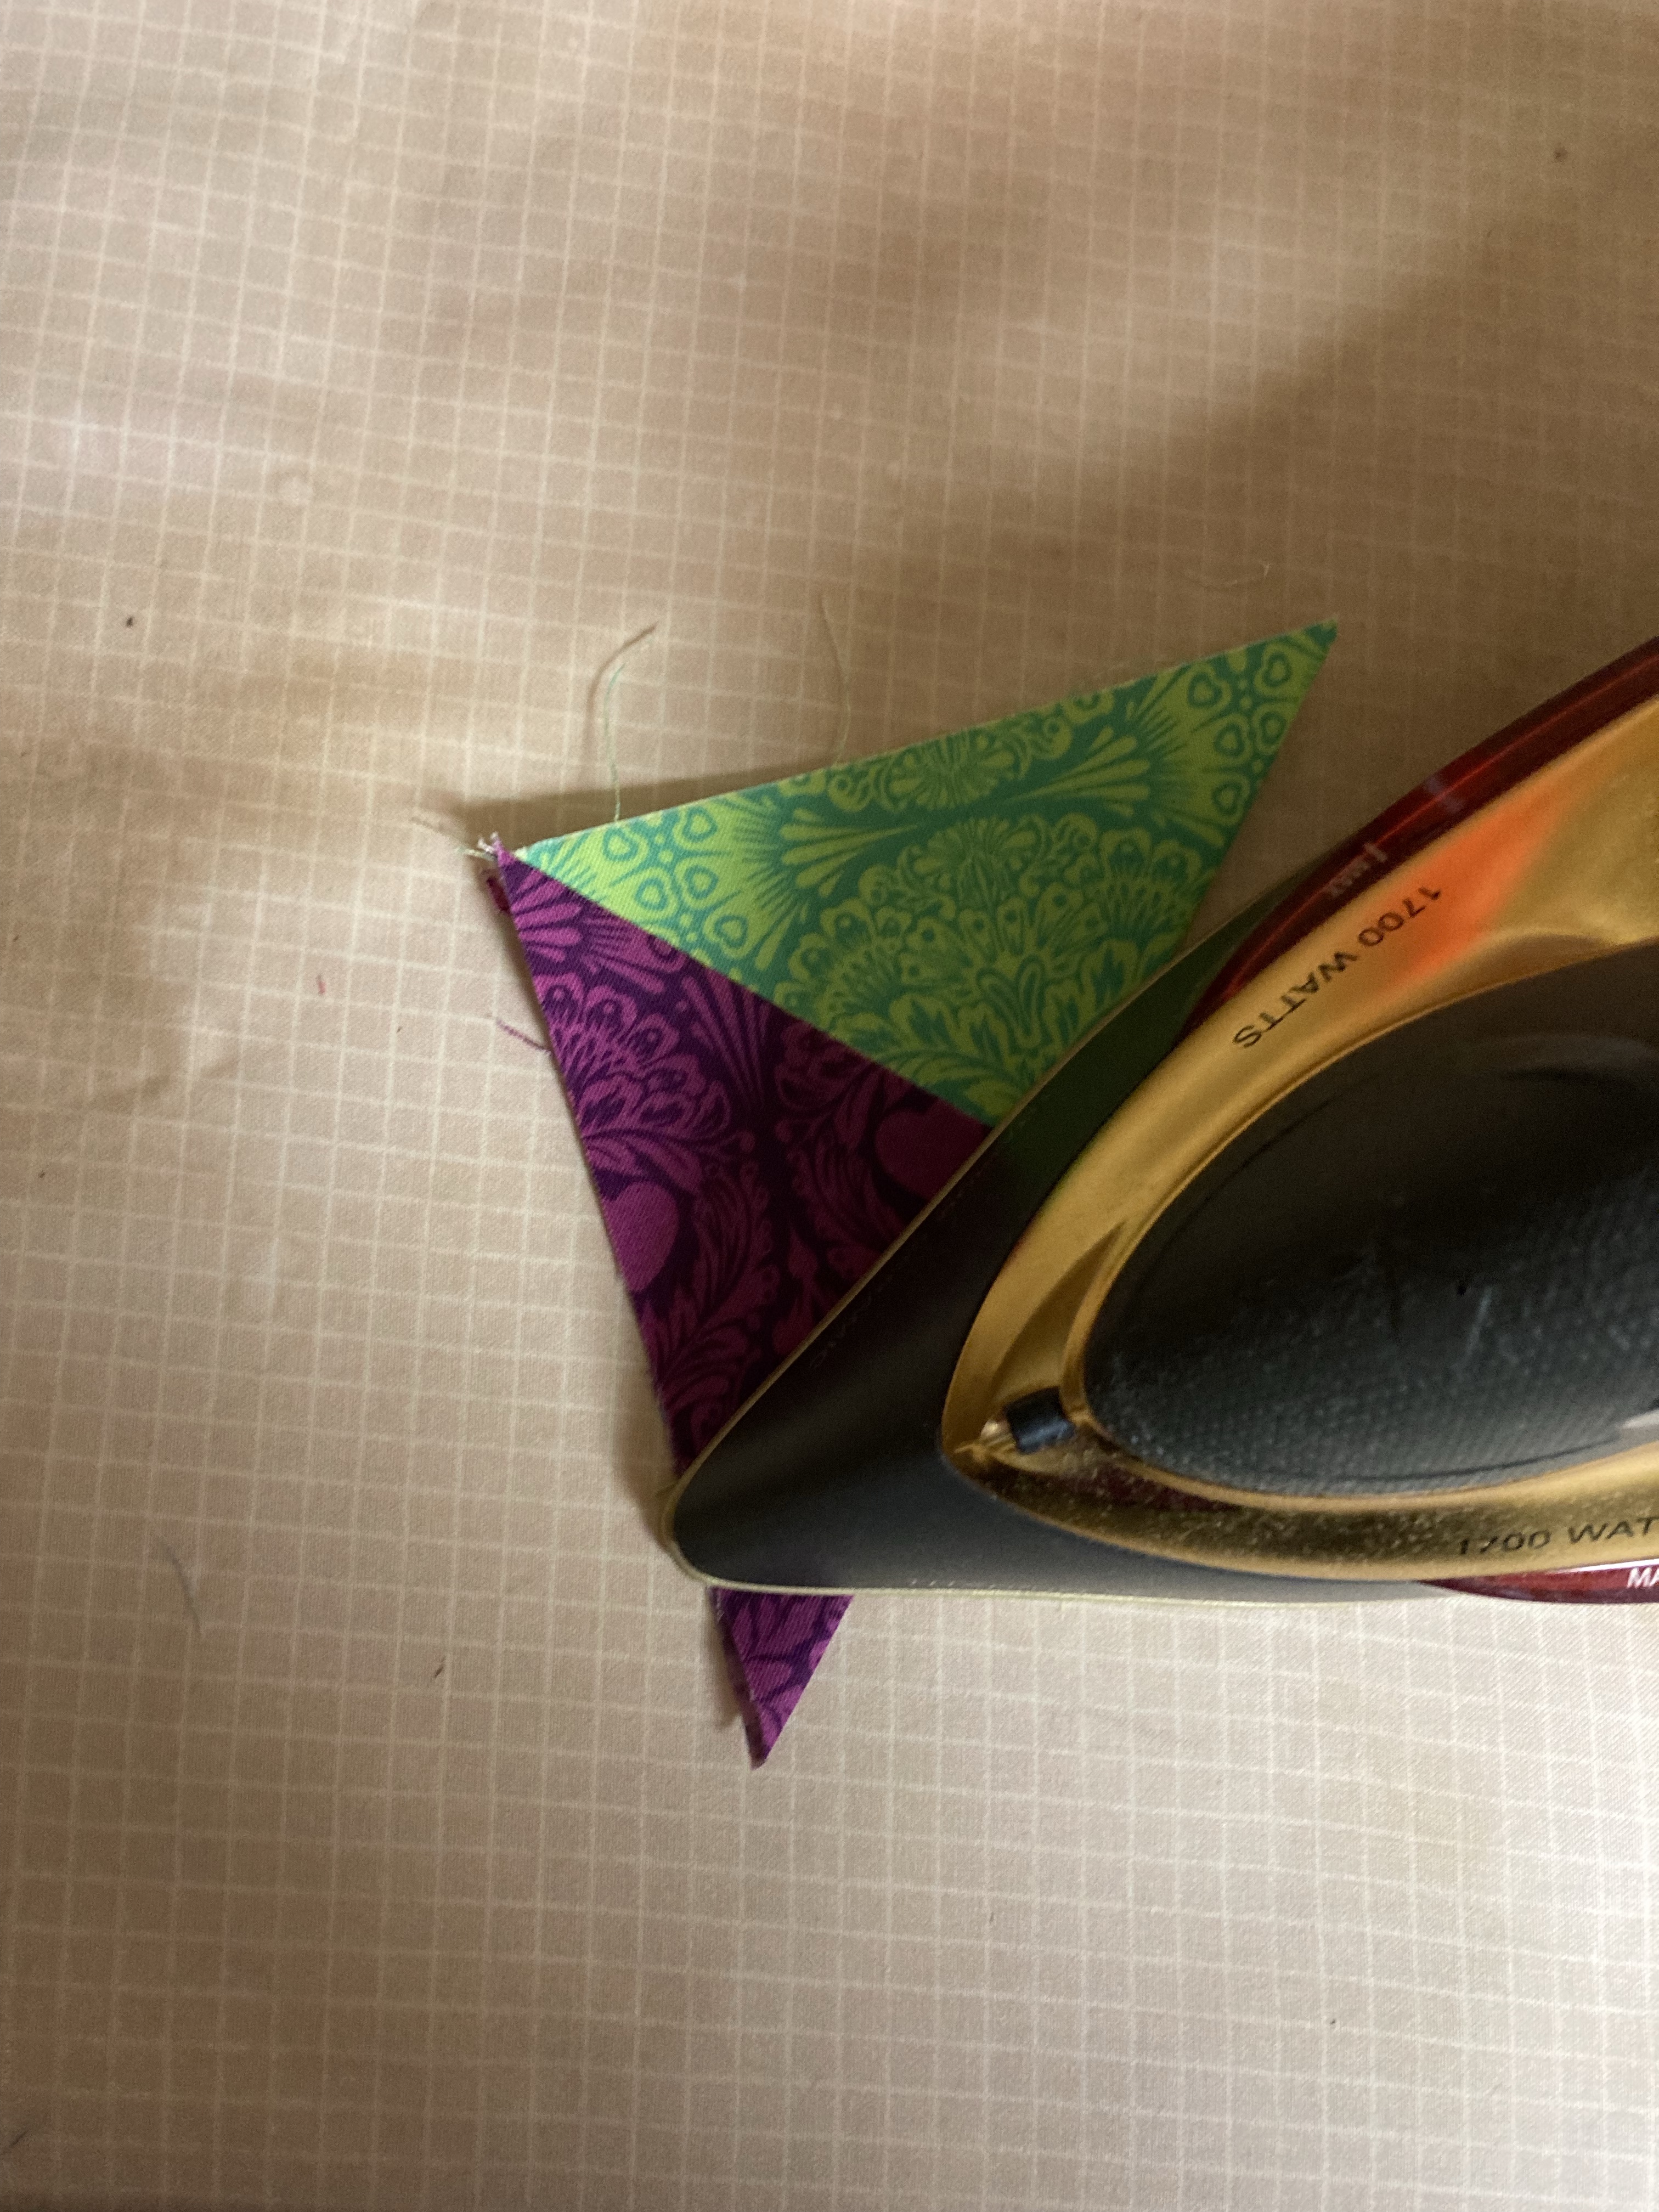
This is one of the MOST crucial steps in the process: starch. So much starch. Fabric is floppy and wiggly and shifty. You cannot trust it to stay put, and we have a lot of little lines to match up here. I use Mary Ellen’s Best Press, and I like it a lot. I spray a generous amount of starch to the back and then flip is over to press. A nice hot iron is key here. You should see some steam rising from the fabric. That is the starch setting. I will often apply another round of starch and press again. You want your fabric to have the feel of thin cardstock. You can see below that I pinched the top of both blocks. The block on the left has not been starched. Look at all the movement. The one on the right is nice and still. Once you have your fabric nice and starched, you can start cutting.
Cutting Your Block
I’ve starched my fabric into the stiffness of a Victorian Aristocrat, so now it’s time to make some cuts. Remember how I said I was adding a .5 inch to the finished block to give myself some wiggle room? This means I have to do some marking before I cut because I don’t have a pretty 5 inch ruler. So I set my 4.5 inch ruler over my fabric and line it up over the part of the motif I wanted centered on the finished block. Then I mark four reference point. Next, I use a different ruler to cut a 5 inch square. I get that’s not pretty/fancy, but I cannot afford to buy a new ruler for each project. Which means, there’s often some creativity/flexibility happening.
I marked a small line on all four sizes as reference pointsI matched the 1/4 inch lines on the ruler with my reference points and cut. Then rotated, repeated, and cut again.
Now I have one pretty 5 inch block, but I need three more. So next I take the block I just cut and line it up on top of the next fabric I want to cut. This next fabric I’m cutting has already been starched. Did I mention how important the starch is? Just checking. I’m trying to get as many points of the motif on the top fabric to match the bottom. After you place your reference fabric on top of the one your cutting, using your fingers to gently slide the top fabric so as much of the pattern matches as possible. IT WON’T BE PERFECT. Fabric moves and stretches as you press and cut. No one will ever look at it as closely as you are now. This is why starch is so important, but it still won’t be perfect. When it’s lined up as best as can be, make your cut.
You can see some places line up a bit better than others. This block is especially hard because there are A LOT of lines to match up. It won’t be perfect. Do the best you can.
Preparing to Sew
I can only get half and quarter square triangles to pattern match when I sew from the top left corner to the bottom right corner. I’m sure someone smarter than me can explain why that is. I’ve just accepted it as fact and don’t fuss with it. Also, this was the point in my tutorial making process where I noticed that my other two fabrics were not big enough to cut my motif at 5 inches. I’m going to have cheat the skull block and that doesn’t make a good example. Thus, with a bit of magic, we’re now making a bee block. Ta dah! What’s fun about the bee block is we only have three color variations, so we’ll also have to pay attention to color placement. We don’t want the two blue fabrics side by side.
Divide your four fabrics into pairs. If you have any fabric that is the same or similar, put them in separate groups. This separation prevents them from being next to each other in the final block.
Since I have two of the same colorways in each group, I need to make sure they don’t end up touching. So in group one, I’ll pick the blue as the top fabric and in group two, I’ll pick it as the bottom. Which ever fabric you’ve picked for your top, fold it in half, wrong sides together, and lay it on the fabric you’ve chosen for the bottom. This lets you see if you’ve folded the top fabric the correct way. Once you have the fold correct, take it back to your ironing board and press it along the diagonal.
I also like to do a quick check of how it’s going to look finished. Before sewing anything I fold one of the blocks a second time and put them all together to get a feel for the finished product. Feel free to rearrange your fabric until you like what you see. This part can feel it bit confusing. It takes some practice to fold the fabric in such a way that it matches. Give yourself some space to play and practice. It’s the only way to learn. It’s also helpful to take a pictures of your arrangement so you don’t get turned around on the last step.
Notice that none of image lines up well here. I’m only trying to get an idea of what colors will end up where in the final block.
Here’s where we get to the actual pattern matching. Take the triangle you’ve made by pressing the square along the diagonal and put some water soluble glue on the side that will become the seam allowance (check out the picture if this seems confusing). Place the piece with the glue on top of your bottom square. Using the same process as you did when you cut, slide the top fabric until it matches the bottom as best it can. I learned about glue basing from Bobbi who you can find on Instagram @geekybobbin or you can check out her blog here.
Here is the block glued together and ready for sewingNotice that I’m applying glue to the “wrong side” of the triagnle
Repeat the process of pressing the top fabric in your second group along the diagonal and gluing.
Time For Sewing
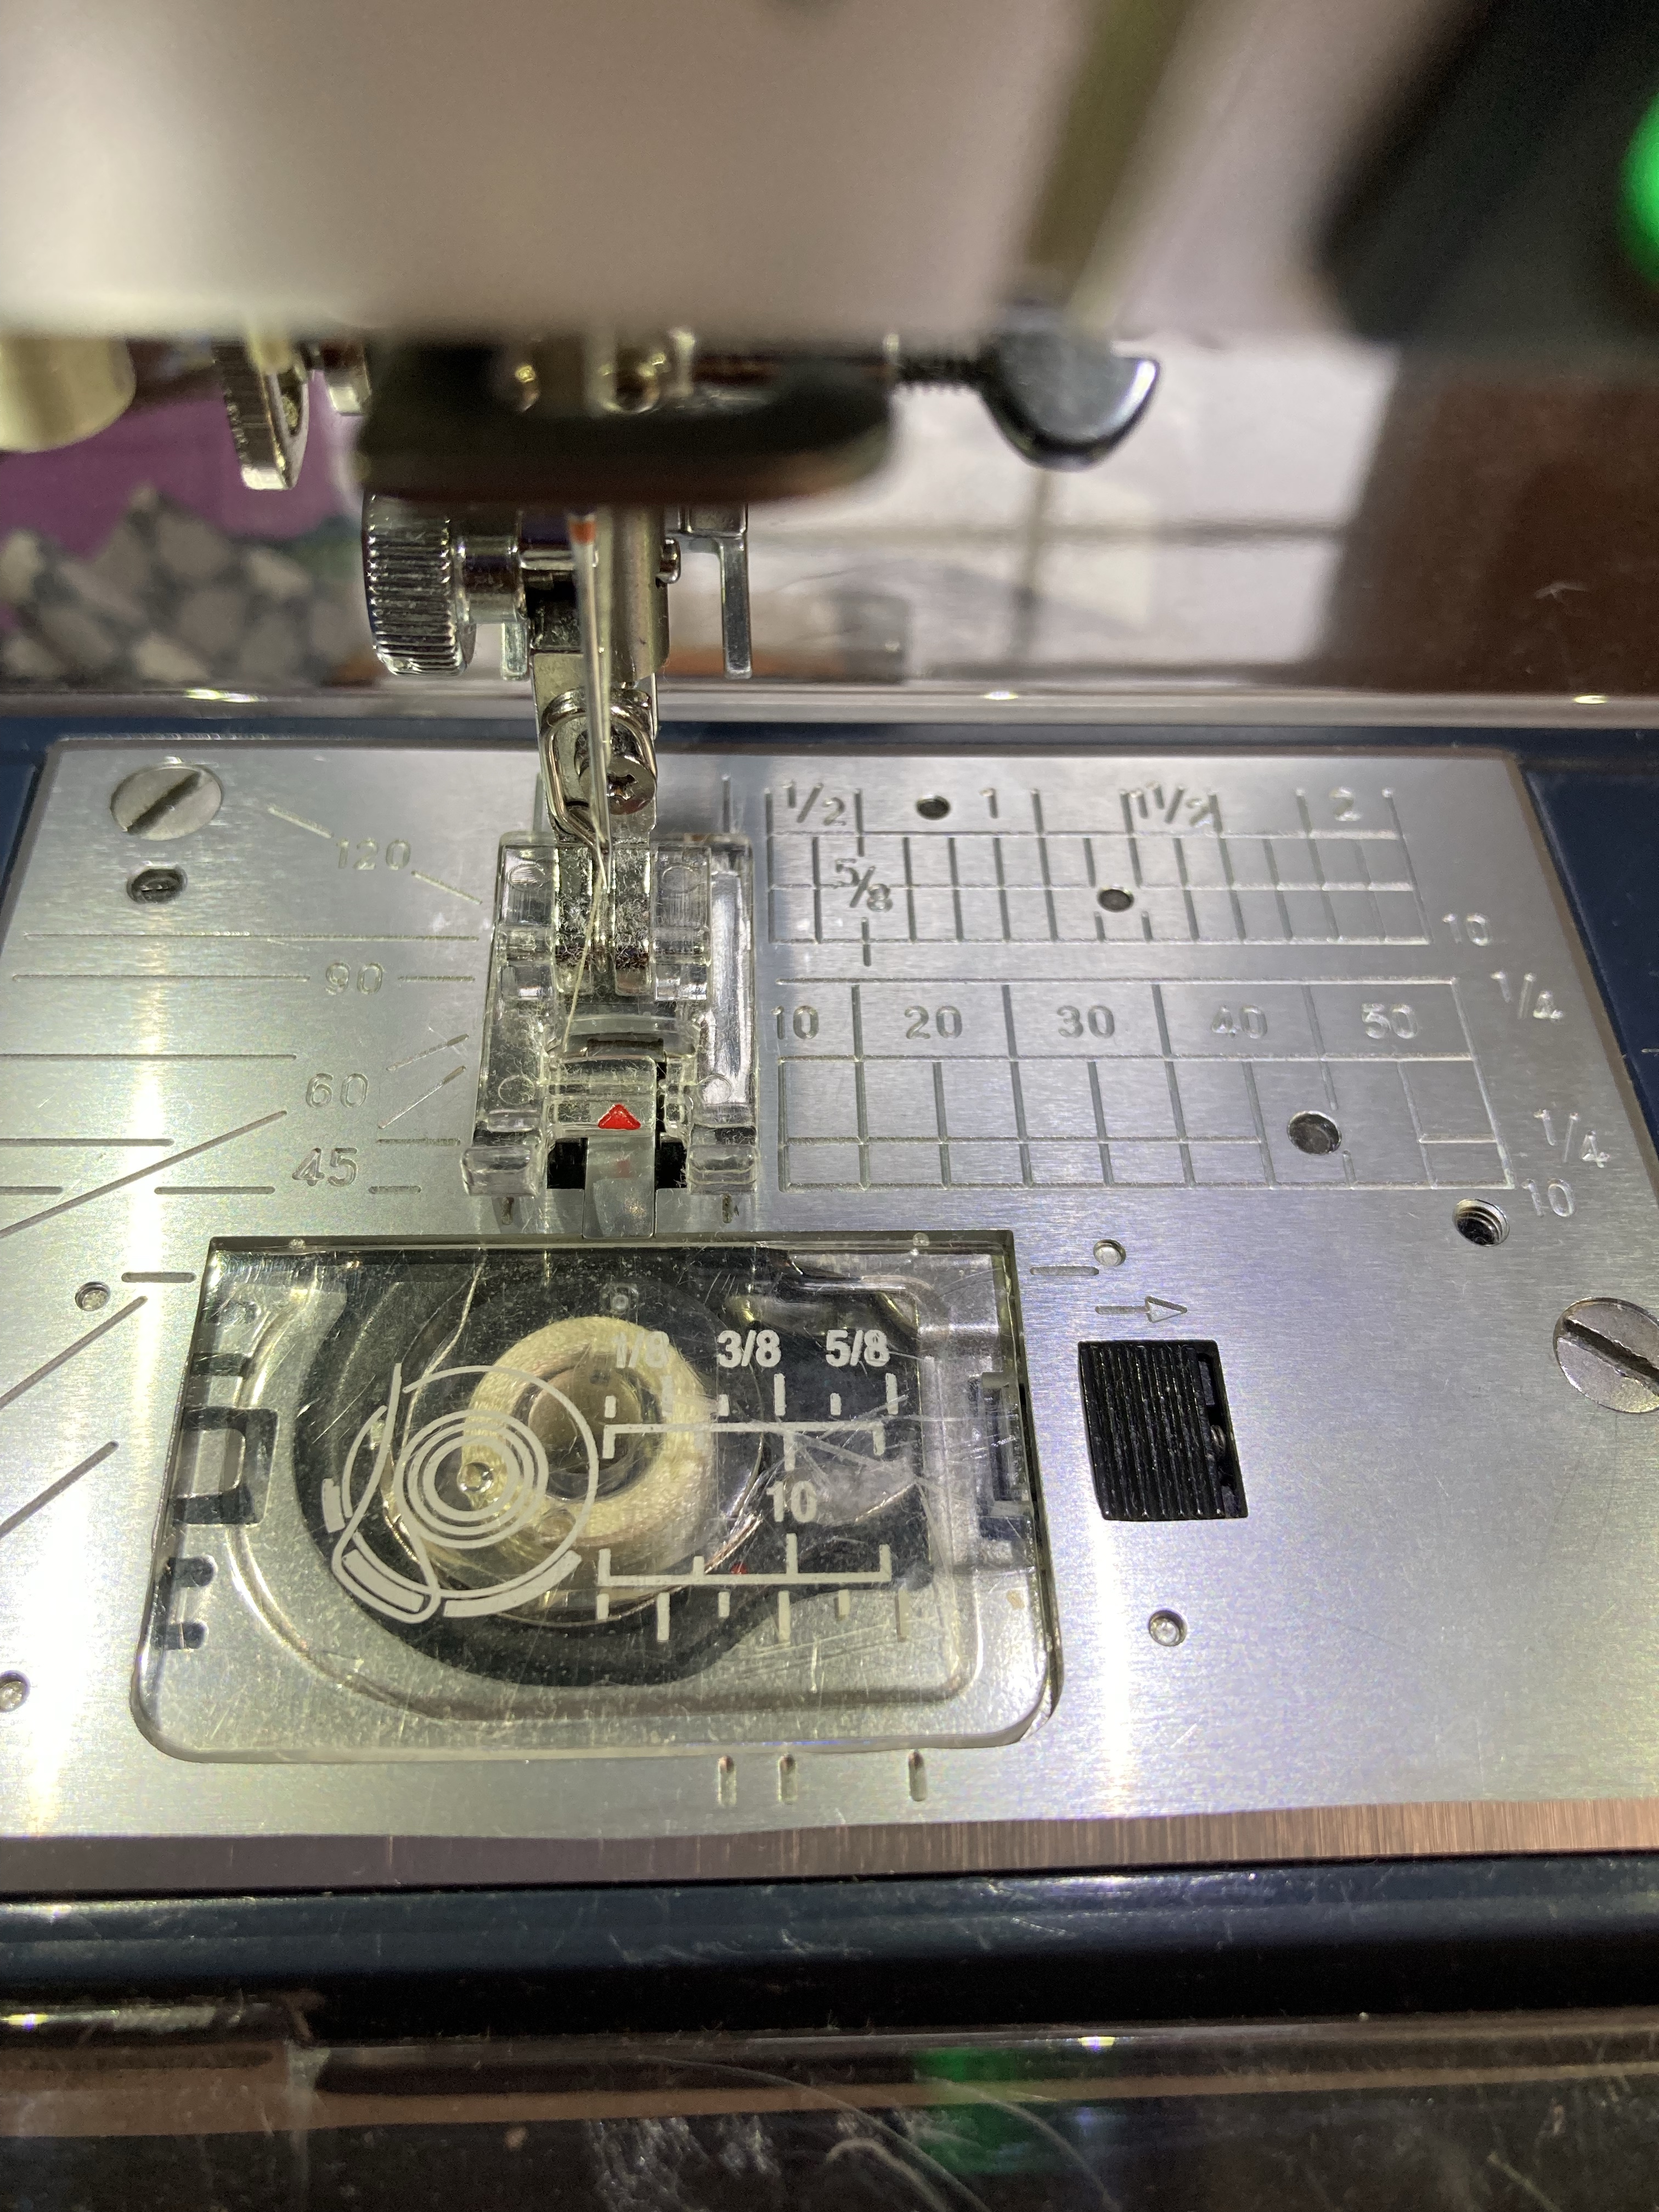
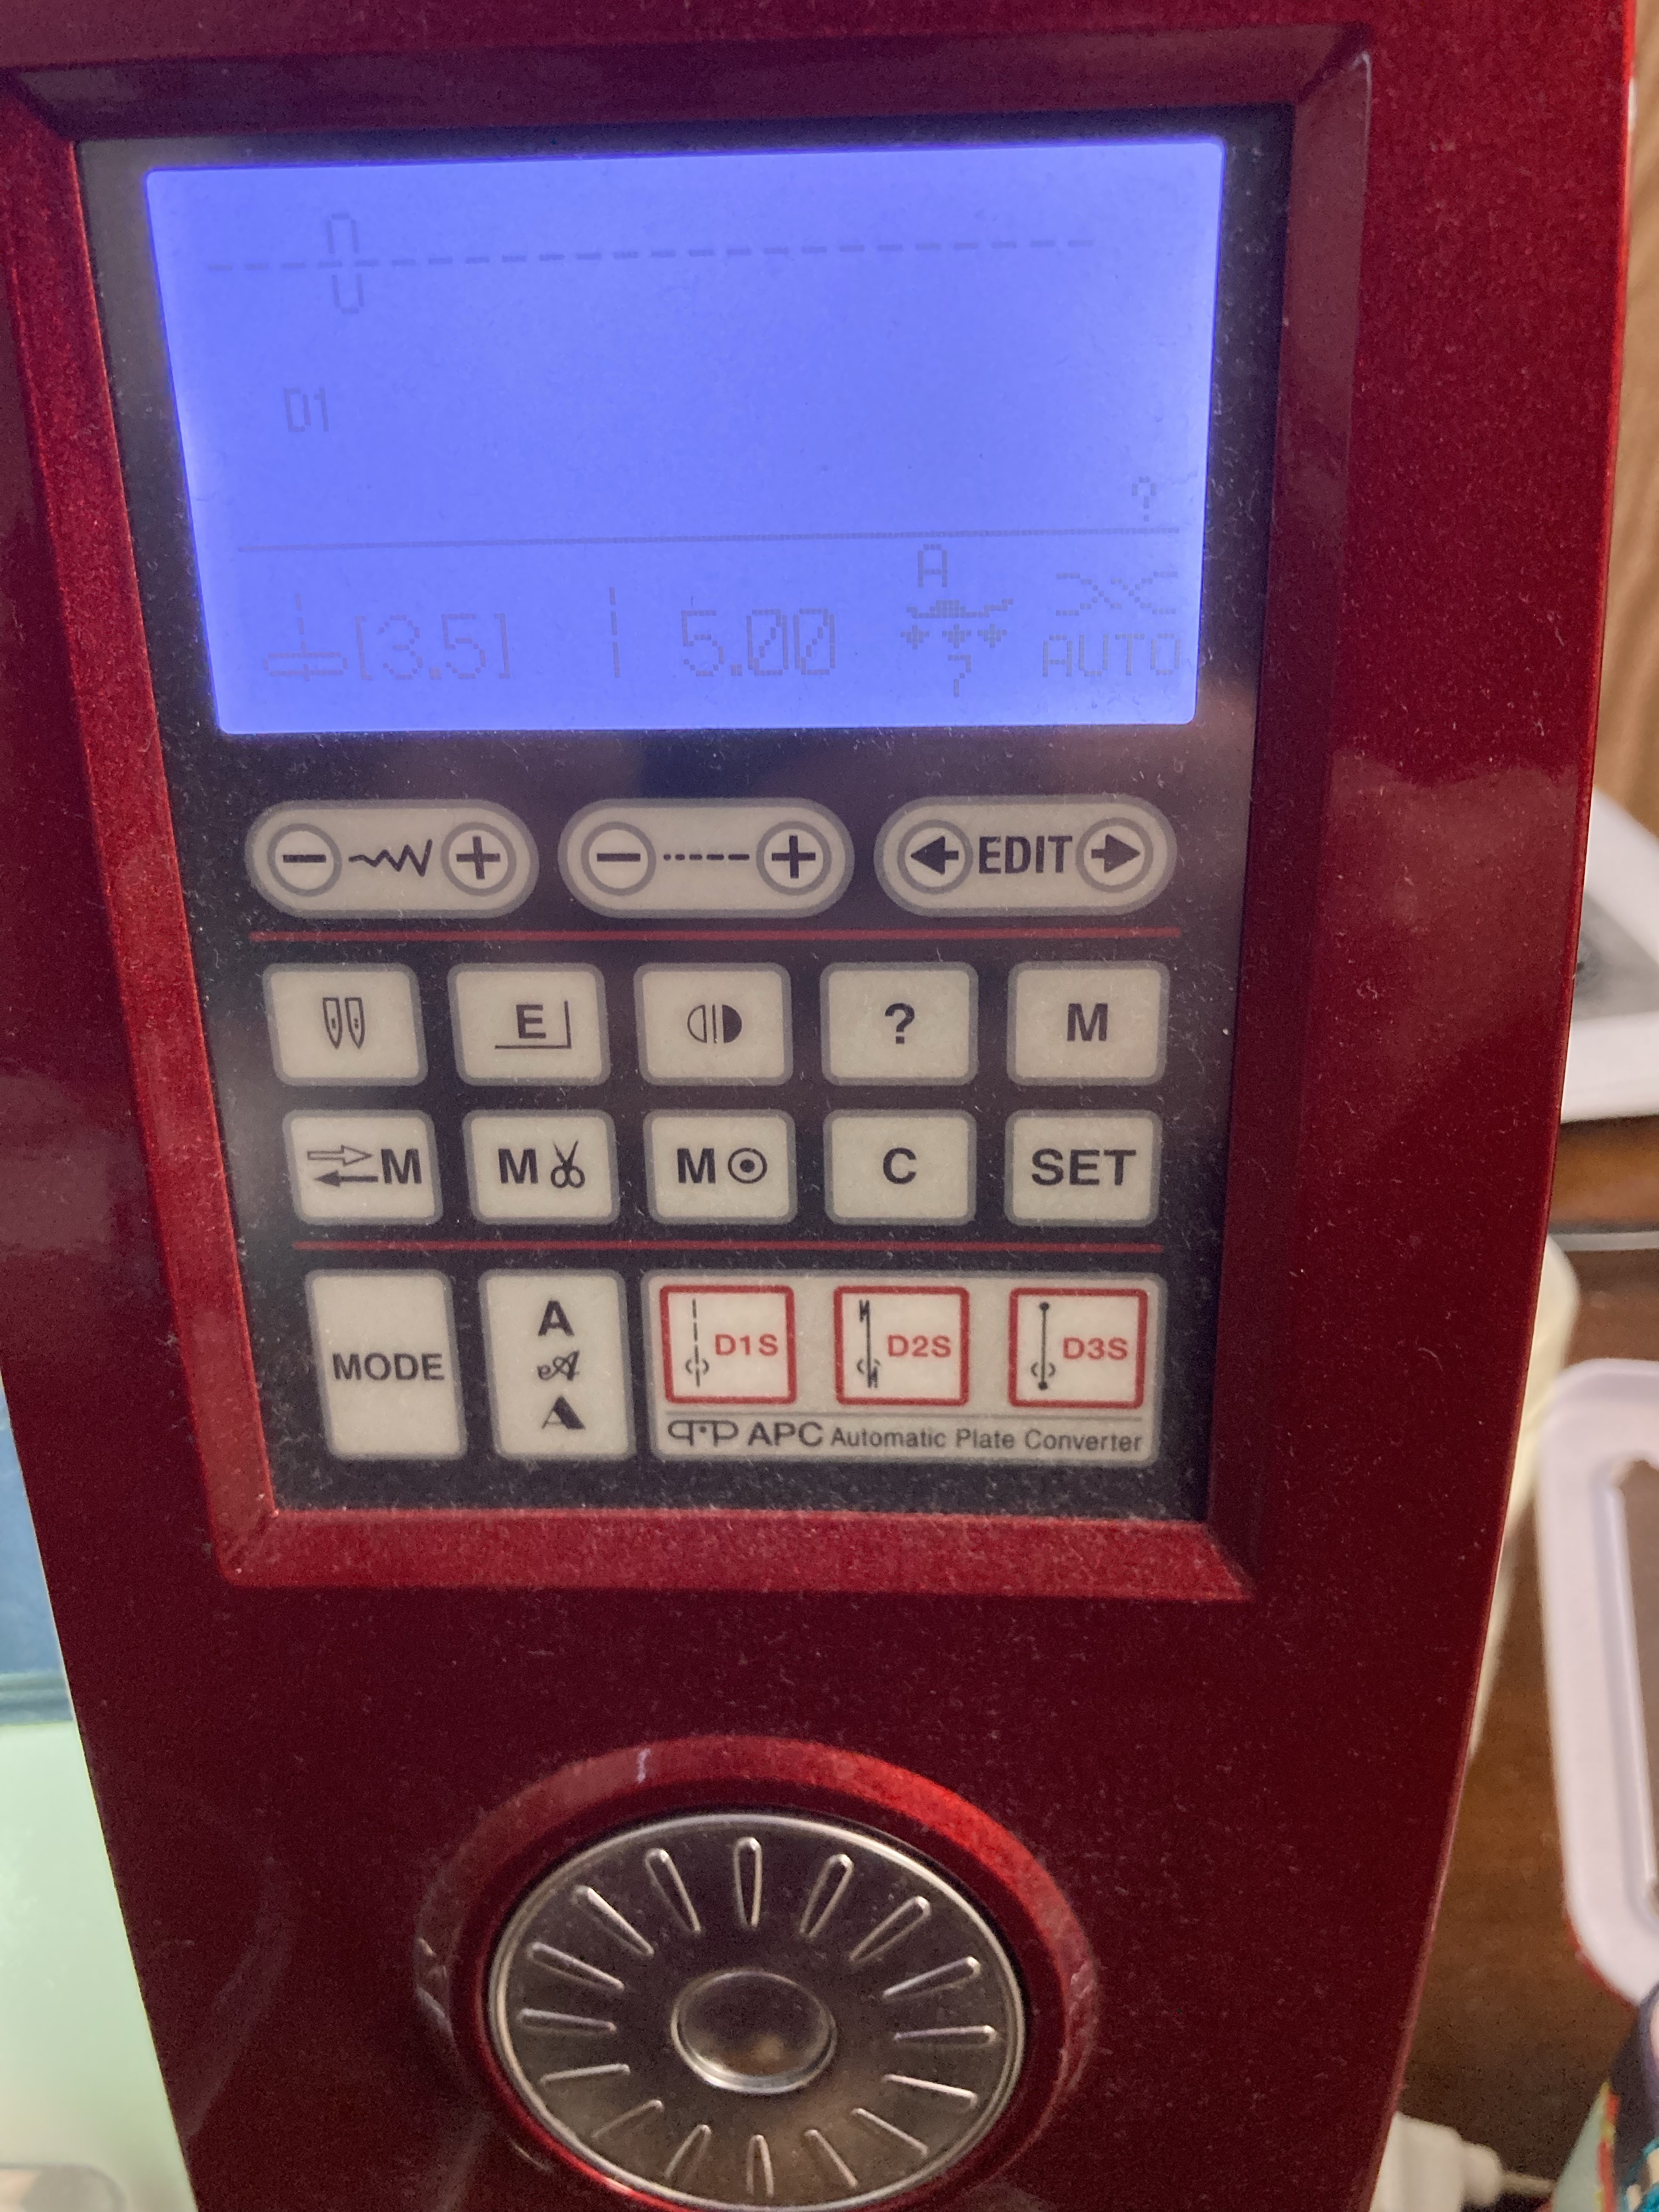
There are some masters of sewing who can fold back their top block, sew right on the fold, and get a delightfully matched block each time. I am not that master. So I need extra help. To do that I picked a sewing foot that shows me right where my needle is going to hit. Then, I set my machine to it’s biggest stich and baste the pieces together. Why yes, that’s right, I baste with glue AND thread when I’m pattern matching half and quarter square triangles. Sewing on the bias is tricky and some patterns have more lines to match than others. Using a basting stich first makes the need to rip and redo feel like a normal part of my process rather than a failure. (Remember what Big Bird said?) I learned about using a basting stitch from Lou who is on Instagram as @sand_salt_sew
Can you see the little red arrow that shows me where to sew?The 5.0 on the machine is the stich length. Here is the fold that I’m going to sew down. I will also go over it with a marking tool to see the line better.
If things line up, I do happy dance and move on. If they don’t, I scowl at no one and try again. This is also when I remind myself that finished is better than perfect. I’m not making a show quilt, and likely no one will every look this closely at the block ever again. Sometimes I need to look at it from a distance to reassure myself that the match is enough. If I’m keeping it, it reset my stitch length and sew over the basted line. Then I repeat the sewing processing with the second block. For this block, I didn’t like my first attempt, so I redid it. You can see both blocks
I rejected this attempt because the lines were a bit off. I kept this attempt. It was close enough for me.
When I have two block sewn together that I am satisfied with, I check a zillon times to make sure it’s right and then trim off the excess and press the block open. BE GENTLE WHEN YOU PRESS. The starch reduces the amount of shifting, but you’re still on the bias and have one seam to go.
Don’t forget to double check you’re cutting on the correct side.
Time to repeat: fold, press, glue baste, thread baste, check, sew the seam, check x 100 and trim. When I reach the glue basting step, I check to make sure my seams are nesting and that the pattern matches in the center where the seams are nesting together. You can see on the block below I did not check and the center is a bit off. Being a bit off isn’t the end of the world, and I like to try my best where I can.
Look at the center of the block. See how the seams don’t match, but the pattern does? Also, look at how wonky the edges are. This why I add that extra .5 inch for trim space.
I didn’t take as many pictures of this step when I was making the bee, so I took some when I went back and finished the skull block. Here they are:
fold your top piece in half and presapply glue to the wrong sideLine up the two piecesSew on the diagonal with a basting stitch.
You did it! Congratulations! If yours is anything like mine, the edges are a little wonky. Time to square it up. Here is where I love my little 4.5 ruler because is has pretty lines I can use to keep my motif centered. If you don’t have that, you can use the diagonal line on any square ruler and use whatever half of your block is (in this case 2.25 inches) as a center line. Then trim to 4.5 inches.
TA-DAH! You did it! Great job!
PS I’ve been actively practicing my pattern matching skills for about five years now. If this is your first time, give yourself permission to be a beginner. This is advanced sewing. Also, these techniques cannot be applied to sewing together rectangles and squares without making some adjustments. When you sew triangles, you want two squares that are exactly the same because you’re sewing on the diagonal. When you’re sewing straight pieces together, you need to adjust what you consider seam allowance to allow the patterns to match correctly. I made tutorial for that years ago…you can see my growth because I didn’t even start by having you starch your fabric. Rookie move.
PPS I hate the waste that comes from sewing half and quarter square triangles one at a time so I sew together the bits I trim off. Sometimes my seams are so good I end up with two bonus 4.5 inch blocks and a 3.5 inch block. On this block my seams were wonky so I ended up with two 4 inch blocks and 3 inch block. Happy Sewing!
Bobbi of @geekybobbin is one of my favorite Instagrammers! She recently posted about #ufovember, a time to go through the pile of incomplete or set aside projects to decide if they need to be restarted, reworked, or rehomed. I’ve been working my way through my pile already, but I thought I’d take her up on the challenge to go through all the places I keep UFOs (unfinished objects) to see if there were any missing and to decide what I want to do with them. These are listed in the order I found them.
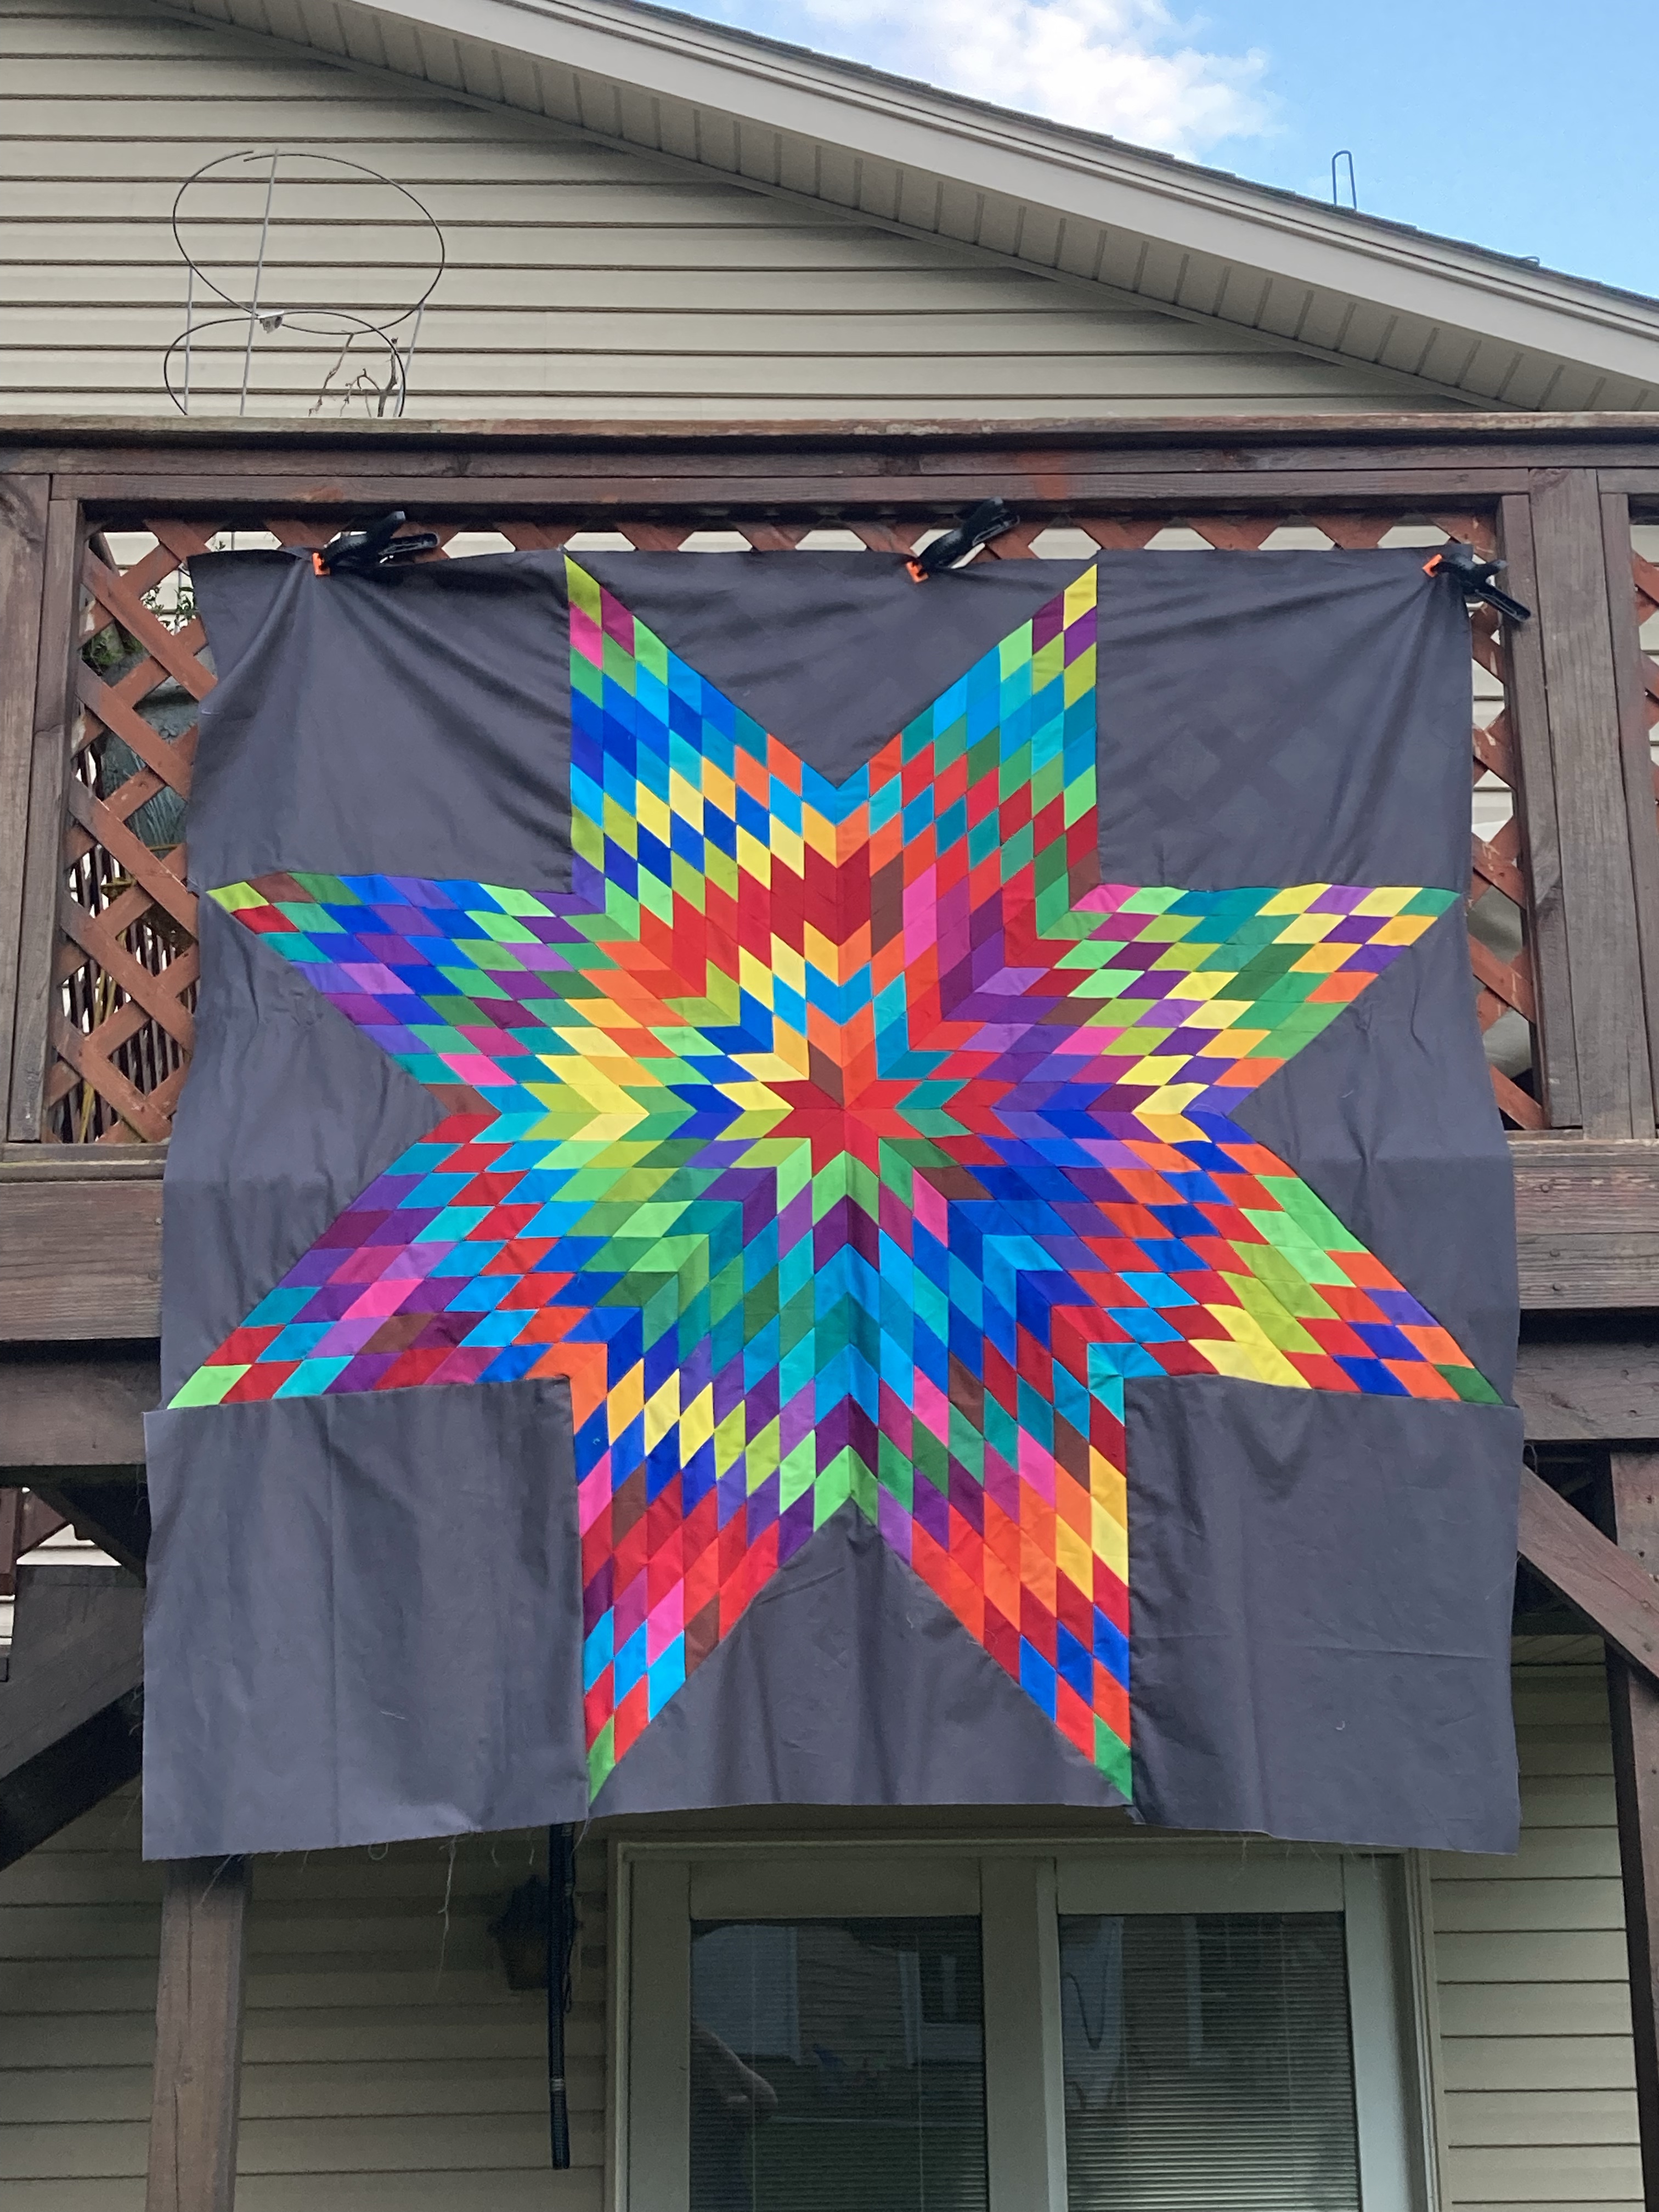
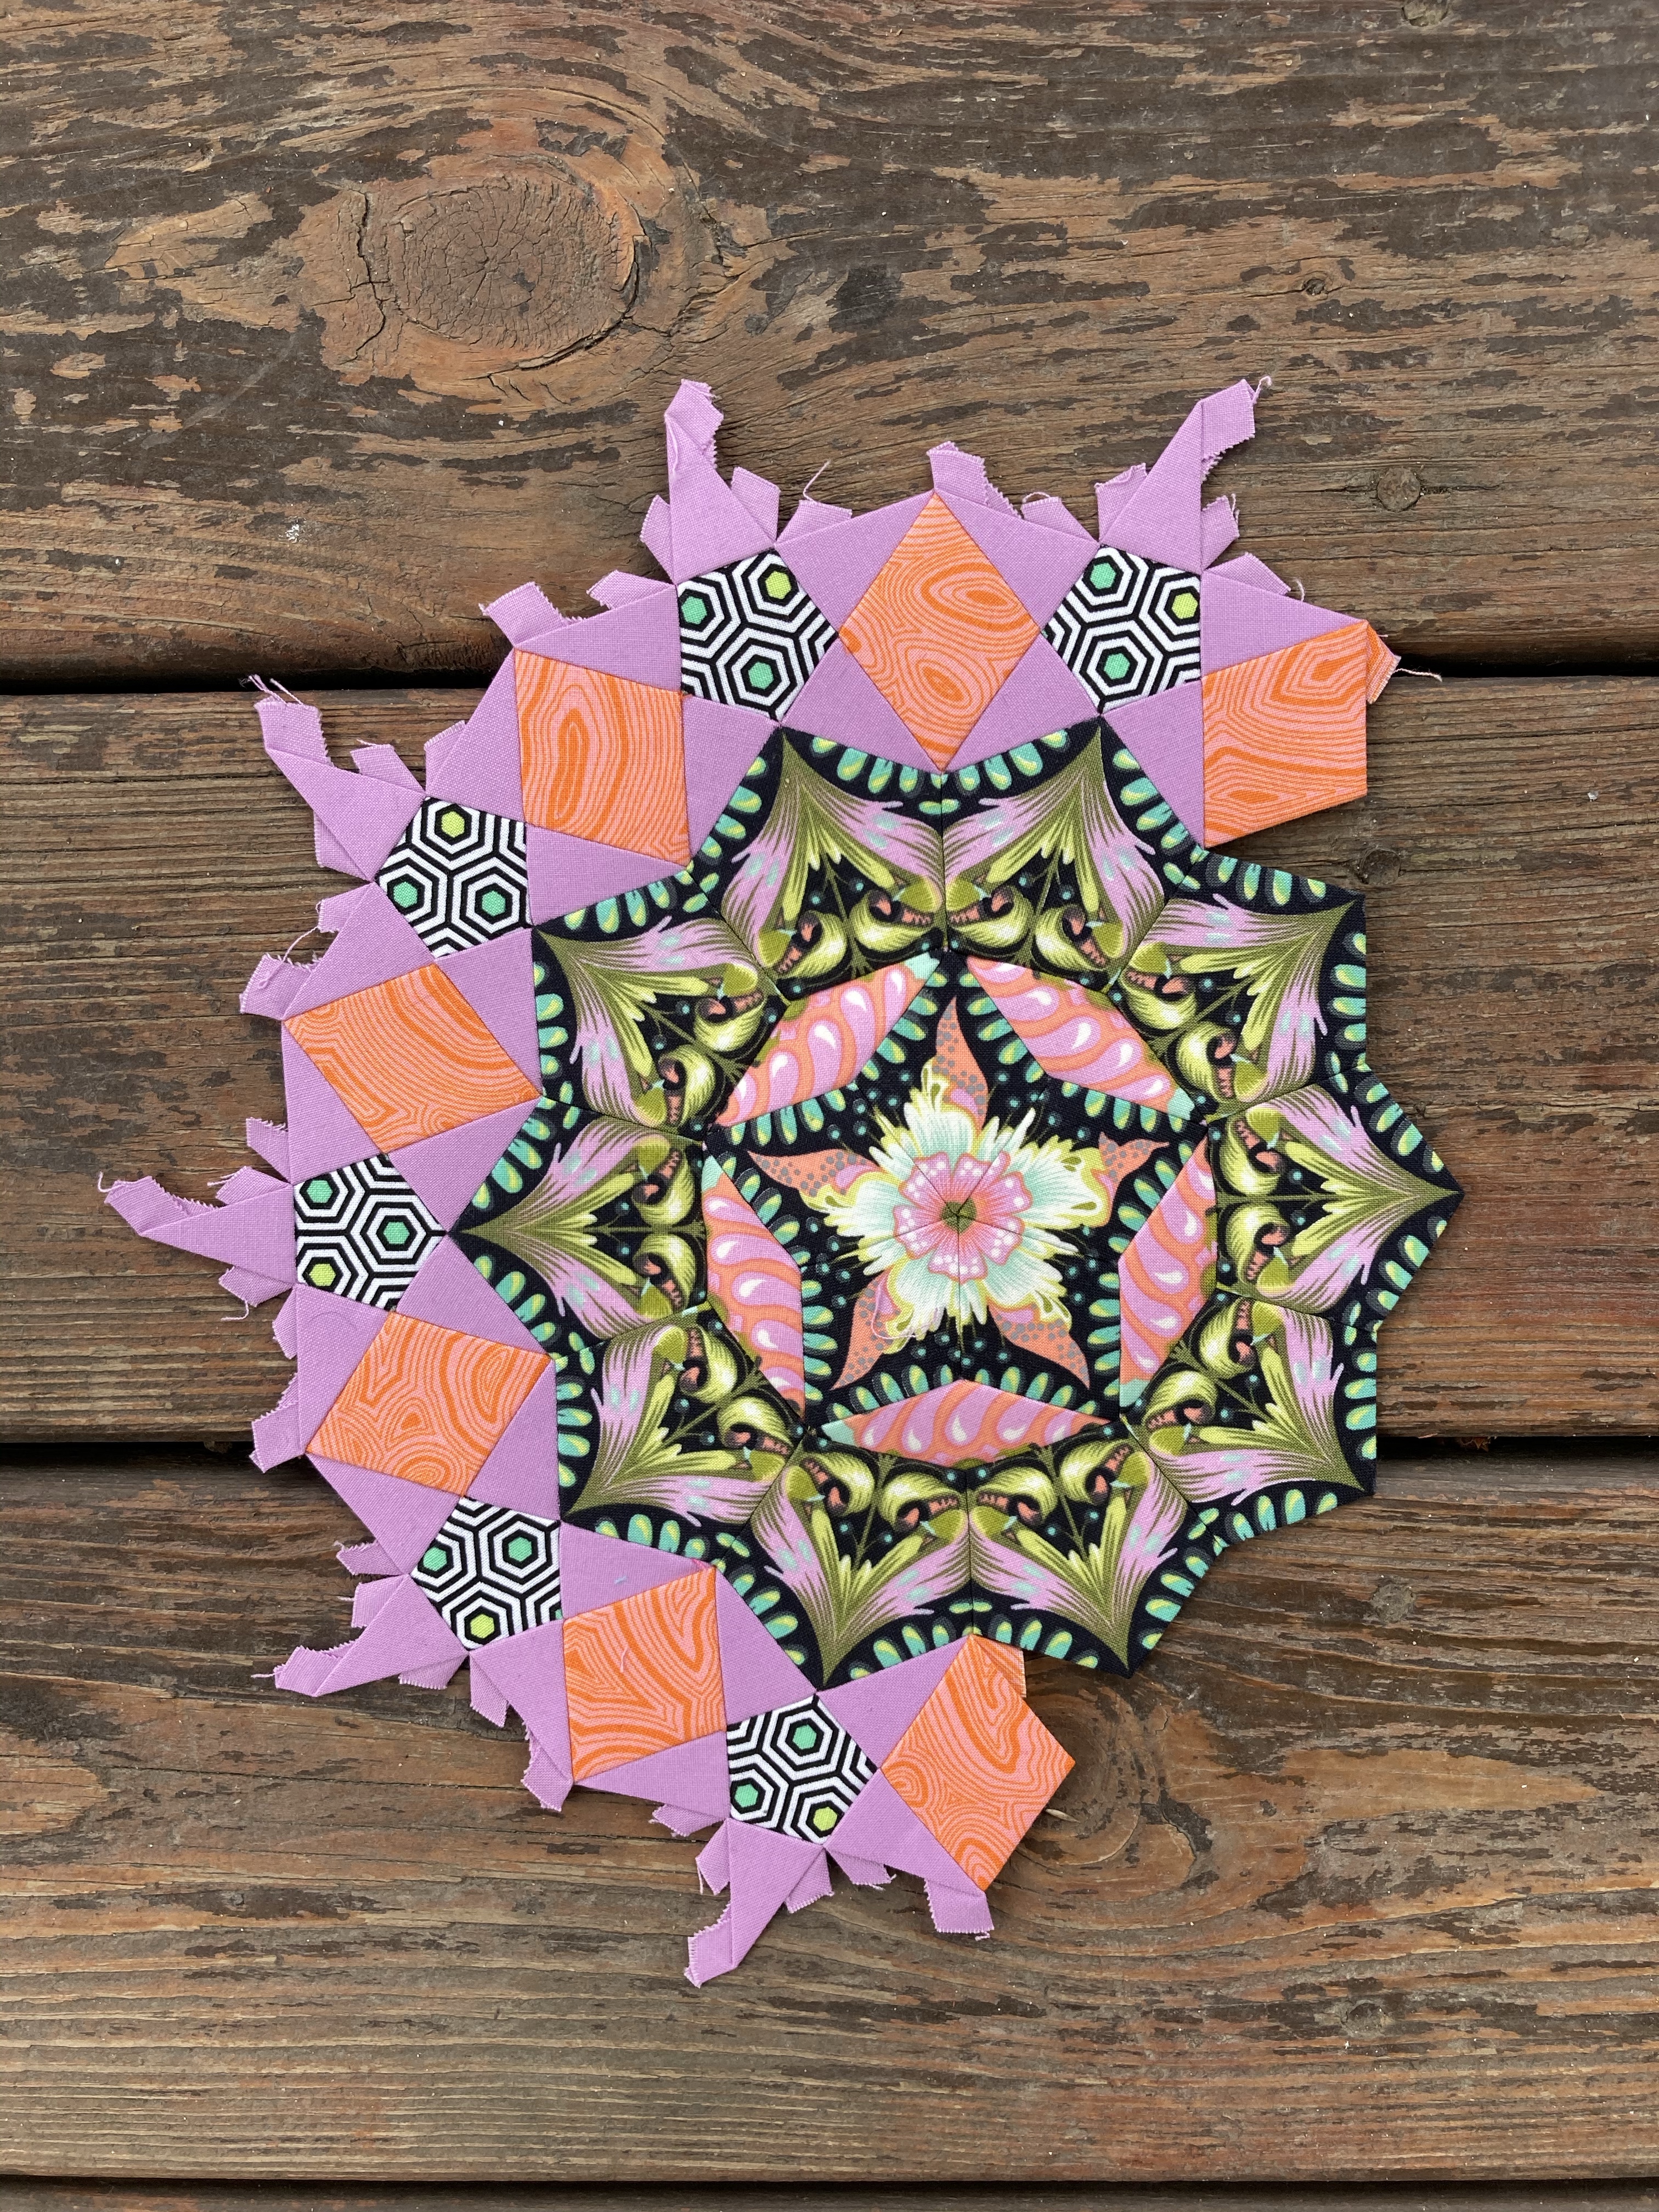
Lone Star Quilt
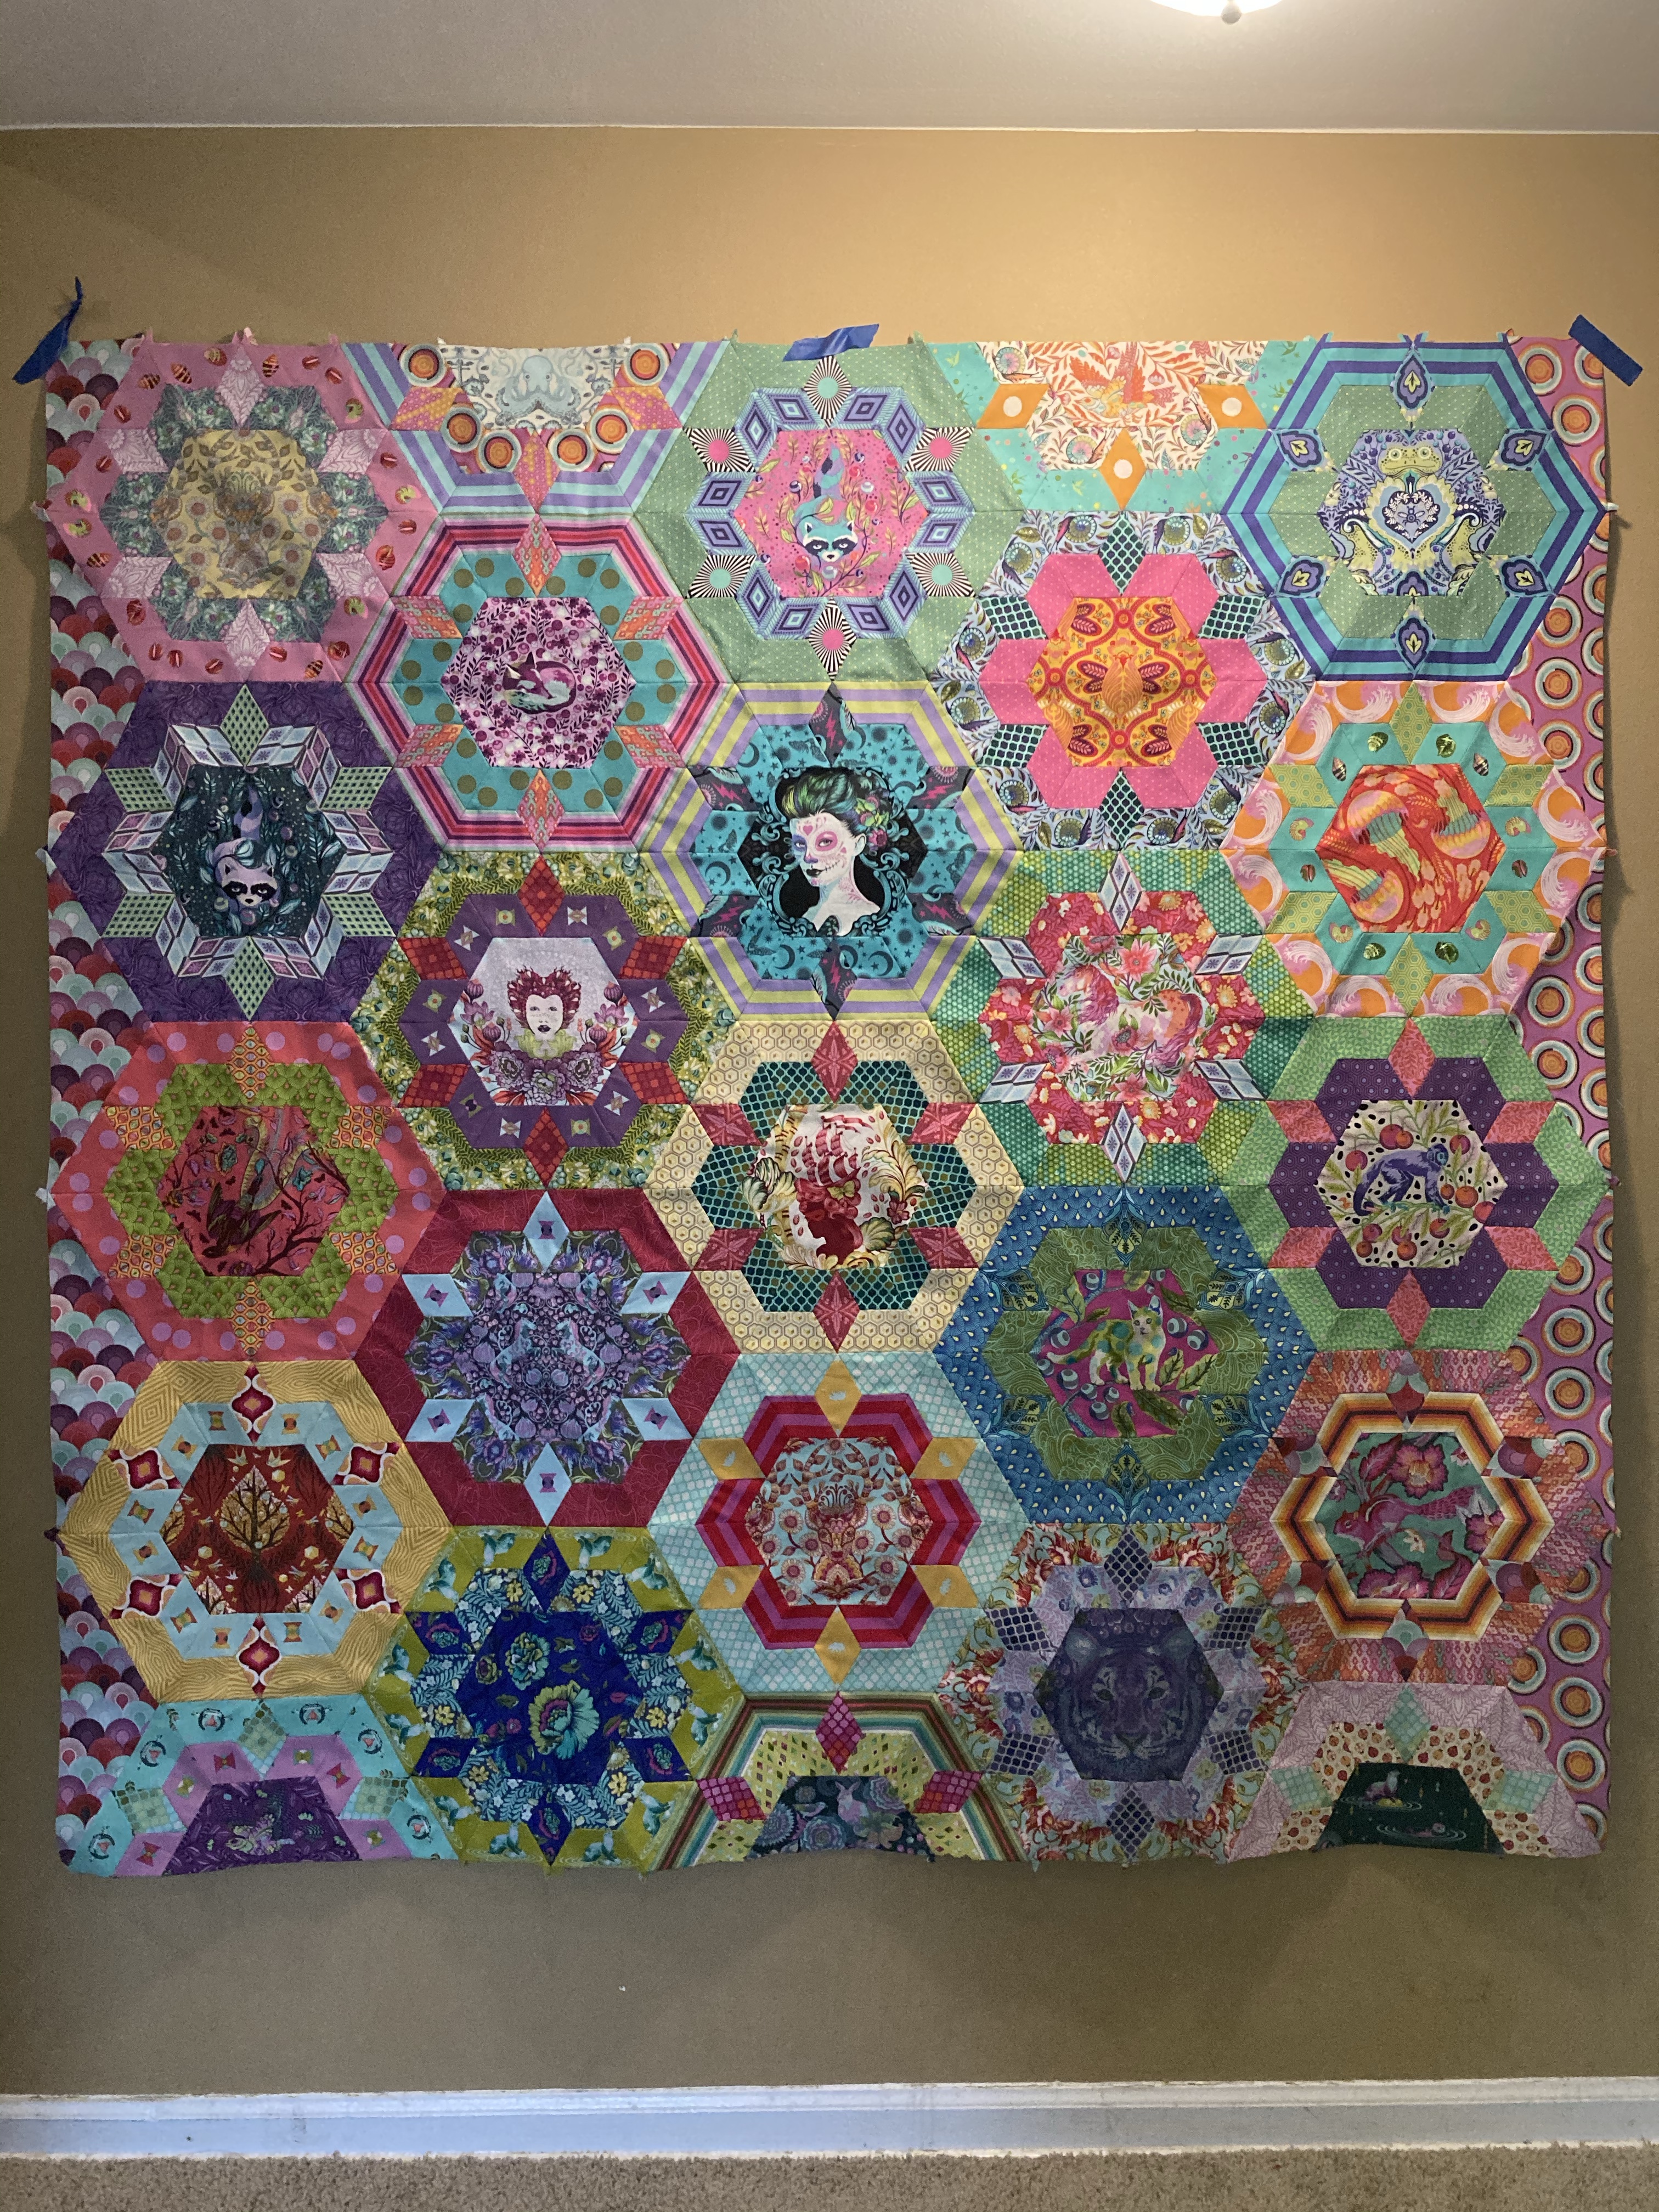
I’ve wanted to make this style of quilt for awhile now, and I decided to do it using English Paper Piecing instead of machine piecing. I am very pleased with how it has turned out so far, but I’m stuck on how to finish. Right now it’s about 63 inches x 63 inches and I don’t like those dimensions. I want it to be bigger and less square, but I’m not sure how to make that happen. I also saw someone who did a colored stripe in the border, and I thought it would be interesting to mix some of the colors into borders. The problem is that I am almost completely out of the fabric I used for the star, and I don’t want to buy cuts of fabric when what I need is scraps.
WHAT I NEED TO FINISH: Solve the borders problem and then buy backing/binding
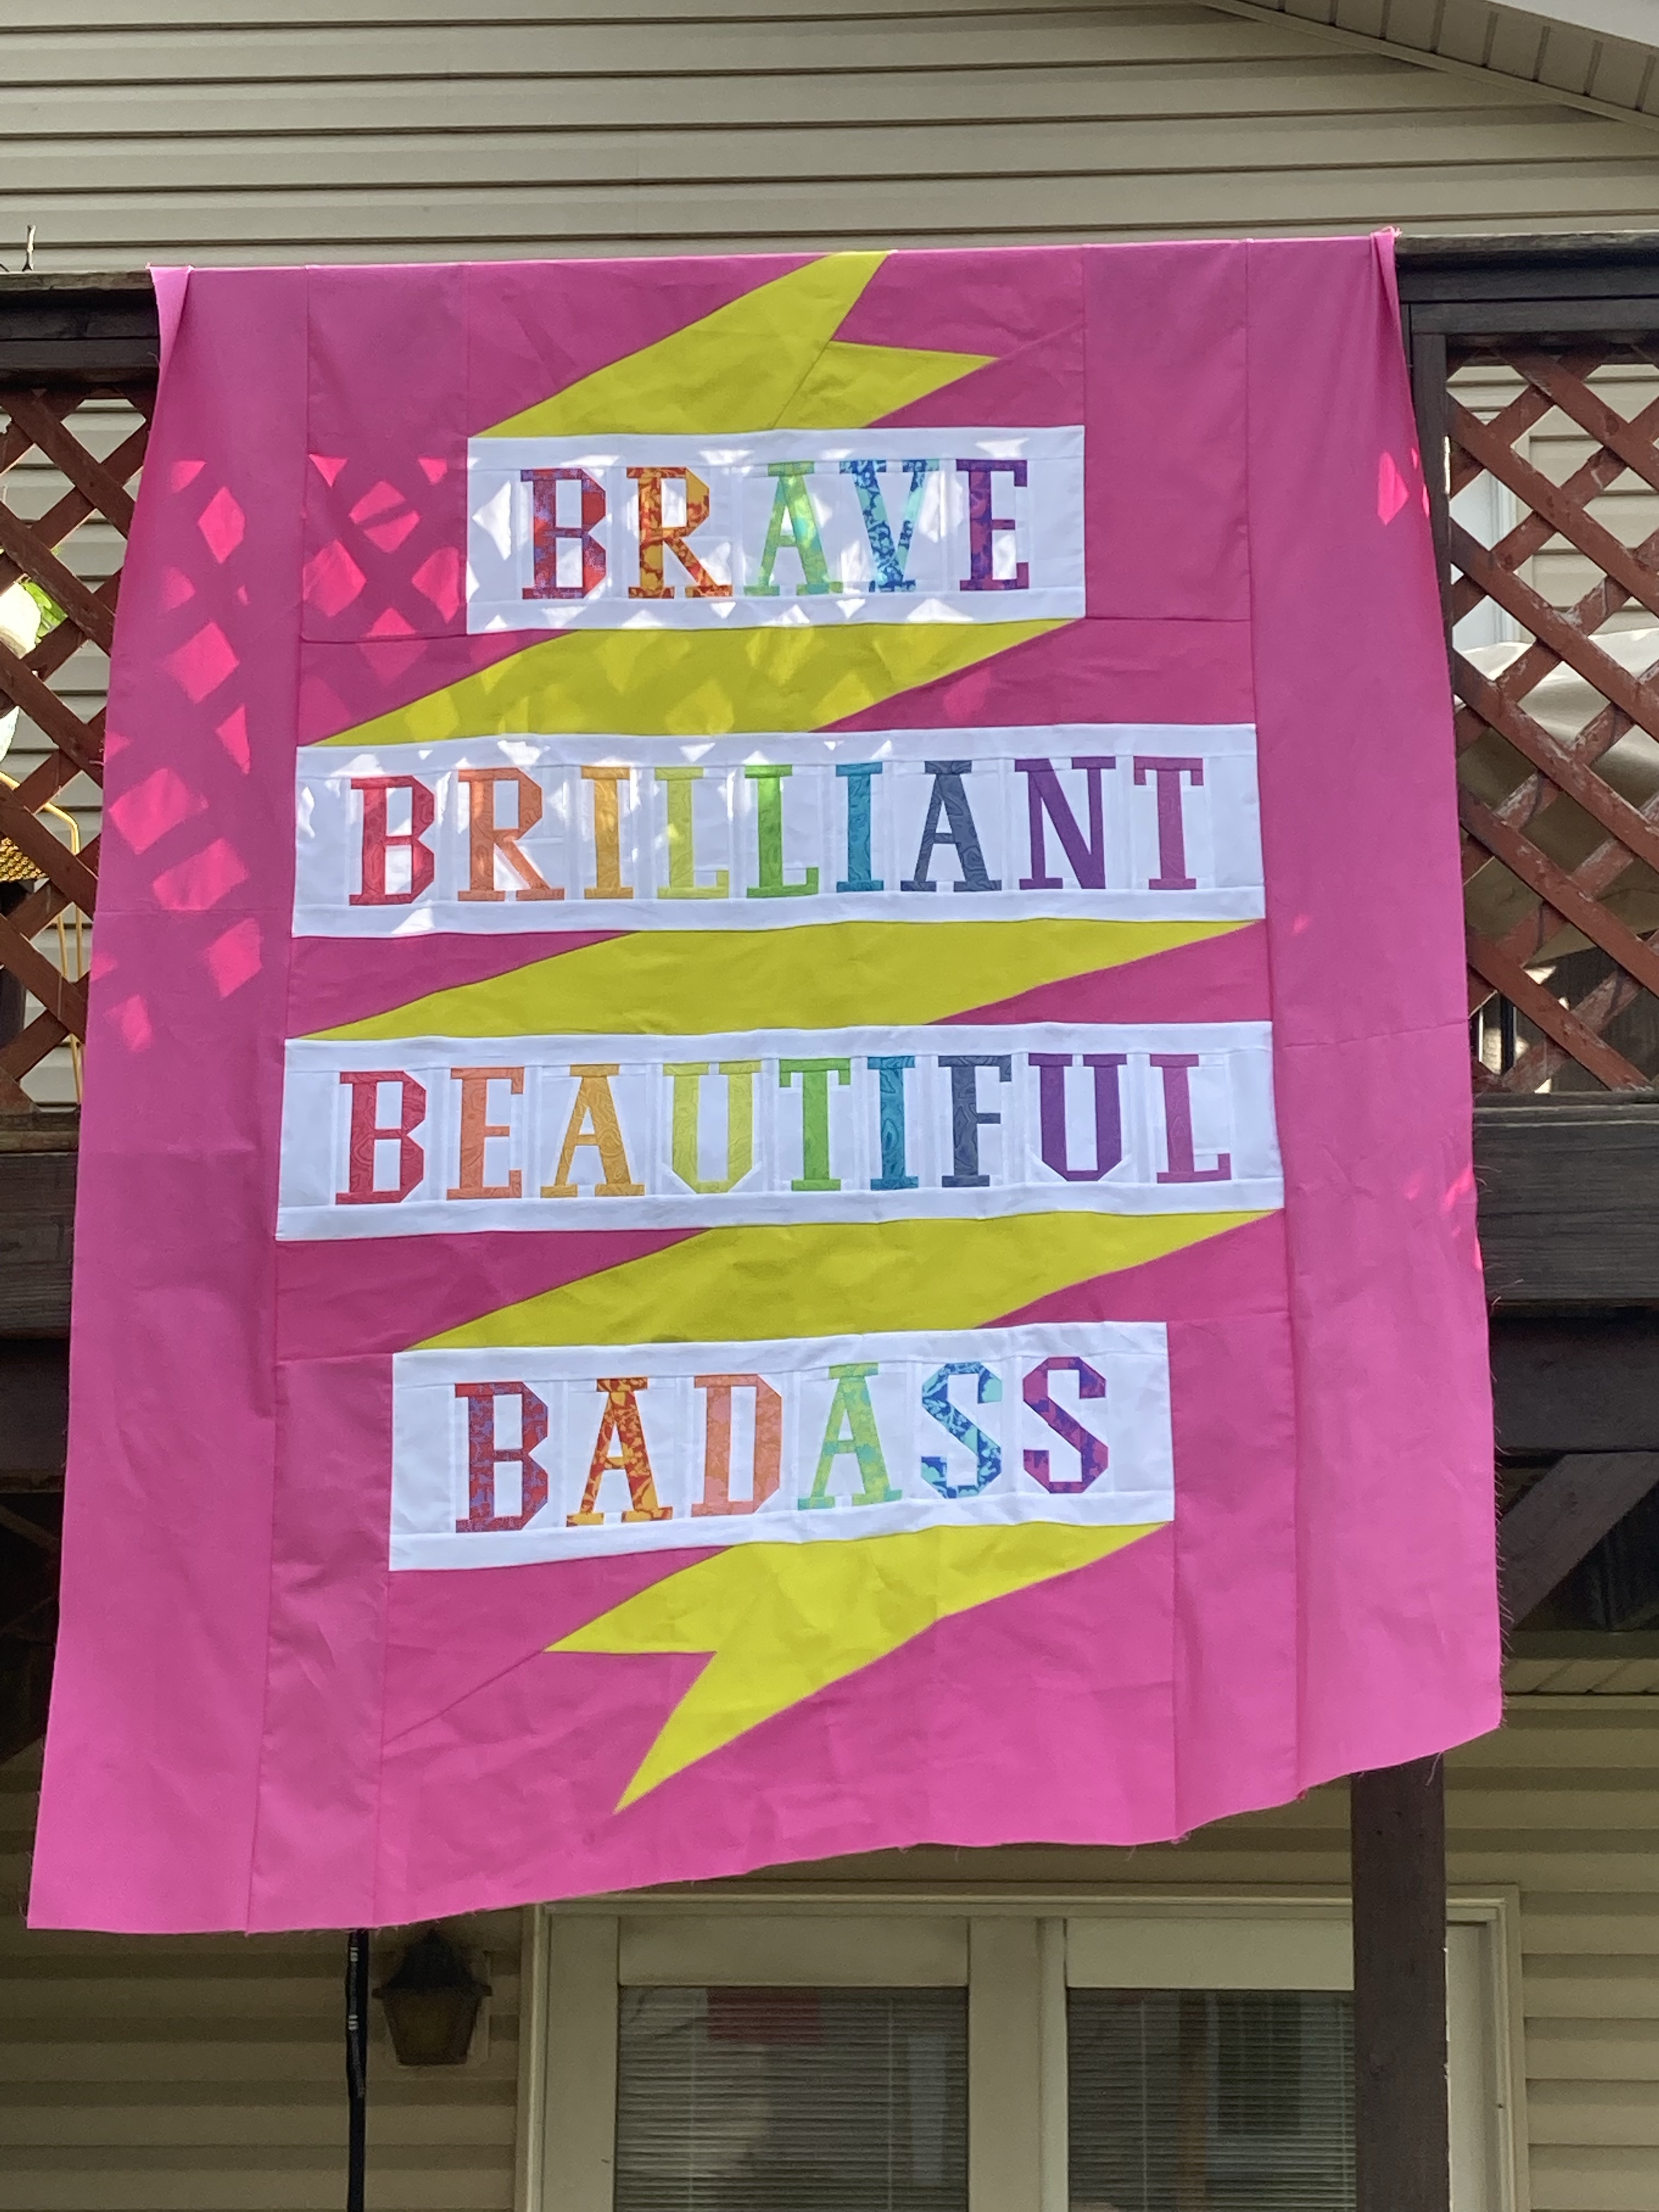
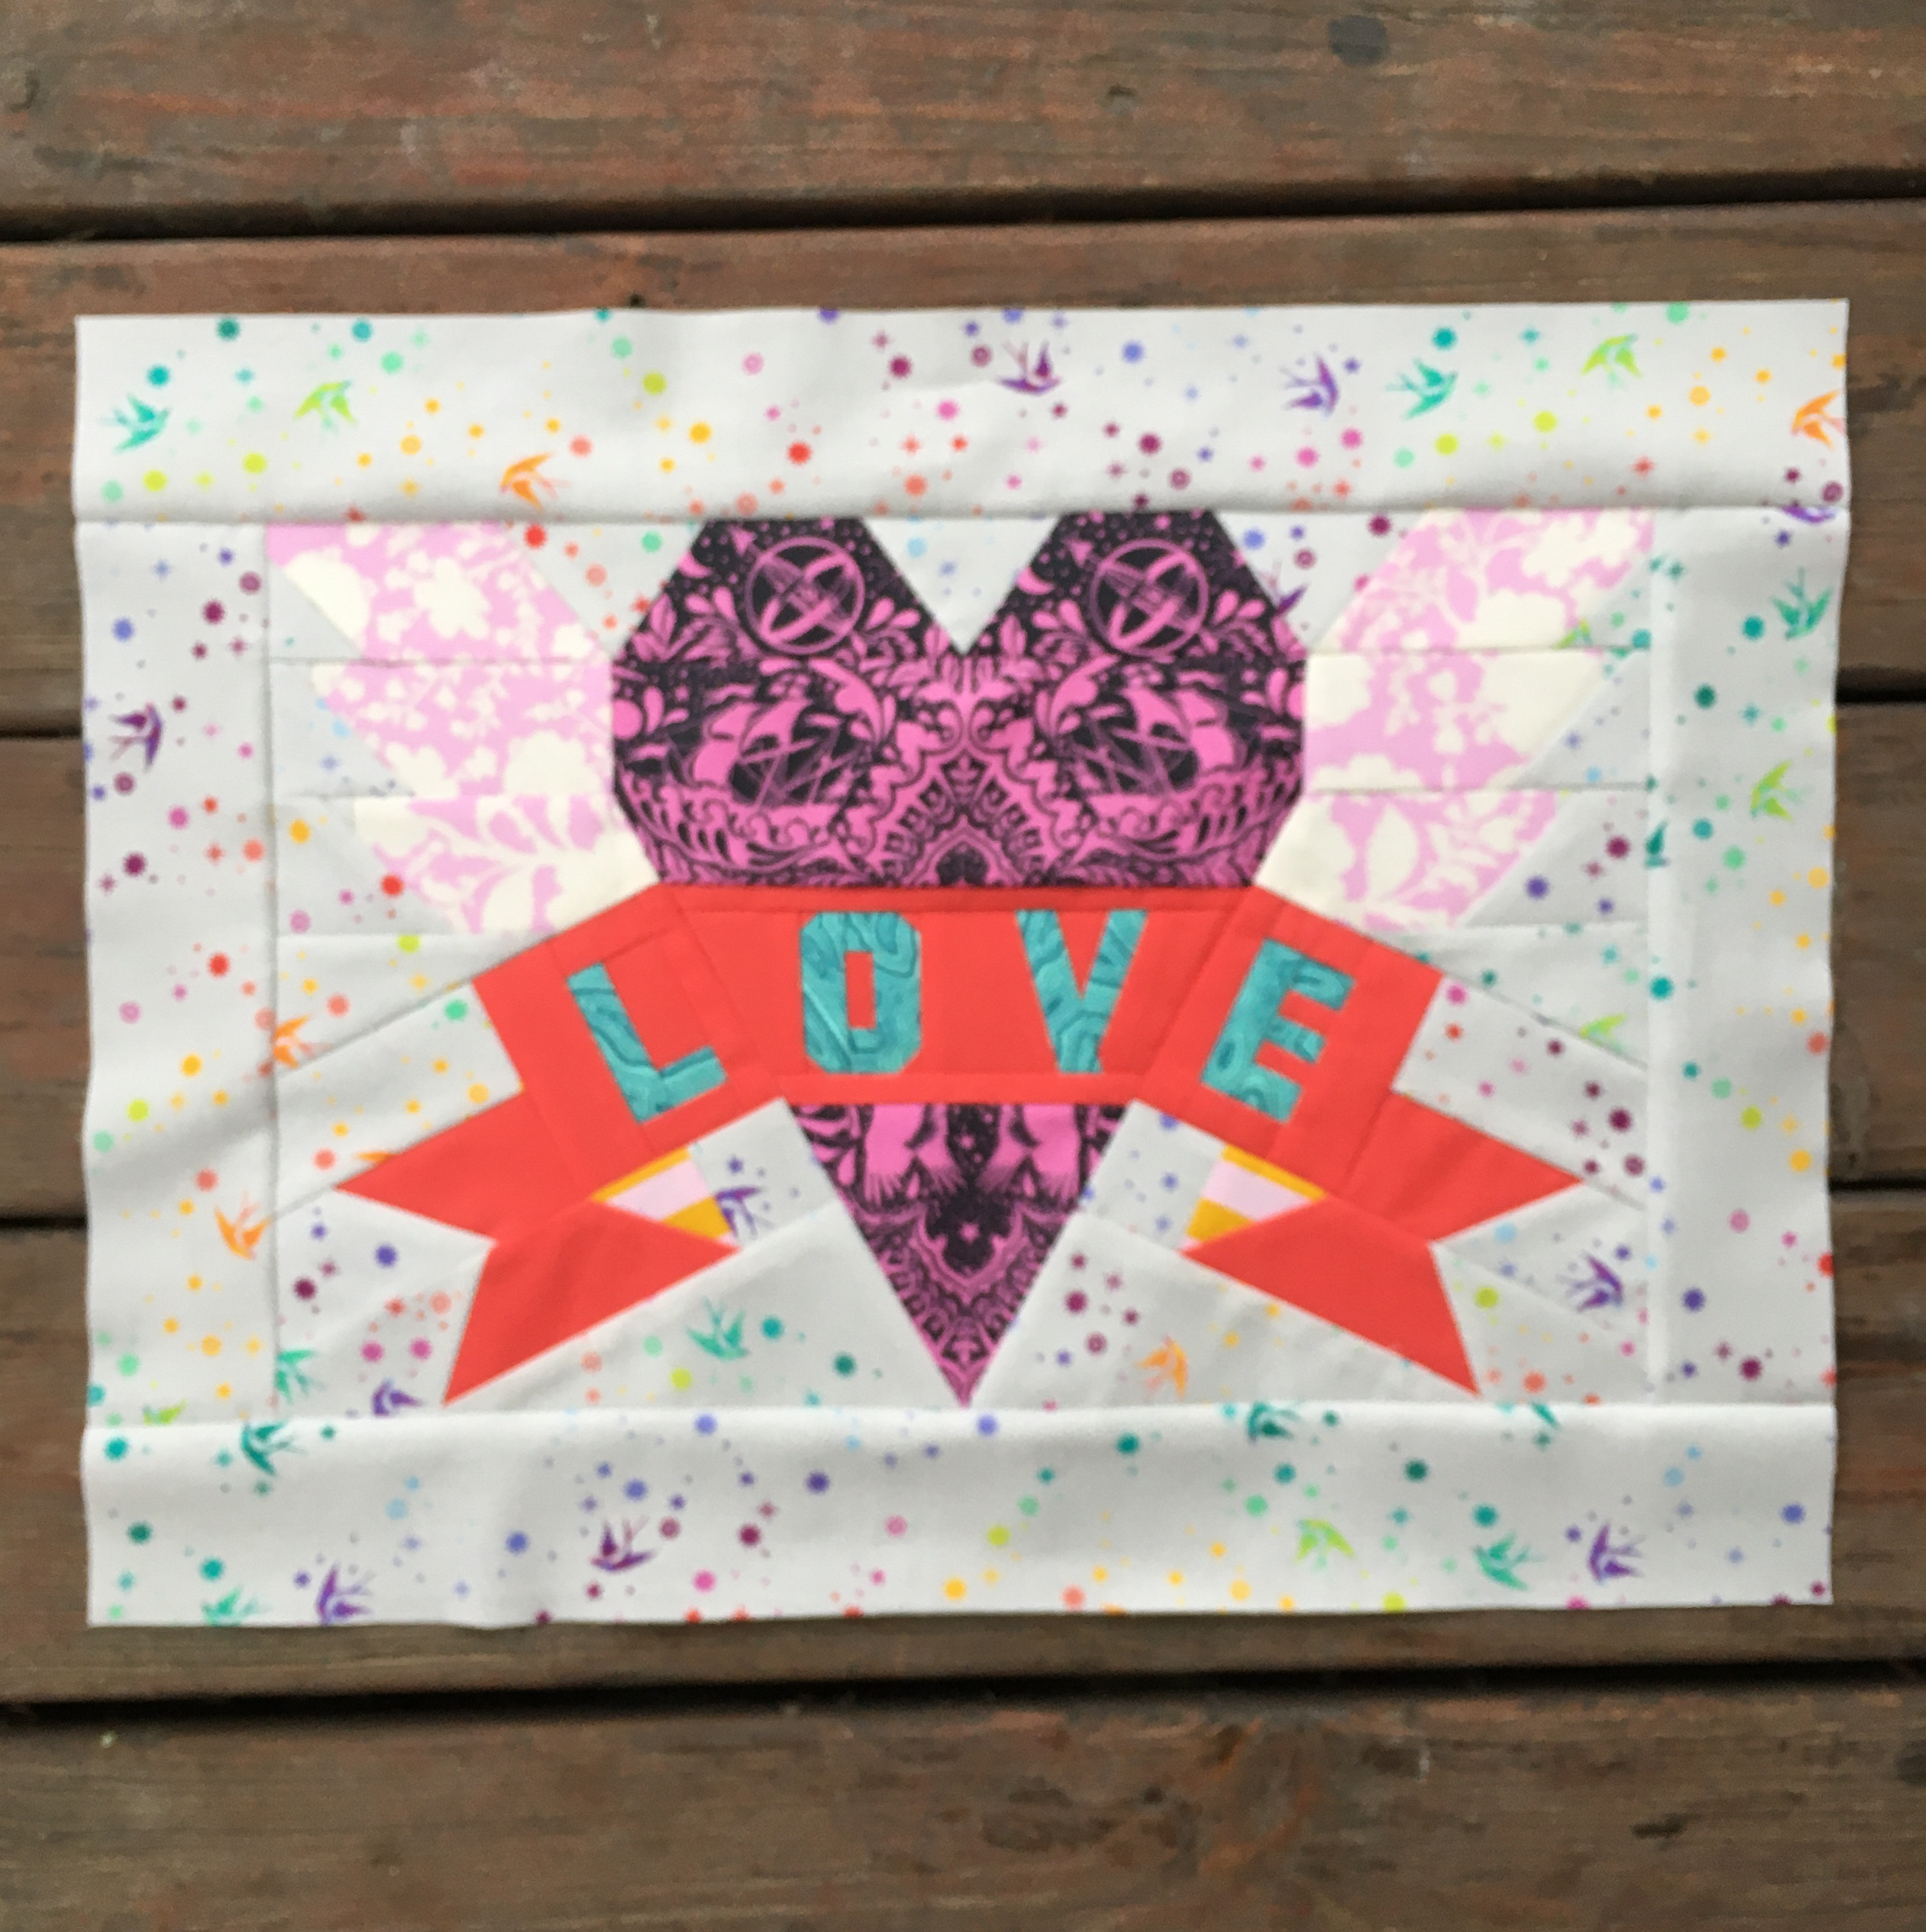
BadAss Quilt
My sister bought me the background fabric for this quilt as a birthday gift and I made the letters from leftovers from my Nebula and Tattoo Quilt blocks of the month. It’s only been on the UFO pile for about a month. It’s mostly waiting in in to be quilted because I haven’t picked and purchased a backing fabric for it yet and there are other quilts that are ready to go.
WHAT I NEED TO FINISH: Select and buy backing and binding fabric
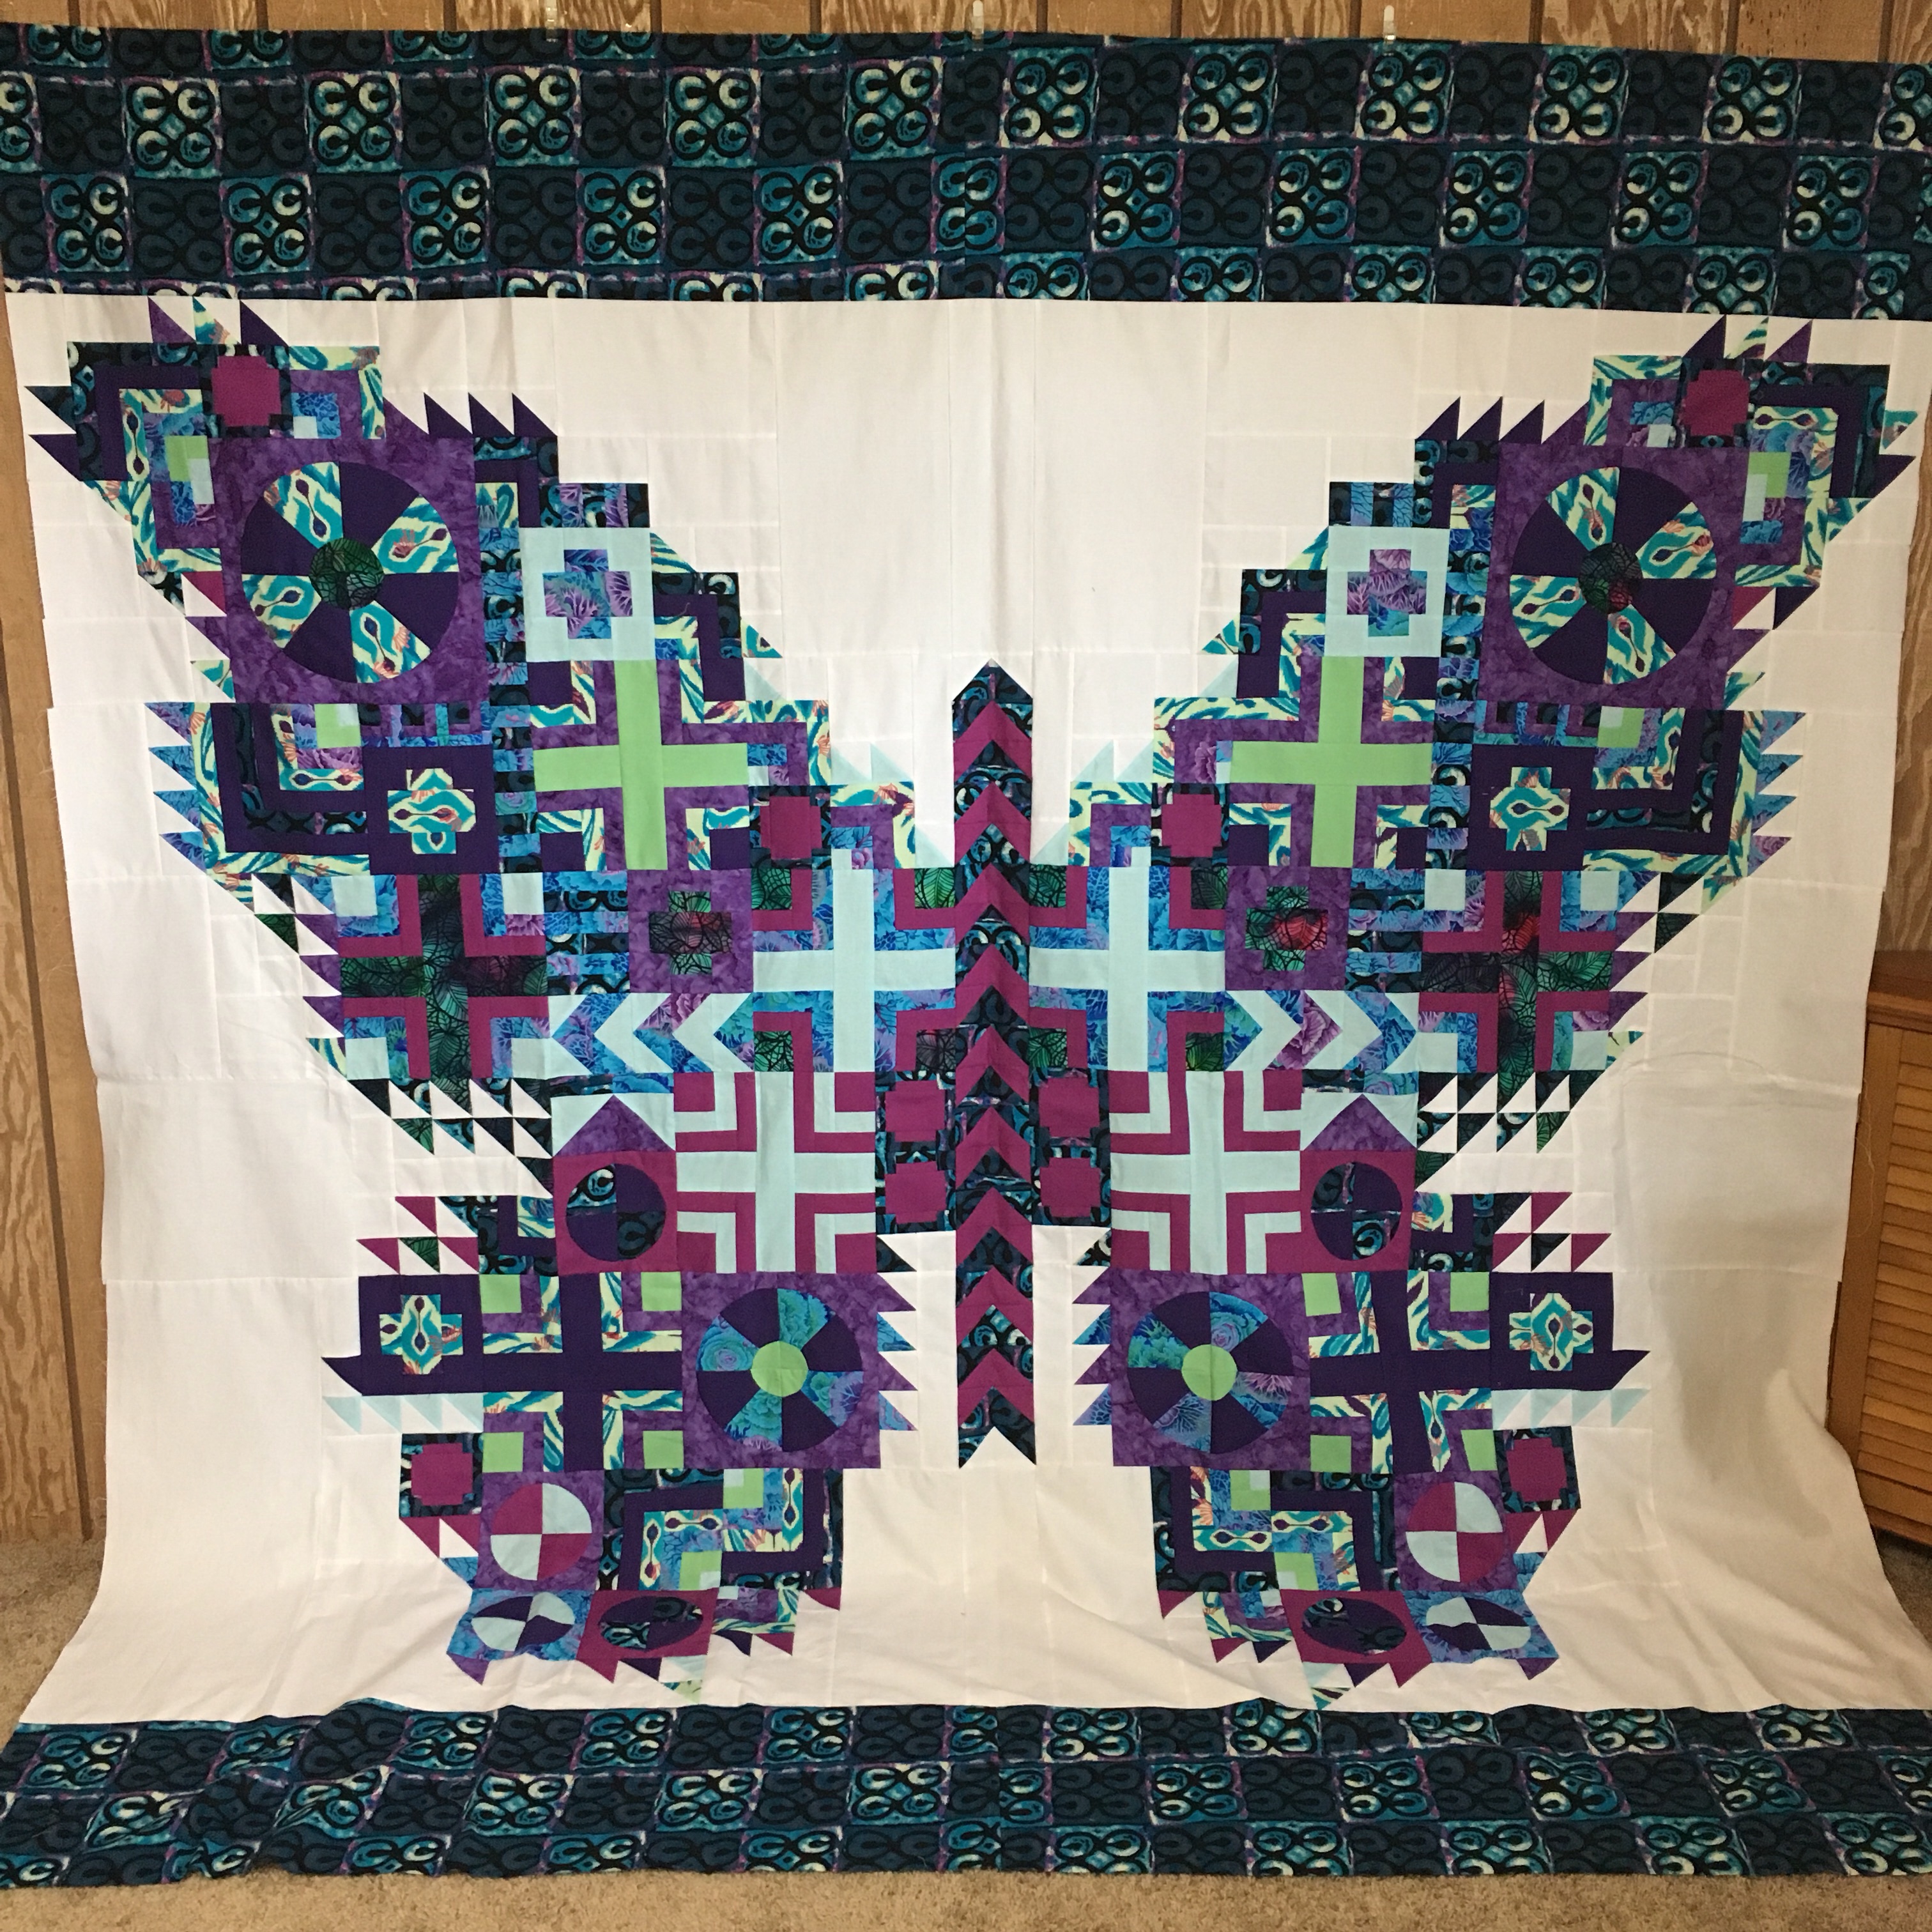
Tula Pink Butterfly Quilt
I made this quilt in 2018 as part of a sew-a-long, and I am just coming to terms with how much I don’t like it. Picking fabric is hard for me, which is why I rarely mix fabric designers. I do not like the outcome of this quilt, so I have decided to rehome it. Sometime in the next week, I will post this quilt to my Instagram feed and offer it and the binding to anyone who wants to finish it. I feel sad about letting it go, but I also think it’s the right thing to do. I’ve put off finishing it for YEARS. It’s time to let it go.
WHAT I NEED TO FINISH: Post of Insta and mail it off.
Interwoven Quilt
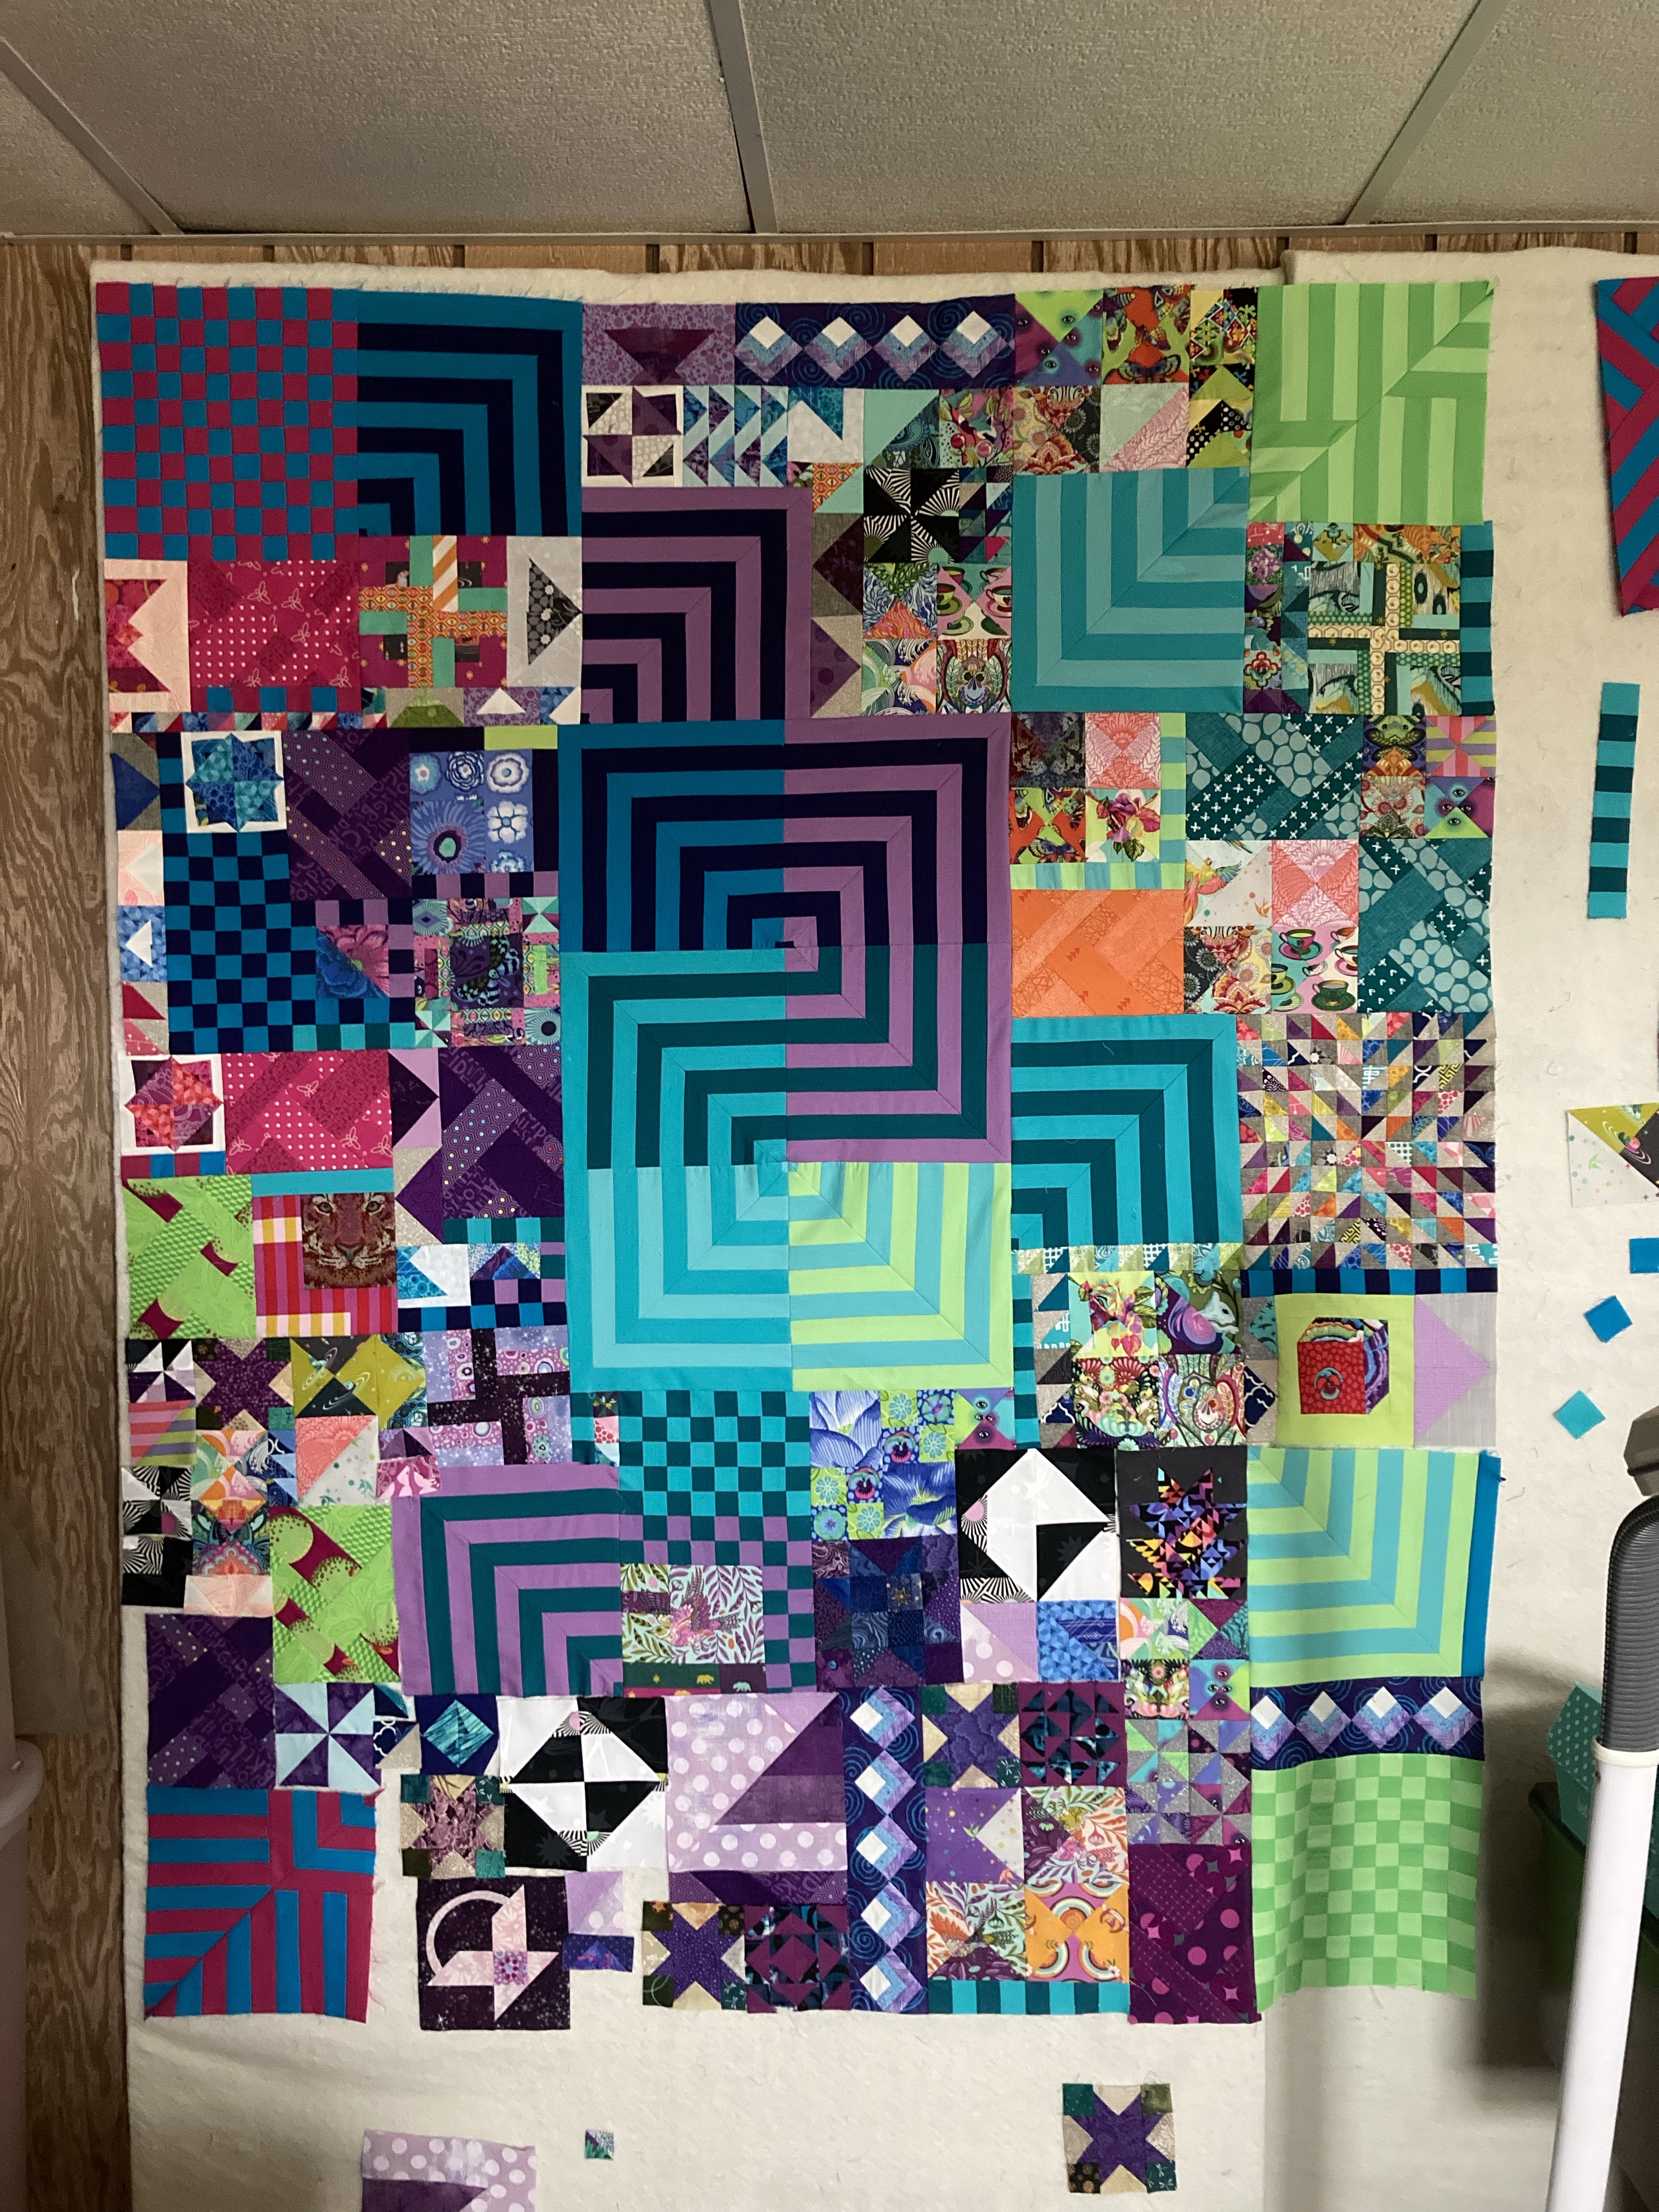
In the Spring of this year my sister hinted that she wanted a quilt. I like my sister, so I thought, “Why not?” We made a deal, she bought the supplies, and I put it together. Holy crap, does my sister know color. How amazing is this project?!?! Today, I started to get the fabric together to piece the backing. I am hoping to have it ready to start quilting…or to actually start the quilting by the end of the week.
WHAT I NEED TO FINISH: Sister needs to give me an idea of how she wanted this project quilted and she’ll need to pick out the binding fabric.
Cherish Quilt
I’ll be honest, I forgot I had this quilt top hanging in the closet of our spare bedroom. I finished this one (I think) in 2019 and I haven’t finished it because I am loathed to use the Tula Pink Trash Panda (aka racoon) fabric I set aside of the backing. It’s so cute! And out of print! What if I want it for something else?!?!?! Okay, you’re right. Let it go and get the quilt done. Good talk.
WHAT I NEED TO FINISH: Suck it up buttercup…..use the fabric and get quilting
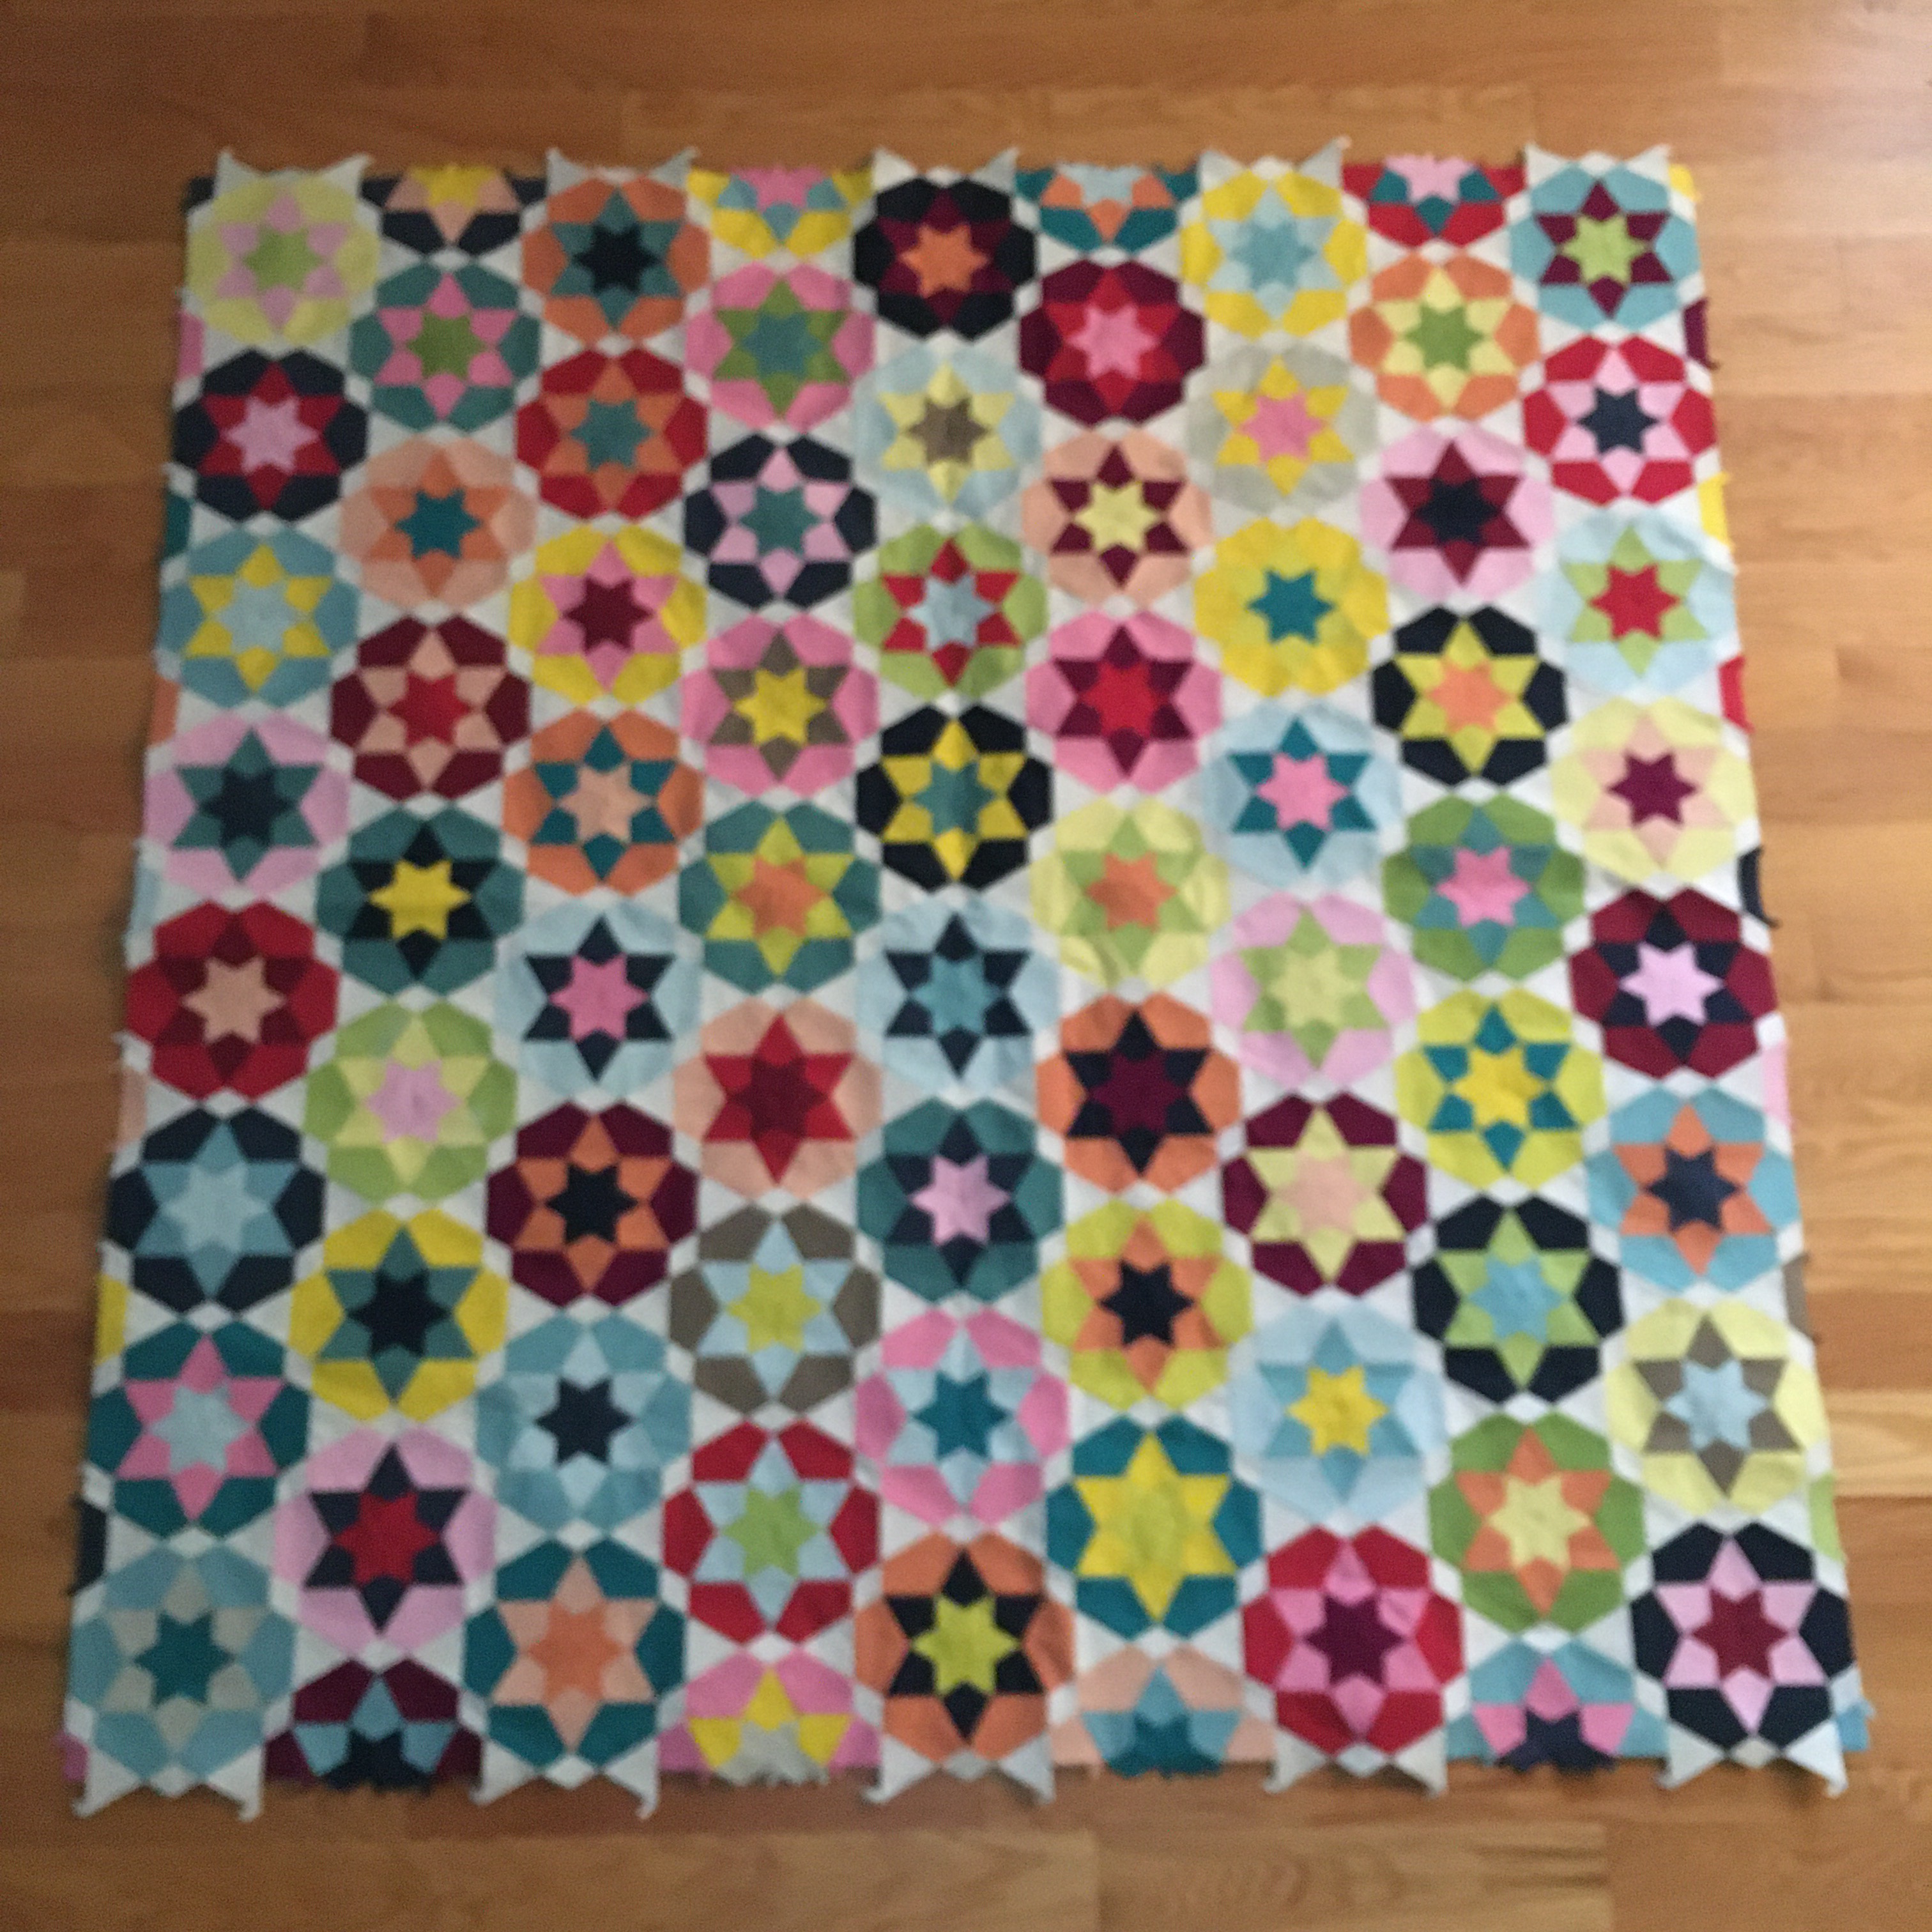
Ice Cream Soda Quilt
This quilt is a good example of why it is important to make sure what you believe is true matches reality. I’ve been thinking for months that I have to sew borders on this quilt. I checked …turns out it’s ready for quilting. This one joins the BadAss quilt in the needs a backing and binding in order to finish. Also, I was too lazy to take a new picture. So imagine a border that matches the joining pieces.
WHAT I NEED TO FINISH: Time to go fabric shopping!!!!!!!!
Tattoo Block of the Month
All of my blocks are sewn and ready for joining. BUT, I’m using three of them for the art show I have up at work, so the soonest I’ll be able to put this top together would be after the show ends in January.
WHAT I NEED TO FINISH: I need all my blocks at home. Courage, Grace, and Wisdom are on loan. I figure there’s no point in putting the rest together until they’re back. They take up less space that way.
Nebula Block of the Month
I may have put this one so far toward the bottom so that you don’t notice that I’m avoiding it. I have the main blocks done, but I have to cut about a million pieces for the background and then sew them together. I feels a bit daunting, so I’m rationalizing my avoidance by focusing on all the projects I’m finishing.
Okay, even I don’t buy that excuse. If I am nagging my Insta-pal Laura like crazy for avoiding a project, than I shouldn’t do it either. So, no other piecing work until I at least start on this one.
WHAT I NEED TO FINISH: I have to finish the background so I can put this baby together.
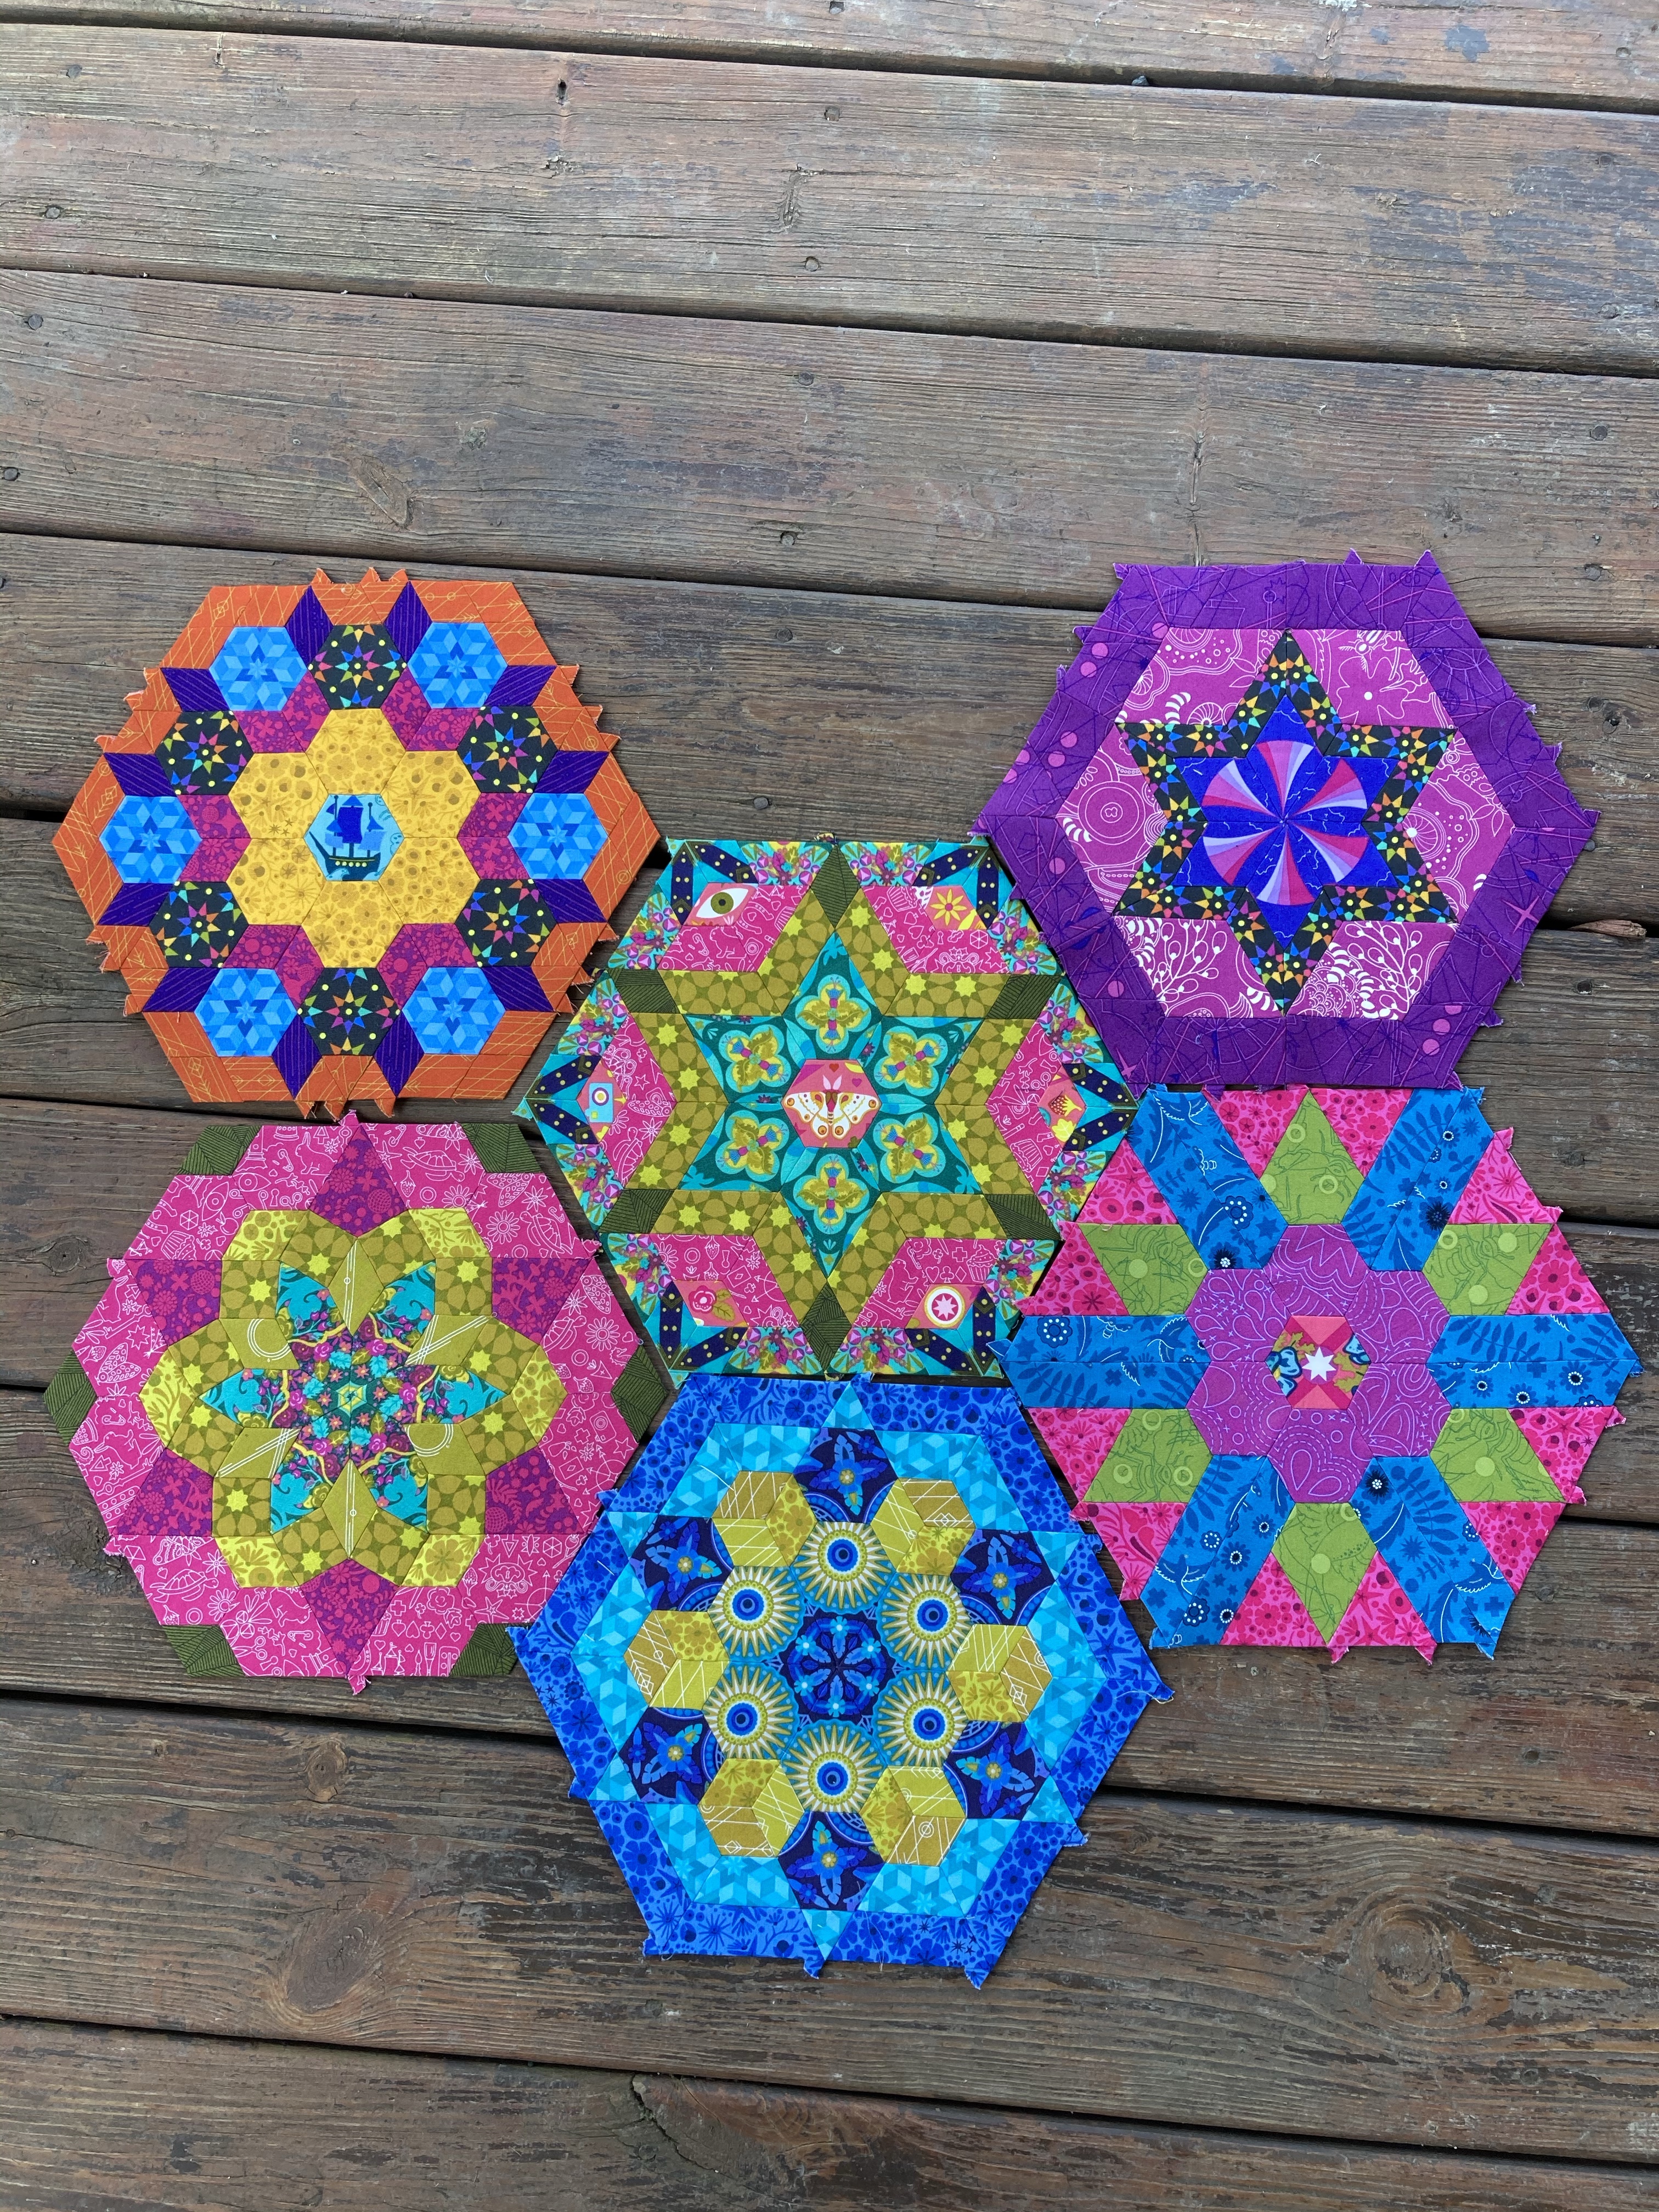
Pemberley
I almost left these next two off the list because English Paper Piecing projects are slow work. However, I decided it’s still good to check in. I have about 16 of the blocks done for this quilt, and I think that’s close to half way. This is another quilt that I used some of the unfinished blocks for my art show. So I will keep chugging along on this project.
La Passacaglia
This is another one that I almost didn’t own up to. I work on this quilt in fits and starts. I suspect I will still be working on it five years from now. But in the meantime, the blocks are cool looking.
And that’s all of it! I wonder if this is a bit like what going to confession feels like. Time to get back to work piecing the backing for my sister’s Interwoven quilt and composing a post to give away the butterfly top. Happy UFOVEMBER!!!!!
Back in August I made a list of all of my unfinished quilt projects. I got myself all psyched up to do some serious quilting….and then my machine spent about a month in the shop because it got cranky. She’s back and working again, so I am started working on this list again. Here is the update:
Pineapple Baby Quilt✔
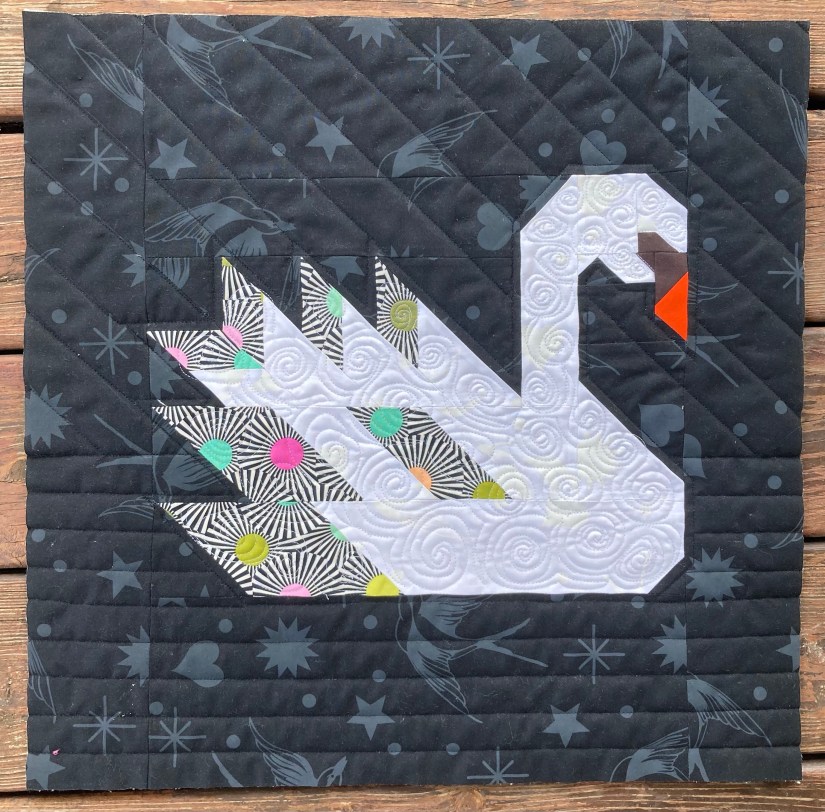
Black Swan✔
White Swan✔
Pineapple pillows x 3 ✔
Pineapple Quilt✔
Interwoven Quilt
Tula Butterfly Quilt
Cherish Quilt
Ice Cream Soda Quilt (technically I still need to put the borders on)
There is a well established connection in my life with feeling stress and wanting to buy something. Obviously, this pattern is rather problematic. Back in 2018, I went on a fabric fast and stopped buying fabric and quilting supplies for about nine months. The experience was painfully amazing. Which is to stay I had many moments of feeling uncomfortable mixed in with increased peace and connection. And I need a repeat.
My work in progress pile is piling up and I am flitting between projects with no real purpose. I need to stop starting and accumulating and working through what I have. Thus, it’s time for a do-over. Starting July 1, 2021, no more fabric, quilting notations, patterns, thread, or that-cool-thing-I-saw-on-Instagram/Estsy/wherever. For this to work, I need rules. So here we go:
No new fabric, notions, books, patterns, blocks of month, cool thing-a-ma-jigs before 2022
No starting new projects until I’ve finished three of my outstanding projects
I am allowed to buy fabric to complete outstanding projects…but bonus to me if I can use what is in my stash
When/if I get to start new project, I have to use what I have.
I am allowed to accept gifts.
None of this applies to someone commissioning me to make them a quilt since they will be doing all the buying/spending anyway.
Anyone else ever feel like they need a cleanse every once in awhile? I find that sometimes I have too many choices and by giving myself some limits it helps me direct my focus. In this case, I want to focus on finishing and practicing my quilting skills. I won’t ever do that if I keep getting distracted by that shiny thing I saw…
I love a good sew-a-long. I enjoy the community and structure that comes from making the same quilt as other and being told what to make when. It’s easier to be creative when there are less choices to make.
I joined Berne of @happysewlucky on Instagram to make her Tattoo Quilt using fabric from Tula Pink’s True Colors line. The result is pretty awesome.
Sew-a-longs are a great opportunity to build/practice some skills. I’ve been stretching my foundation paper piecing skills. This pattern has some fiddly seams to match and there are even Y-seams.
Here are the blocks I’ve made so far. Also, one of my 2021 goals is to figure out what my camera is focusing properly.
Piecing those flames was NO JOKE. There were a LOT of seams to match. The final result is fantastic!
The Courage and Love blocks taught my I can sew y-seams without dying.
Sometimes you have to rip things to pieces and start over.
When I first started quilting I was obsessed with the Missouri Star Quilt Company video tutorials. I loved watching them…I still do.
The first tutorial I watch that had me thinking, “I wanna try that!” was the jelly roll race tutorial. Basically you sew a bunch of 2.5 inch strips together end to end, and then you sew the strips together over and over until you have a quilt top.
As a new quilter, I thought all 2.5 inch strip rolls were the same. I went to JoAnn Fabric and bought their version of a roll of 2.5 inch strips. I was aware enough to notice there were only 20 strips in the package so I bought two. I did not know that a Jelly Roll is a trademarked product by Moda Fabric and contains 40-42 2.5 inch strips from a fabric line. Other design houses have variations of the same things: Roll Ups, Pixie Stripes, Rolie Polie, etc. I believed that two of the JoAnn’s versions would be the same as buying one of the others. I was wrong.
The result was a disaster. All the fabric strips ended up grouped by value in the final quilt. All the lights, mediums and darks were together. It looked awful.
Sometimes I would look at this picture and think, “Maybe it wasn’t THAT bad.” Then I would see it in person and think, “Nope is really is that bad.” Also, I look a this picture and notice how much my photography skills have improved.
I was so discouraged. I loved the fabric, and I hated the result. I also hated that I hated the result. I wasted by little bit of quilting money on something I could not stand to look at. It was misery.
So like any (un)healthy person, I put it away somewhere I would not have to look at it and pretended it wasn’t a thing. I denied that quilt top’s existence. I moved on to other projects, improving my skills along the way.
About six months later, this quilt top started coming to mind a lot. I started to question if it really was as bad as I remember. I took it out and looked at it, concluding it was worse. The more I knew about quilting, the more I didn’t like it. However, I had come to appreciate the power of a good seam ripper.
A seam ripper is the ultimate permission to declare, “This isn’t working. I’m trying something else!”
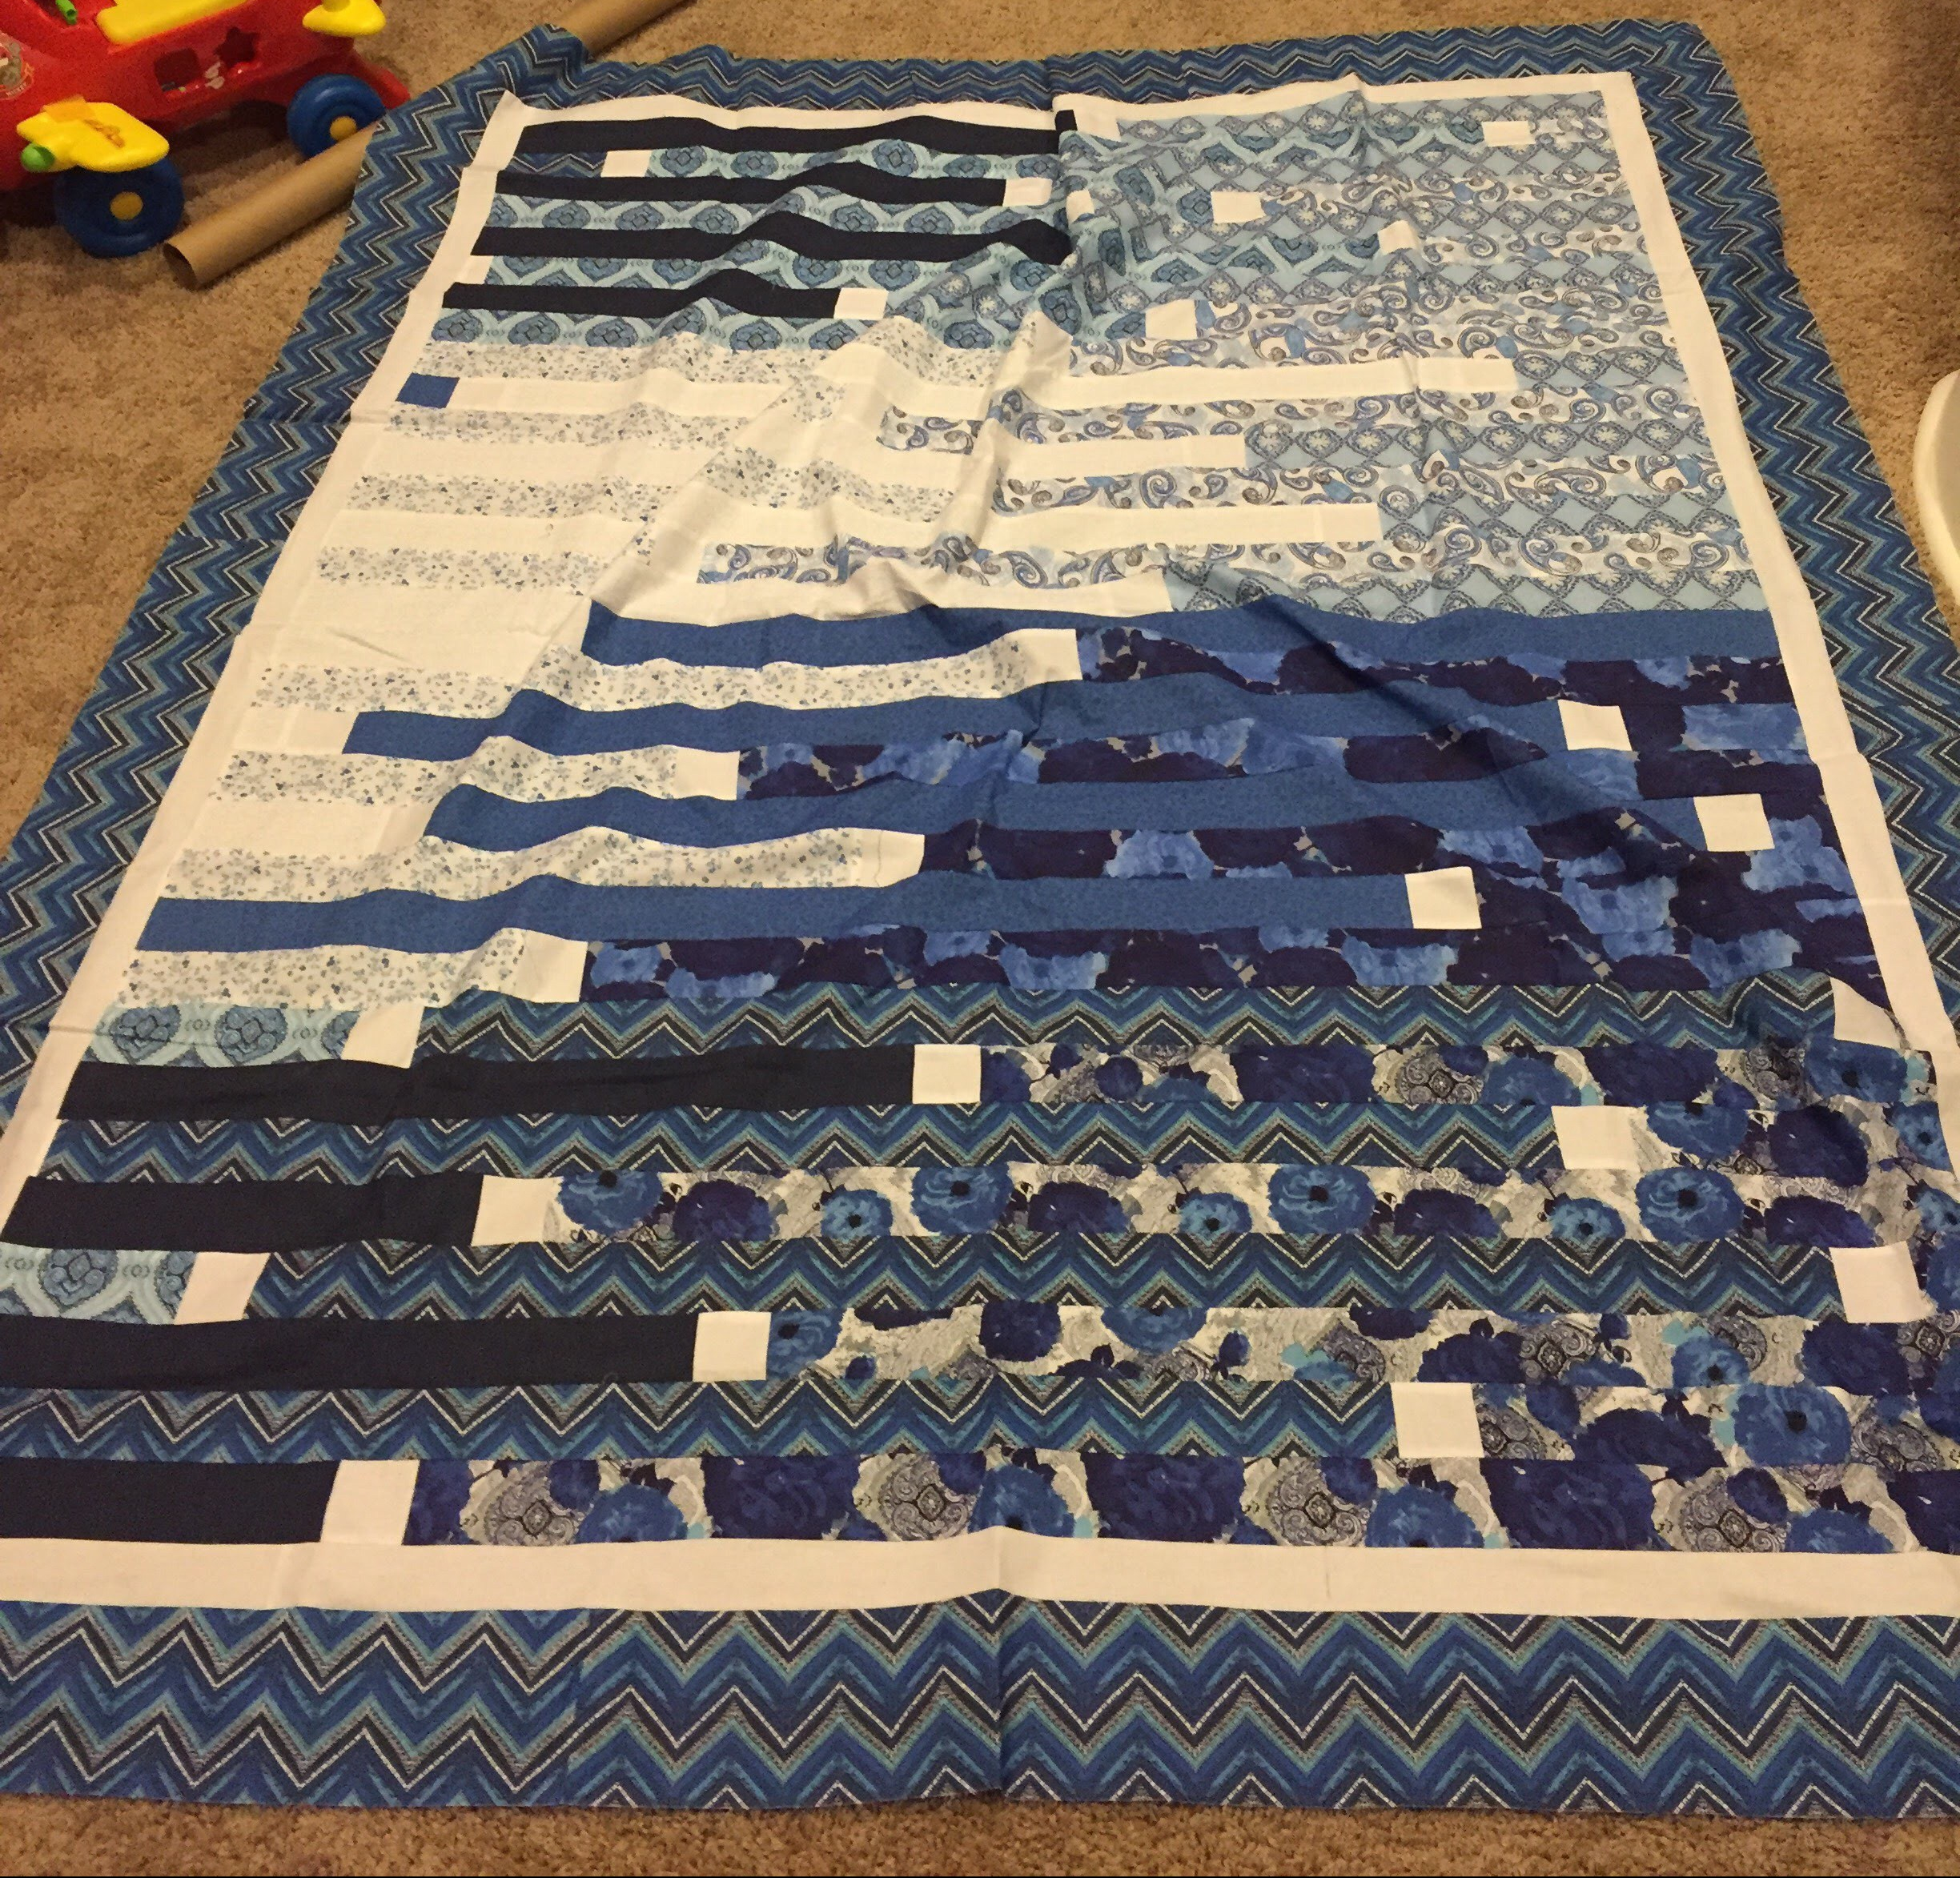
I ripped off the borders. And then I remembered ANOTHER Missouri Star Quilt tutorial featuring a technique by 3 Dogs quilting that used three 2.5 inch strips sewn together and then cut into 6.5 inch squares.
So I ripped the quilt into sets of three strips, cutting those strips into 6.5 inch squares. I decided to keep them scrappy and random, so I threw the squares into a laundry basket.
I sewed them back together as per the pattern, ending up with blocks that looked like this:
This quilt also started the habit of my youngest of wanting to play on any quilting related object I had laid out on the floor. No blocks in a layout, quilt top to be basted, or quilting in progress is safe.
There was a time that a seam ripper represented failure to me. Only novice, unskilled, lousy quilters need a seam ripper. Excellent quilters don’t make mistakes.
Now my the seam ripper represents freedom. It’s an opportunity for a do-over or a change of a plan. It gives me the opportunity to try something new or a different way of doing. And try again if that doesn’t work.
What I love about this quilt is that the materials and essence of the quilt stayed the same. I didn’t buy new fabric or materials. The only thing that changed was how the fabric was arranged.
I am an in-progress quilter. I am an in-progress person. I have not yet arrived a mastery level skill. I am on a learning journey. Part of learning is having the courage to declare that something isn’t working, rip it to pieces and reassemble it into something that does.
The road to mastery is paved with the lint of ripped seams…so at least it’s a fluffy road.
I heard the term bucket list quilts recently and I realized that I totally have a quilting bucket list. These are the big or the complex quilts that you take your time making and developing because they cannot help but be stunners! I broke my list into three groups: The quilts I’m dreaming/planning/thinking about doing, the bucket list quilts I started, and the quilts I’ve already finished.
Quilts I Dream About:
La Passacaglia
This stunning version of the La Passacaglia Quilt was made by Karen Tripp of http://www.thediyaddict.com She sells the paper pieces for this quilt on her site. Photo used with permission
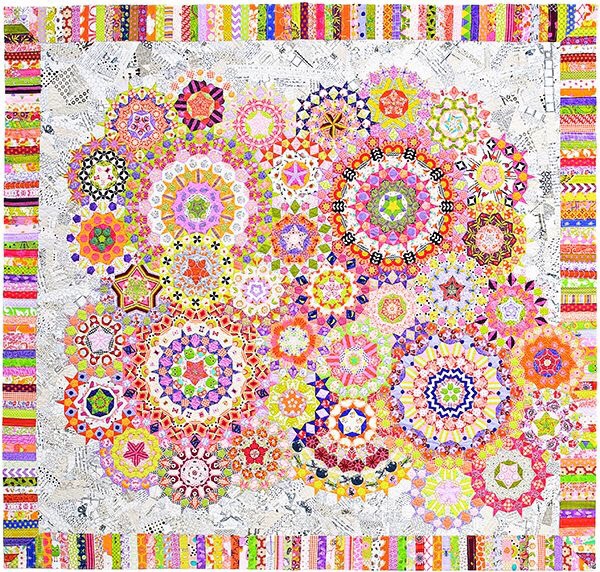
This quilt was designed by Willyne Hammerstien and is featured in her book Millefiori Quilts. Hammerstien’s Millefori quilts are sort of like the Godfather (mother?) of EPP quilts. The rosettes form a kaleidoscope effect when the fabric is repeated around the rosette. As you can see from this example below, the quilt is a show stopper. My husband bought me the book and the paper pieces kit for Mother’s Day/My Birthday. I’ve decided to wait to start it until my fabric fast is over. I want to go crazy with the fussy cutting and the colors, which means I need access to fabric. Plus I think after the fast is over, I’ll have enough fabric in my stash to get started that will help me get an idea of how many repeats of what I want are in a fat quarter so I can avoid over buying. I have a deal with my Instagram buddy, Annika, that if I haven’t made a rosette by January 1, 2018, she’ll pick the fabric for my first rosette. I think a barrier to finishing with be getting over the fear of starting in the first place.
I anticipate this quilt being a slow stitcher. I would be amazed if I have the top assembles in less than five years.
Dear Jane or Baby Jane
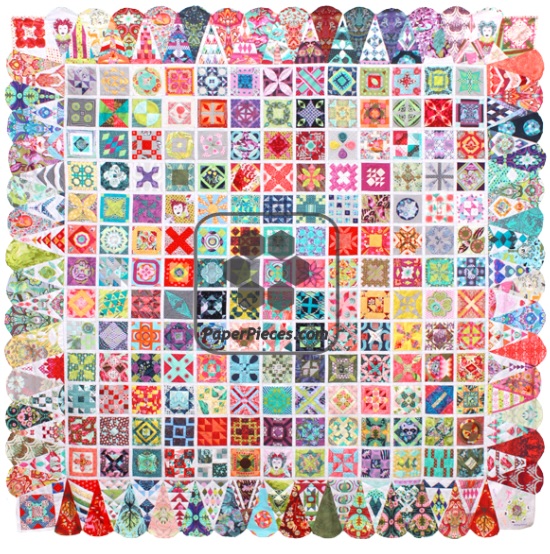
Quilt by paperpieces.com They have everything you need to EPP the quilt. Photo used with permission.
The Dear Jane Quilt has a very special significance for me. My late mom-in-law was named Jane, and I miss her a lot. My daughter’s middle name is Jane in honor of the grandmother she was never able to meet. I am also a big fan of Jane Austen and the book Jane Eyre. When I heard there was a quilt called Dear Jane, I felt my heart pulling towards it. This is a quilt of many tiny pieces, which intimidates me. Recently, I learned that paperpieces.com had partnered with the author/publisher to offer an English Paper Pieced version. I’m waiting until after the fabric fast is over to start buying rows.
I’m hoping this quilt will help me learn how to plan color placements ahead of time. This quilt will also be a slow one. I hope to listen to many Jane Austen audio books, watch many Jane Austen movies, and remember my mother-in-law while I create this quilt.
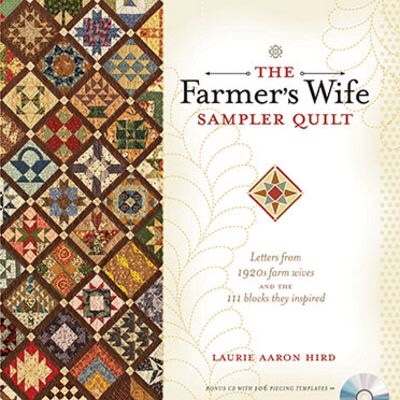
Farmers Wife
I’m going really honest: If Angie Wilson of gnomeangel.com does a sew-a-long, I always want in. She picks the most epic quilts, breaks them down into steps and then builds a community to sew-a-long. It’s wonderful. Even though she’s partnered with paperpieces.com to do an EPP version of this, I think I’m going to try to foundation paper piece this one. I really want to hone by FPP skills. Also, that darn fabric fast gets in the way of EPP. I will say I enjoy the creativity needed to make this one work without more fabric.
Color Block Solids from the Midnight Quilt Show
Color Block quilt designed by Carl Hentsch and featured on an episode of the Midnight Quilt Show. The quilt pattern and kit are available on craftsy.com
My daughter and I have a ritual. When her hair needs to be combed we watch episodes of the Midnight Quilt show and this episode is by far her favorite. She loves the colors associated with this quilt, and she thinks Ms. Angela is SO COOL! I would love to show her how to make a quilt using this quilt. Also, I have this creative curve ruler I really want to try.
Quilts I Started:
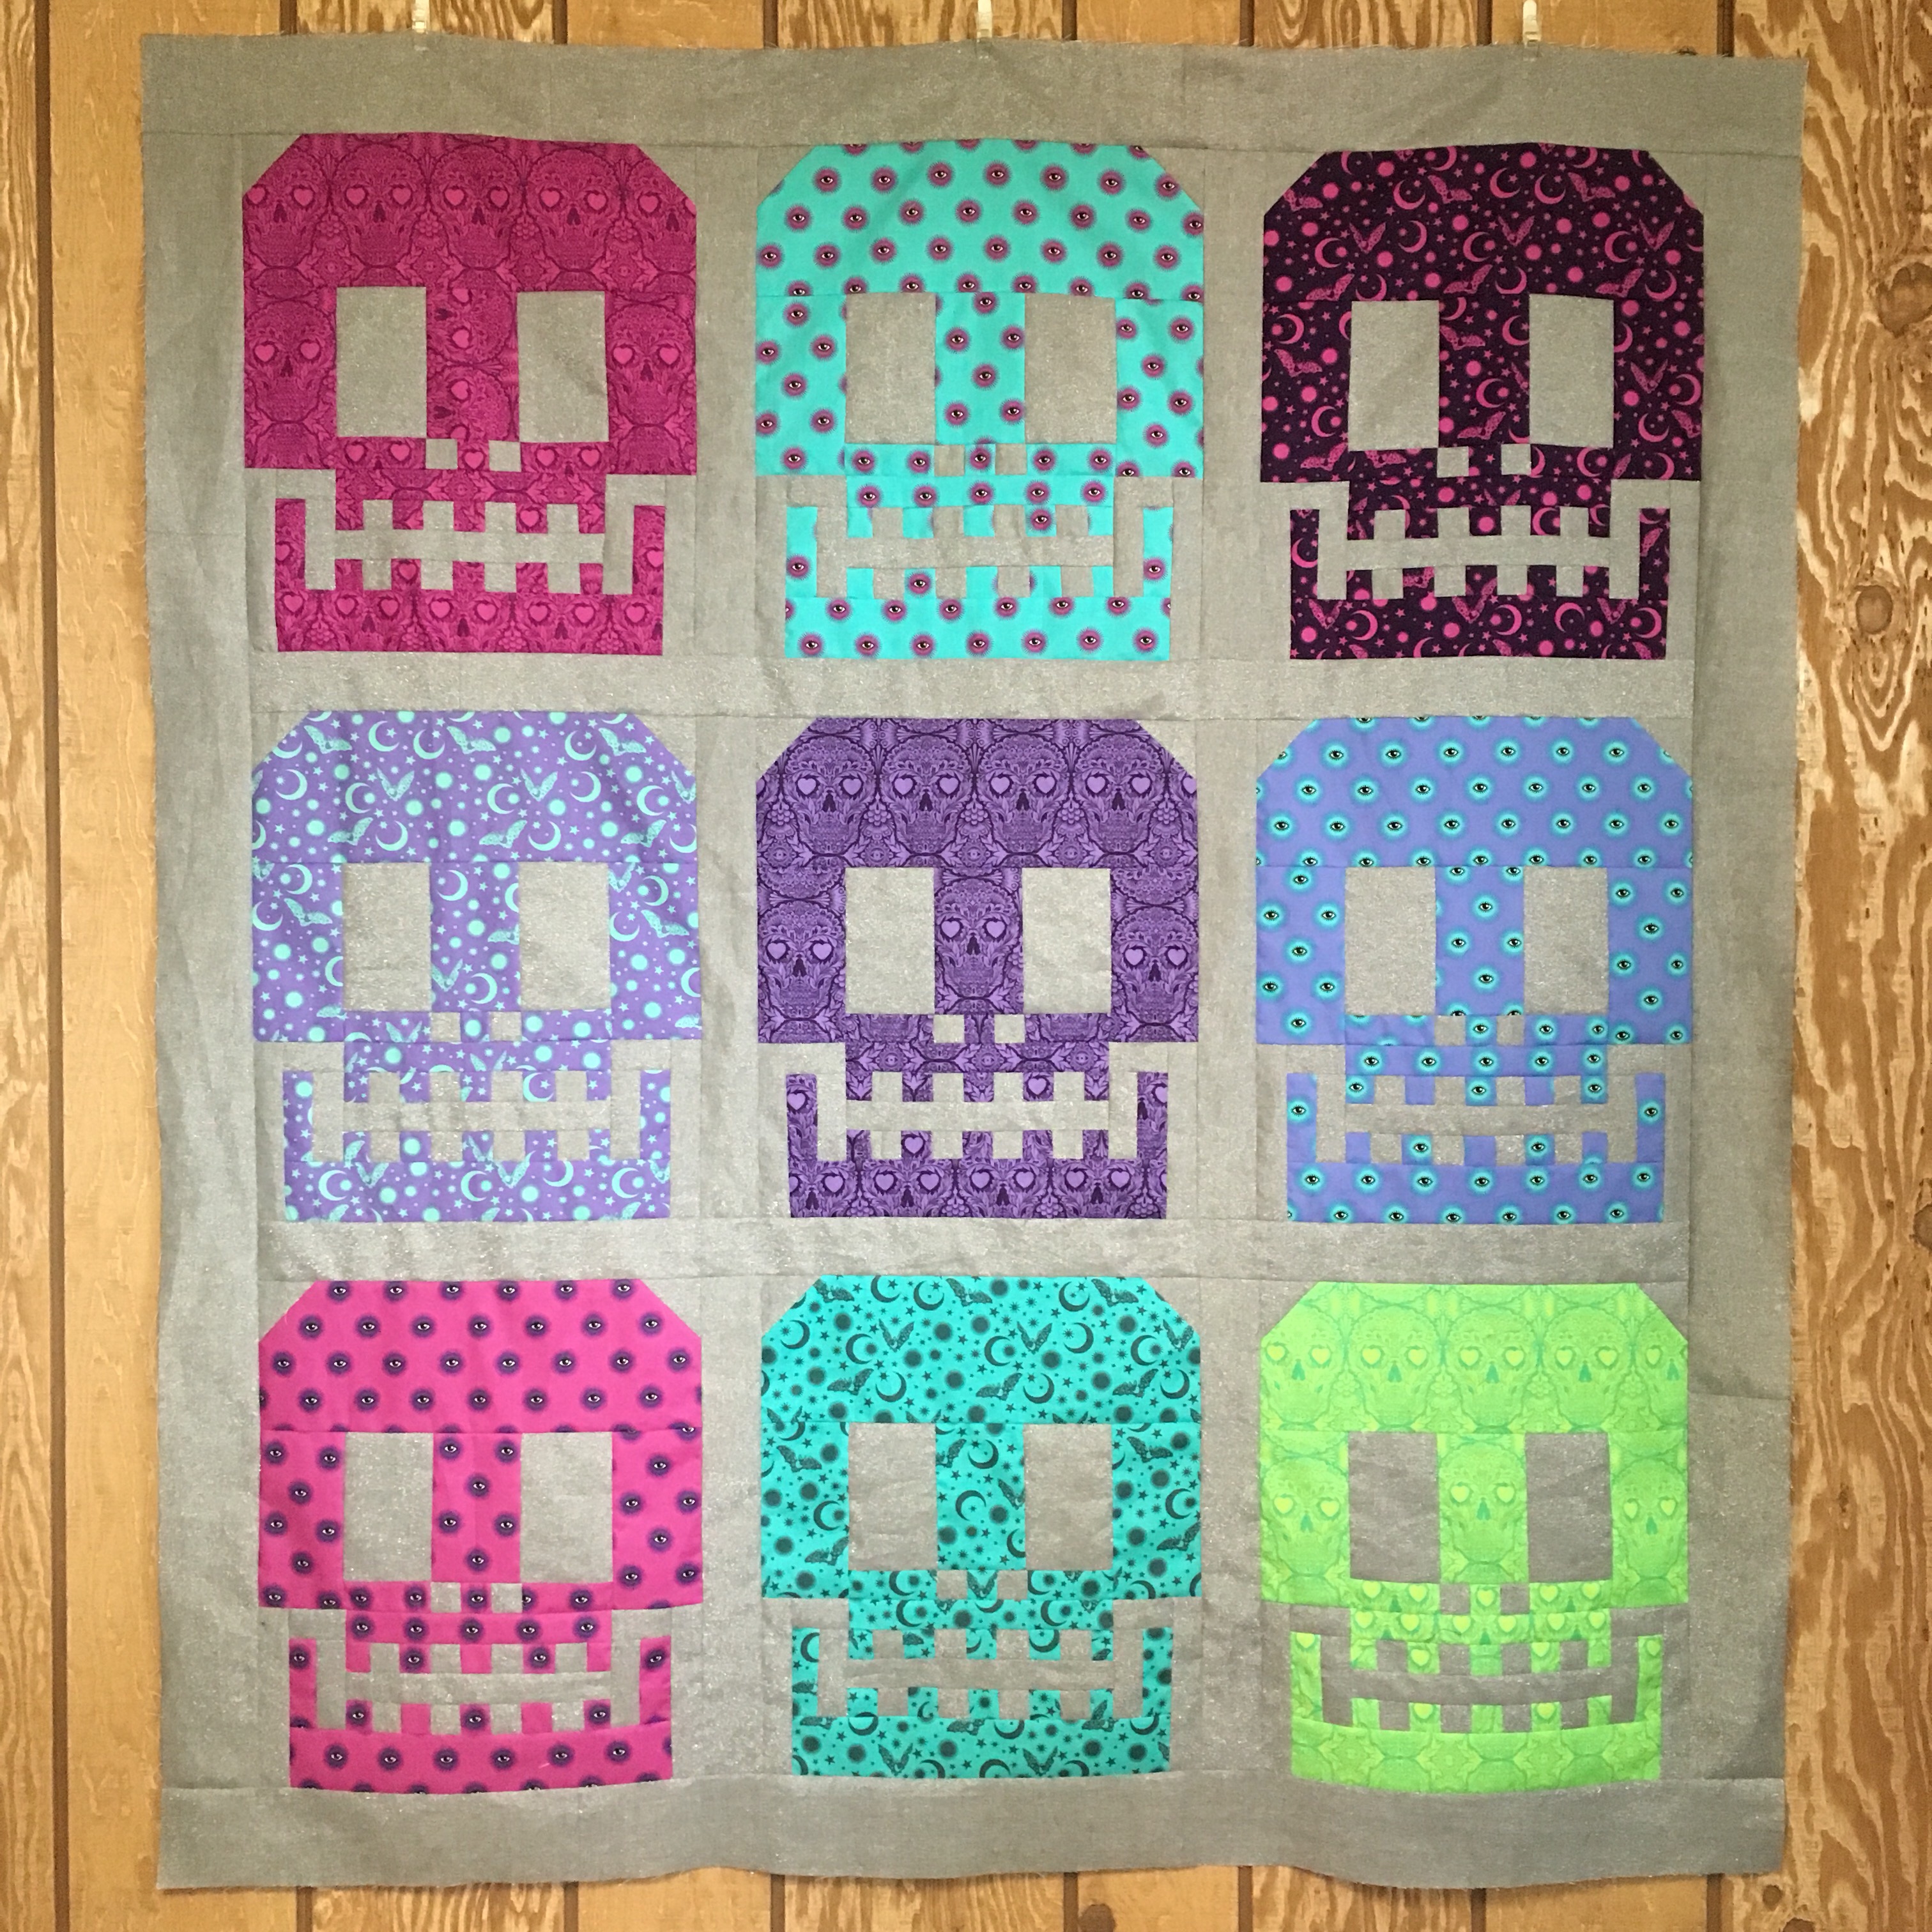
Sugar Skulls
This quilt is in the book Quilting with Tula and Angela. I wanted to make it almost from the moment I saw it. After I saw Tula Pink’s line De La Luna, I REALLY wanted to make it. When the fabric arrived, I had to start cutting. I love the playful and mischievous of the fabric. This quilt is both. Plus, it turns out that the skulls are quite fast and easy to assemble.
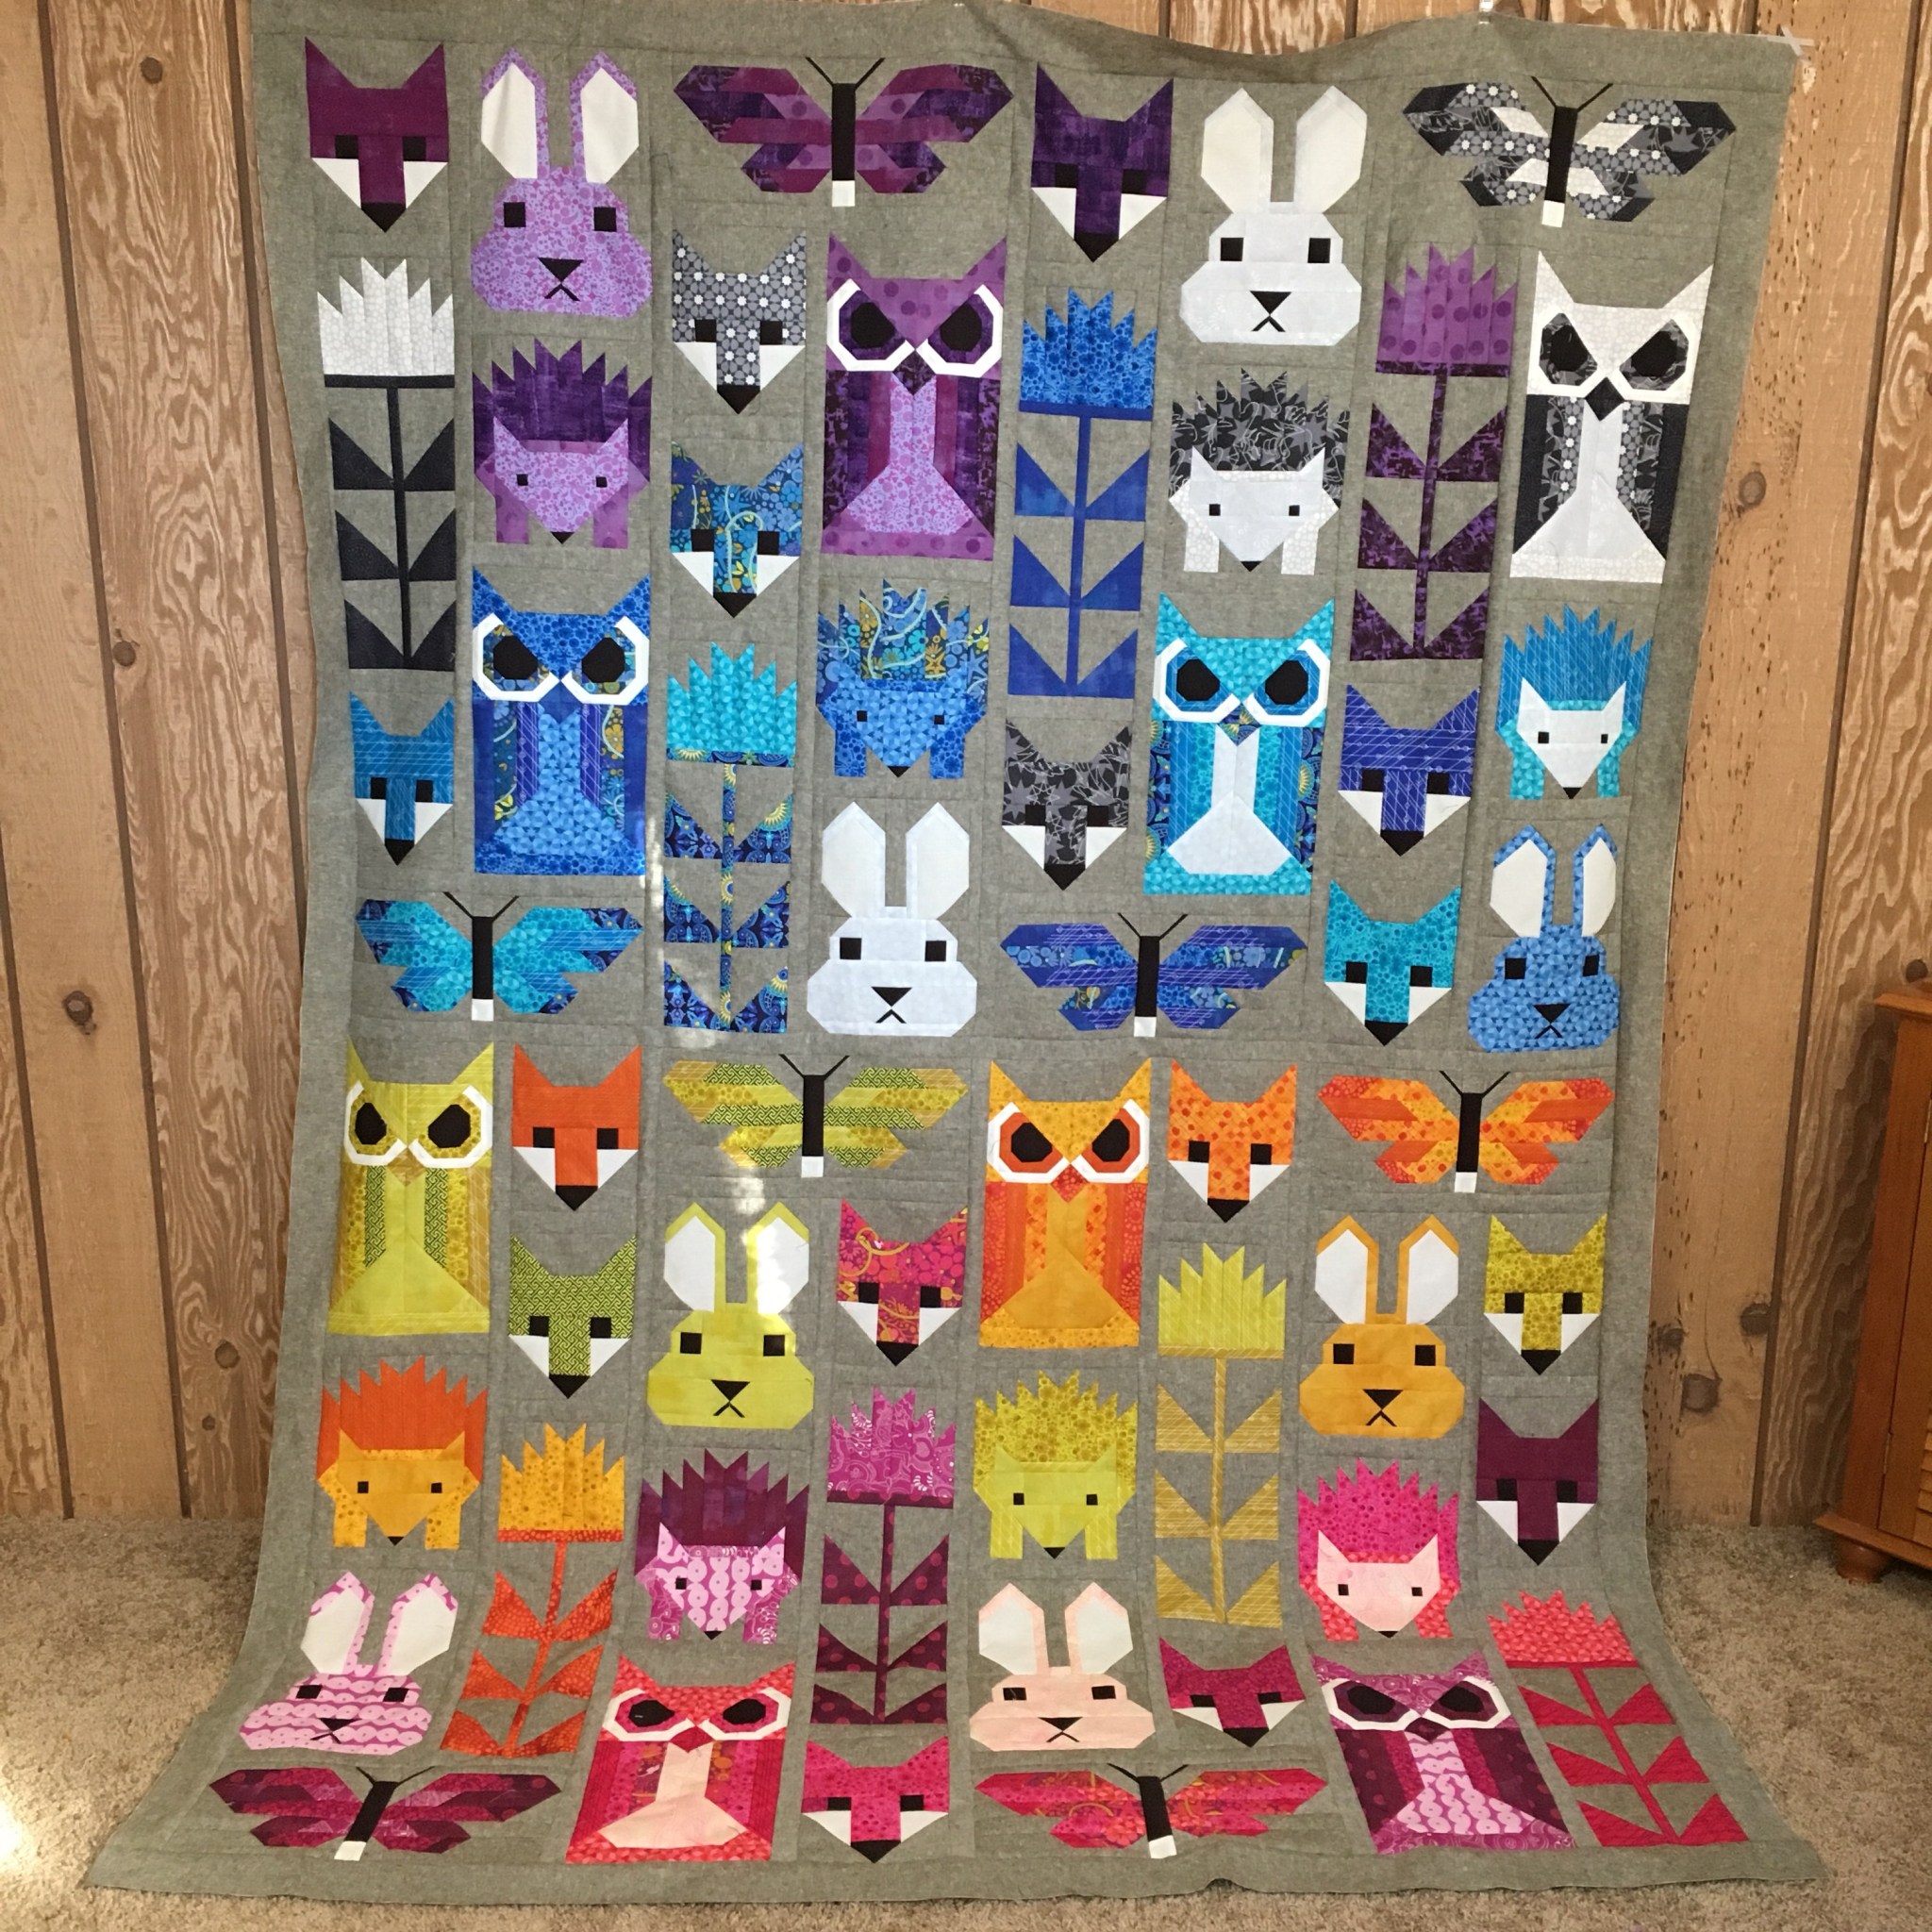
Fancy Forest by Elizabeth Hartman
Elizabeth Hartman is a genius. Her ability to make animals into quilts with traditional piecing is incredible. I admired this quilt from the first time I saw the pattern. This pattern sat on my Amazon wish list for ages until my sister bought it for me for Christmas. I am really excited about finishing this quilt!
Checked Off the List:
Lepidotera by Elizabeth Hartman
I’d been itching to do an Elizabeth Hartman pattern ever since I saw Fancy Forrest and her butterfly pattern blew my mind. I bought the pattern from a deal of the day. I would regularly take it out and look at it, but I was intimidated by picking the fabrics. My sister rescued me. She was super helpful. I am so super proud of this finish!
What’s on your list? What are the quilts or projects you’re dying to make? What is stopping you?
Instagram sew-a-longs are my favorite and no one does a sew-a-long like Angie Wilson of Gnomeangel.com. Angie has a gift for identifying fantastic quilt patterns and engaging a community to sew a long. I have tackled quilts I would not dream of trying because I was sewing a long with her and the community she’s built on Instagram. During an Instagram live event she referred to a quilt as a “bucket list quilt.” That phrase captures why I love quilting along with her. Angie picks bucket list quilts and makes them manageable. In fact, I have my fabric sorted to join her for Tula Pink’s City Sampler Quilt in the 100Days100Blocks2018 sew-a-long.
I am ready to get piecing for #100Days100Blocks2018 Check out all that Tula Pink!!!
Recently she announced a new sew-a-long featuring the 1920s Farmer’s Wife Sampler Quilt and a partnership with Paper Pieces to provide an English Paper Piecing version of the quilt sampler.
I. Want. In.
This kind of event is exactly the reason I started a fabric fast in the first place. I see a cool idea. I get all caught up in it. I forget to count the cost.
Let’s do some math:
The book is listed for $27.99
If I wanted to buy all the paper pieces to English Paper Piece the quilt at one time, it would cost $195.00 OR I could spread it out over course of 9 months a pay $24.00 per month ($216) and then buy the finishing pieces ($14) for a total of $230.
Next there are the acrylic templates. These are super helpful for fussy cutting the shapes AND the book only has paper templates…that means NO dimensions for cutting shapes. There are two template options: only the shapes that appear 10 or more times in the pattern ($80) or every single shape ($240).
Lastly the hosts recommend having 50 fat quarters for the blocks plus a few extra for sashing and corner stones. There are the 12 boxes of fat quarters (10 per box) that Paper Pieces used to make the GORGEOUS version of the quilt showing above. $34.95 each for a total of $420 (if we’re rounding)
Let’s add it all up:
Book: $28.00
Paper Pieces: $230.00 (because I wouldn’t be able to buy it all at once)
Templates: $240.00
Fabric (not including backing and binding): $420.00
Total: $918.00 add in backing, batting, batting, and thread for quilting, you’re easily over a grand.
Obviously there are ways to do this cheaper. Buy the book second hand, pay for the pieces all at once, only use the top ten templates, and use fabric from your stash and you’re down to $290. Or you could only buy the book and if you have quilting software like EQ8 (which I don’t) you can make foundation paper piecing versions.
My point is that the expense of quilting can get out of control really quickly, especially when I don’t take time to reflect on what I actually need. I have a habit of getting swept up in the excitement of an idea without reflecting on the idea’s long term impact (you can read more about that here). I need to ask myself if the joy of hand sewing out weighs the stress of paying for materials to make the quilt.
I want the answer to be yes so badly! I want to be able to join the Facebook group and post my blocks on Instagram. I want the challenge of stretching my EPP skills.
If I really dig deep, I also want to play with the cool kids. I admire the other makers I see on Instagram, and I want to imagine that money doesn’t matter for them. I want to imagine they live in a world where they get to make whatever they want whenever they want. But I know that isn’t true. Angie has even said many times to stay within what you can afford. No quilt, not even a bucket list quilt, is worth the stress of carrying debt.
Since I am on a fast and the only way I would be able to participate is if I was given the supplies as a gift, and I have yet to secure a wealthy quilting benefactor (is that a thing?), my original plan was to say no.
Then this happened:
Jennifer of @yokokudo88 started the hashtag #GetYourQuiltyWishGrantedSummerEdition Here’s how it works: You post your wishes as a quilter and then someone else grants them. How magical is that?! So I posted my wish for the 1920’s Farmer’s Wife Sampler and someone offered it to me!!! I also posted three pre-cuts that came in my sew sampler box that I was NEVER going to us. I got to mail those to quilters who were excited about them. How wonderful is that?!?
In a fun little twist, a quilter messaged me and said she thought she had an extra copy of the Farmer’s Wife and would look for it. She said it turns out is was The Dear Jane book. I asked if she was willing to part with her extra copy and she said yes!!! That’s two bucket list quilts without breaking my fast. Yay!!!!
Now, there is no reason for me to spend $200-$400 on paper pieces and templates. That totally breaks the fast rules. Here’s my plan, I’m going to keep my fingers crossed and hope that the person who offered me her book is able to find it. I am going to do some research on making my own pieces or seeing if there are foundation paper piecing versions of the patterns.
Then I’m going to play around with using my scraps from #100Days100Blocks2017 and all those little pieces of Alison Glass I have and the left over Tula Pink that will inevitably exist after #100Days100Blocks2018. Maybe that will work and maybe it will not. We will have to see. In the meantime, I am breaking my habit of leaping without looking and I am going slow and planning.